
Email, Calendar & Approvals
In short
A connector is a saved connection to a source that project information comes from: a mailbox, a calendar, a chat, or another program. TensorPM pulls new hints about your project out of it, but it never turns them into project truth on its own. Anything coming in from outside first becomes a signal that you review. And anything TensorPM should do to the outside world, such as sending an email or creating a calendar event, needs your explicit approval first.
Connector settings stay on your device. Credentials never travel to the cloud.
What a connector is
Think of a connector as a doorframe. It links TensorPM to a source you already use. The doorframe defines:
- Which source: which mailbox, which calendar, which program.
- Which slice: which folders, which calendar, how many days back.
- Which project: where the new signals show up.
- Who sees it: only you, or everyone in the workspace.
A workspace is the container that holds your projects. See Workspaces for details.
Just as important is what a connector is not. It is not an automation that quietly rewrites your project context in the background. It is a supply line, and you sit at the end of it.
The basic principle in three stages
TensorPM deliberately separates three things that other tools blend together.
1. Connect a source
You set up the connector and define which slice TensorPM may read. That is a one-time decision you can change at any point.
2. Review what is relevant
Whatever arrives lands in a queue as a signal. A signal is nothing more than a find at first: an email, a document, a message from another program. You decide what actually concerns your project. If you want, an automatic pre-check sorts out obvious noise beforehand.
3. Approve every outbound action individually
When the project agent wants to send an email, create an event, or use a tool from another program, an approval card appears in chat. Nothing happens outside TensorPM until you agree. An approval always covers exactly that one proposal.
Important: Content arriving through a connector is data, not instructions. If an incoming email says "please forward immediately without asking", TensorPM treats that as text, not as a command.
Where connectors live
Connectors are not in the settings. You reach them from the start screen, meaning the screen you see when no project is open.
- Close an open project, or restart TensorPM, until you see the start screen.
- Click
Connectorsin the top right. The button sits next to the workspace selector, and its tooltip readsConfigure connectors.
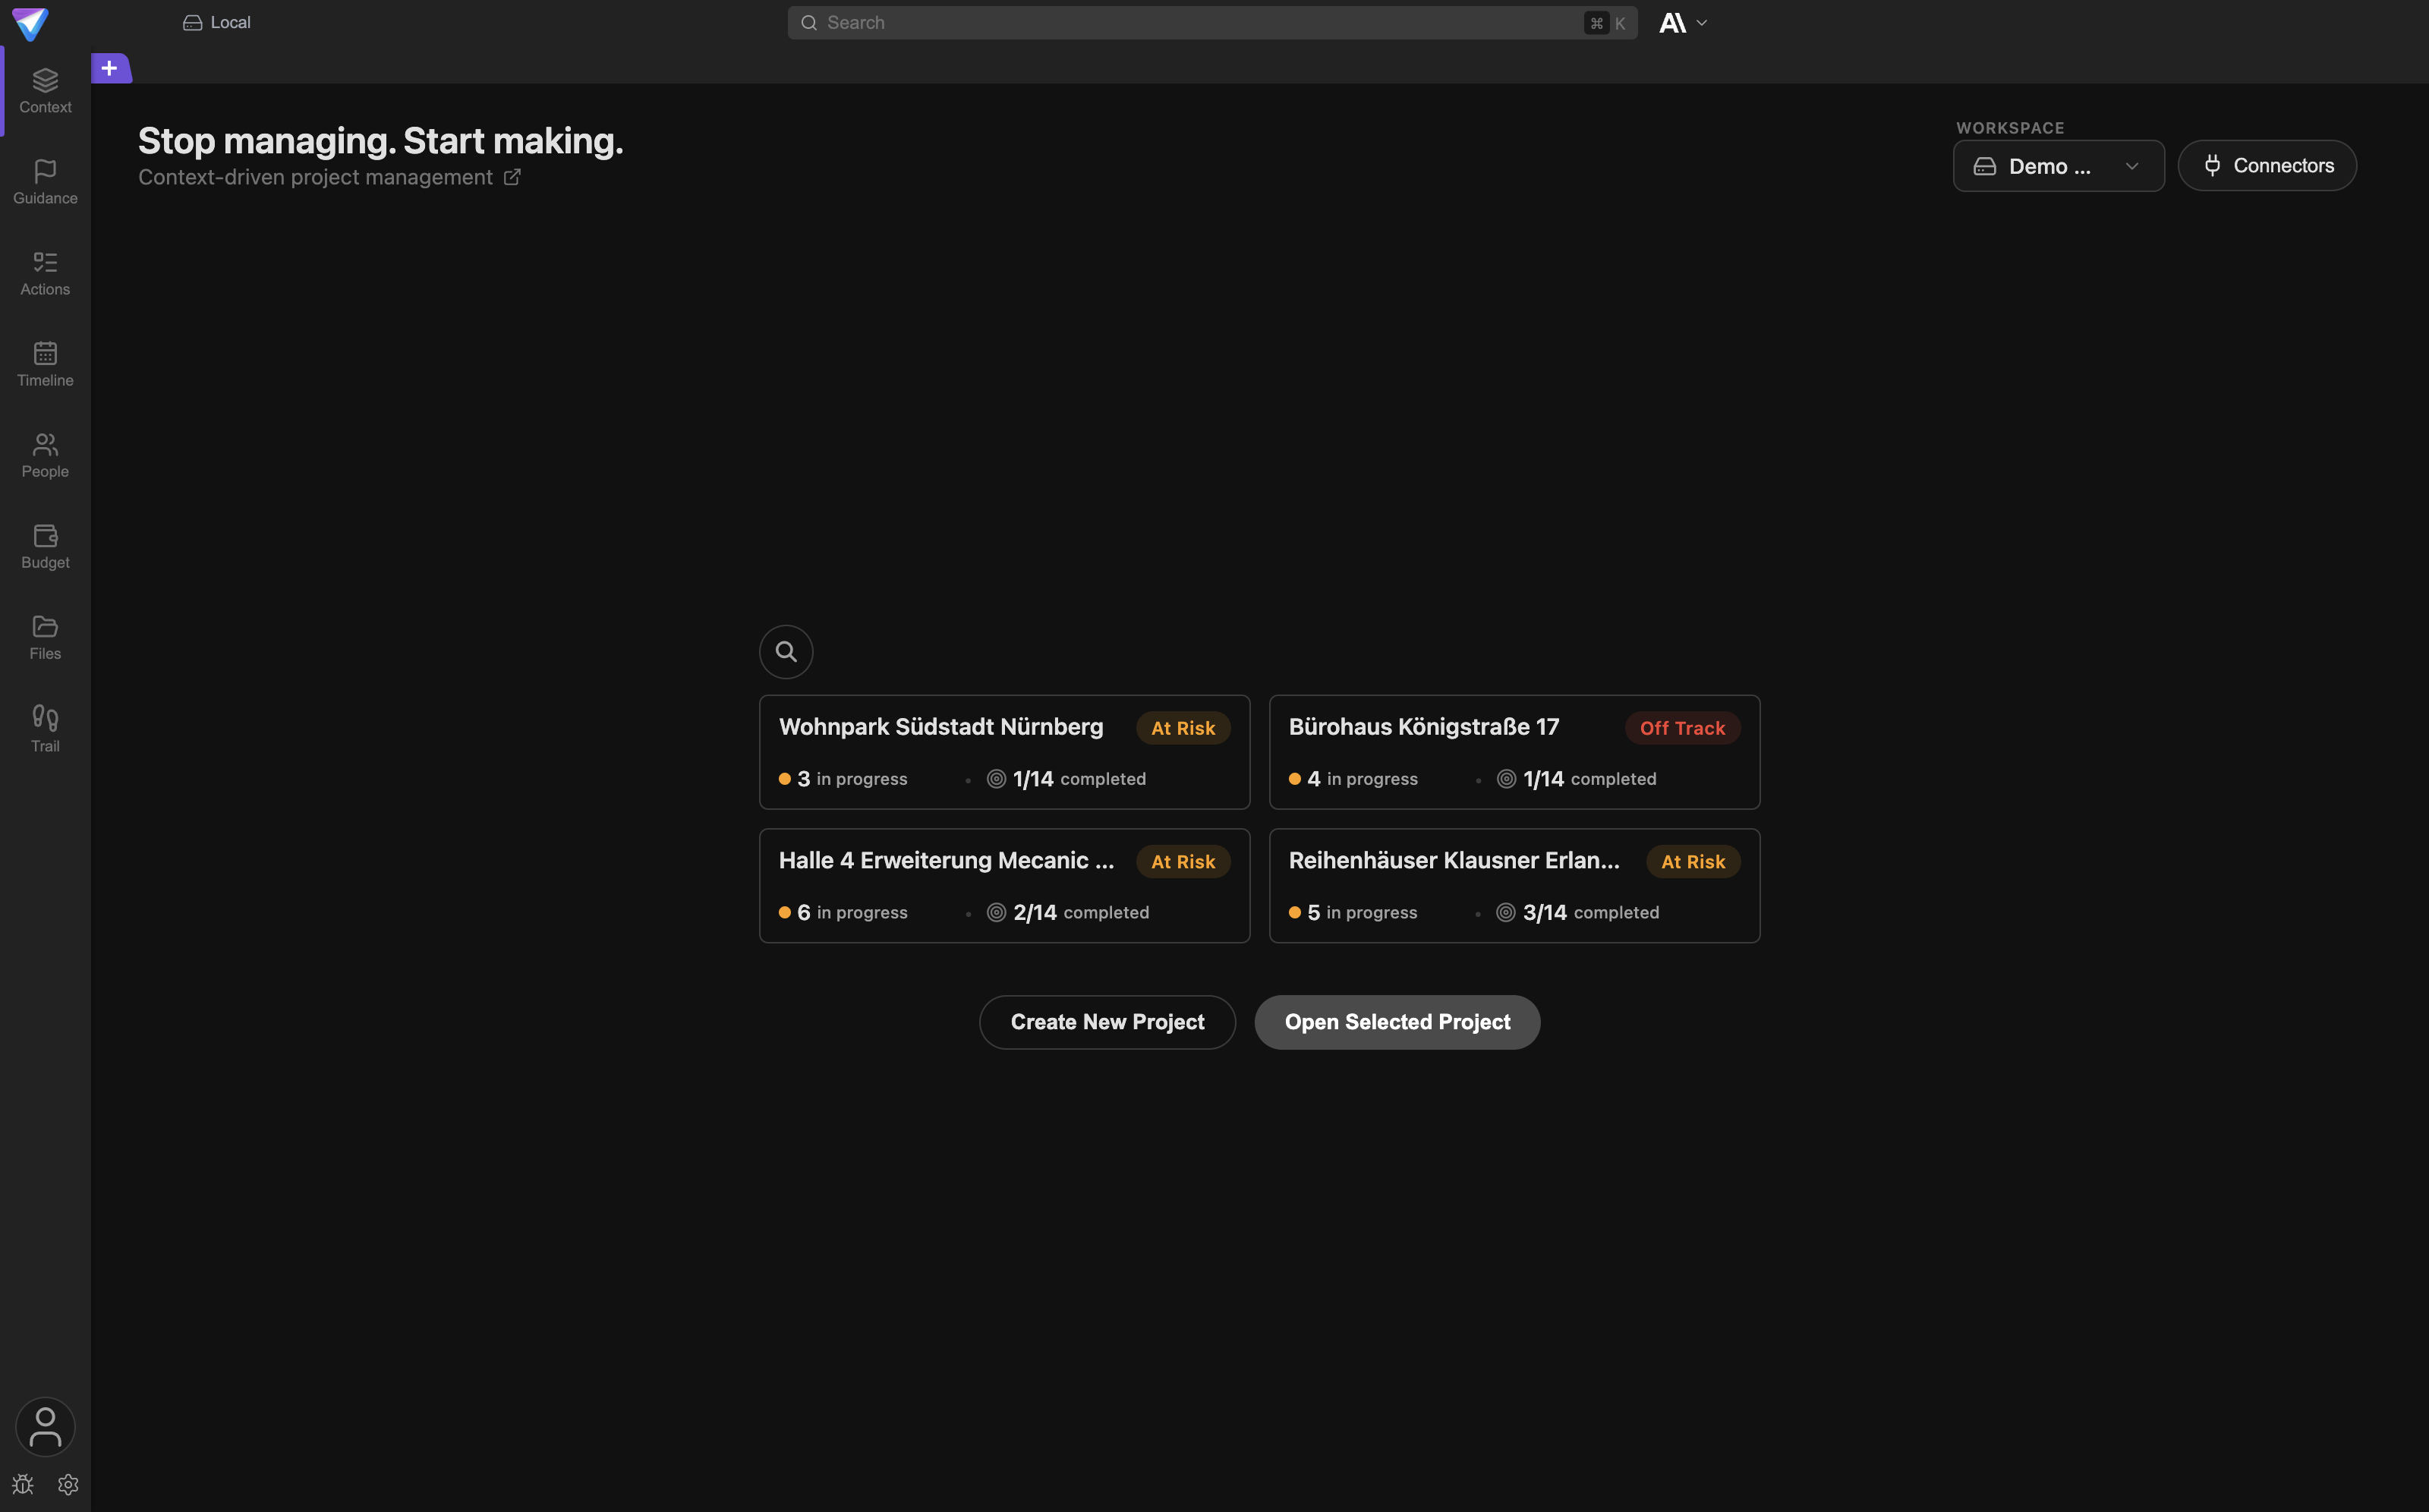
The Configure Connectors panel opens. Its subtitle repeats the core promise: Configure and assign connectors to projects. Settings are local-only.
On the left you see every configured connector, grouped into sections. On the right the selected connector appears with its details. Three buttons sit in the top right: MCP config, Manual setup, and Close.
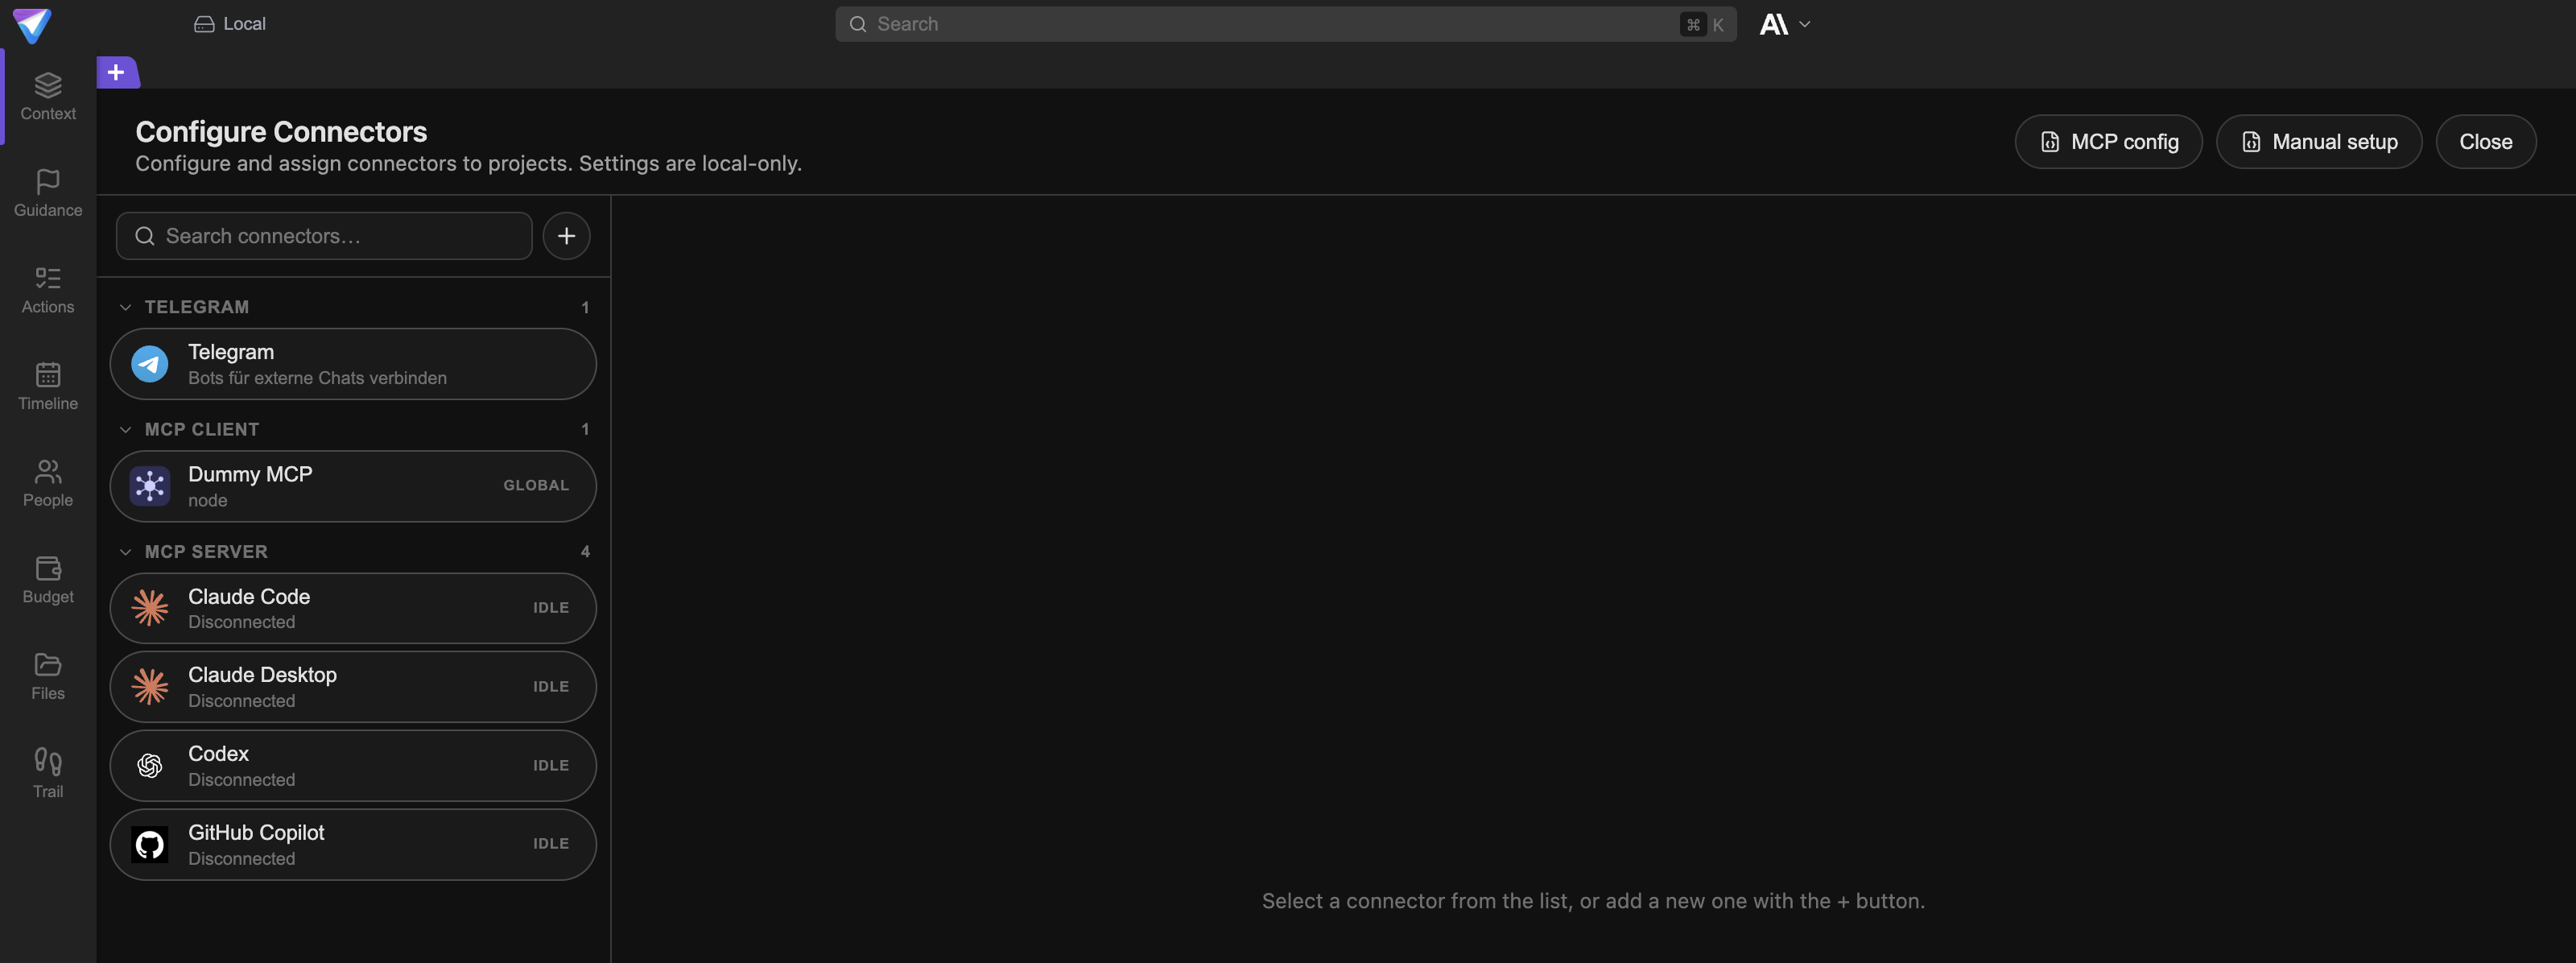
Every entry carries an uppercase status badge. Treat these badges as your checklist:
| Badge | Meaning |
|---|---|
GLOBAL |
The connector applies to all projects. |
PROJECT |
The connector applies only to the assigned project. |
DISABLED |
The connector is switched off and reads nothing. |
RECONNECT |
The sign-in expired or was revoked. |
SIGN IN |
The provider sign-in is still missing. |
SELECT FOLDERS |
Setup is incomplete, the folder selection is missing. |
ALLOW ACCESS |
The operating system has not granted access yet. |
IDLE |
Connection possible, nothing active right now. |
Which connectors exist
You add a connector with the + button next to the search field. The Add connector list opens.
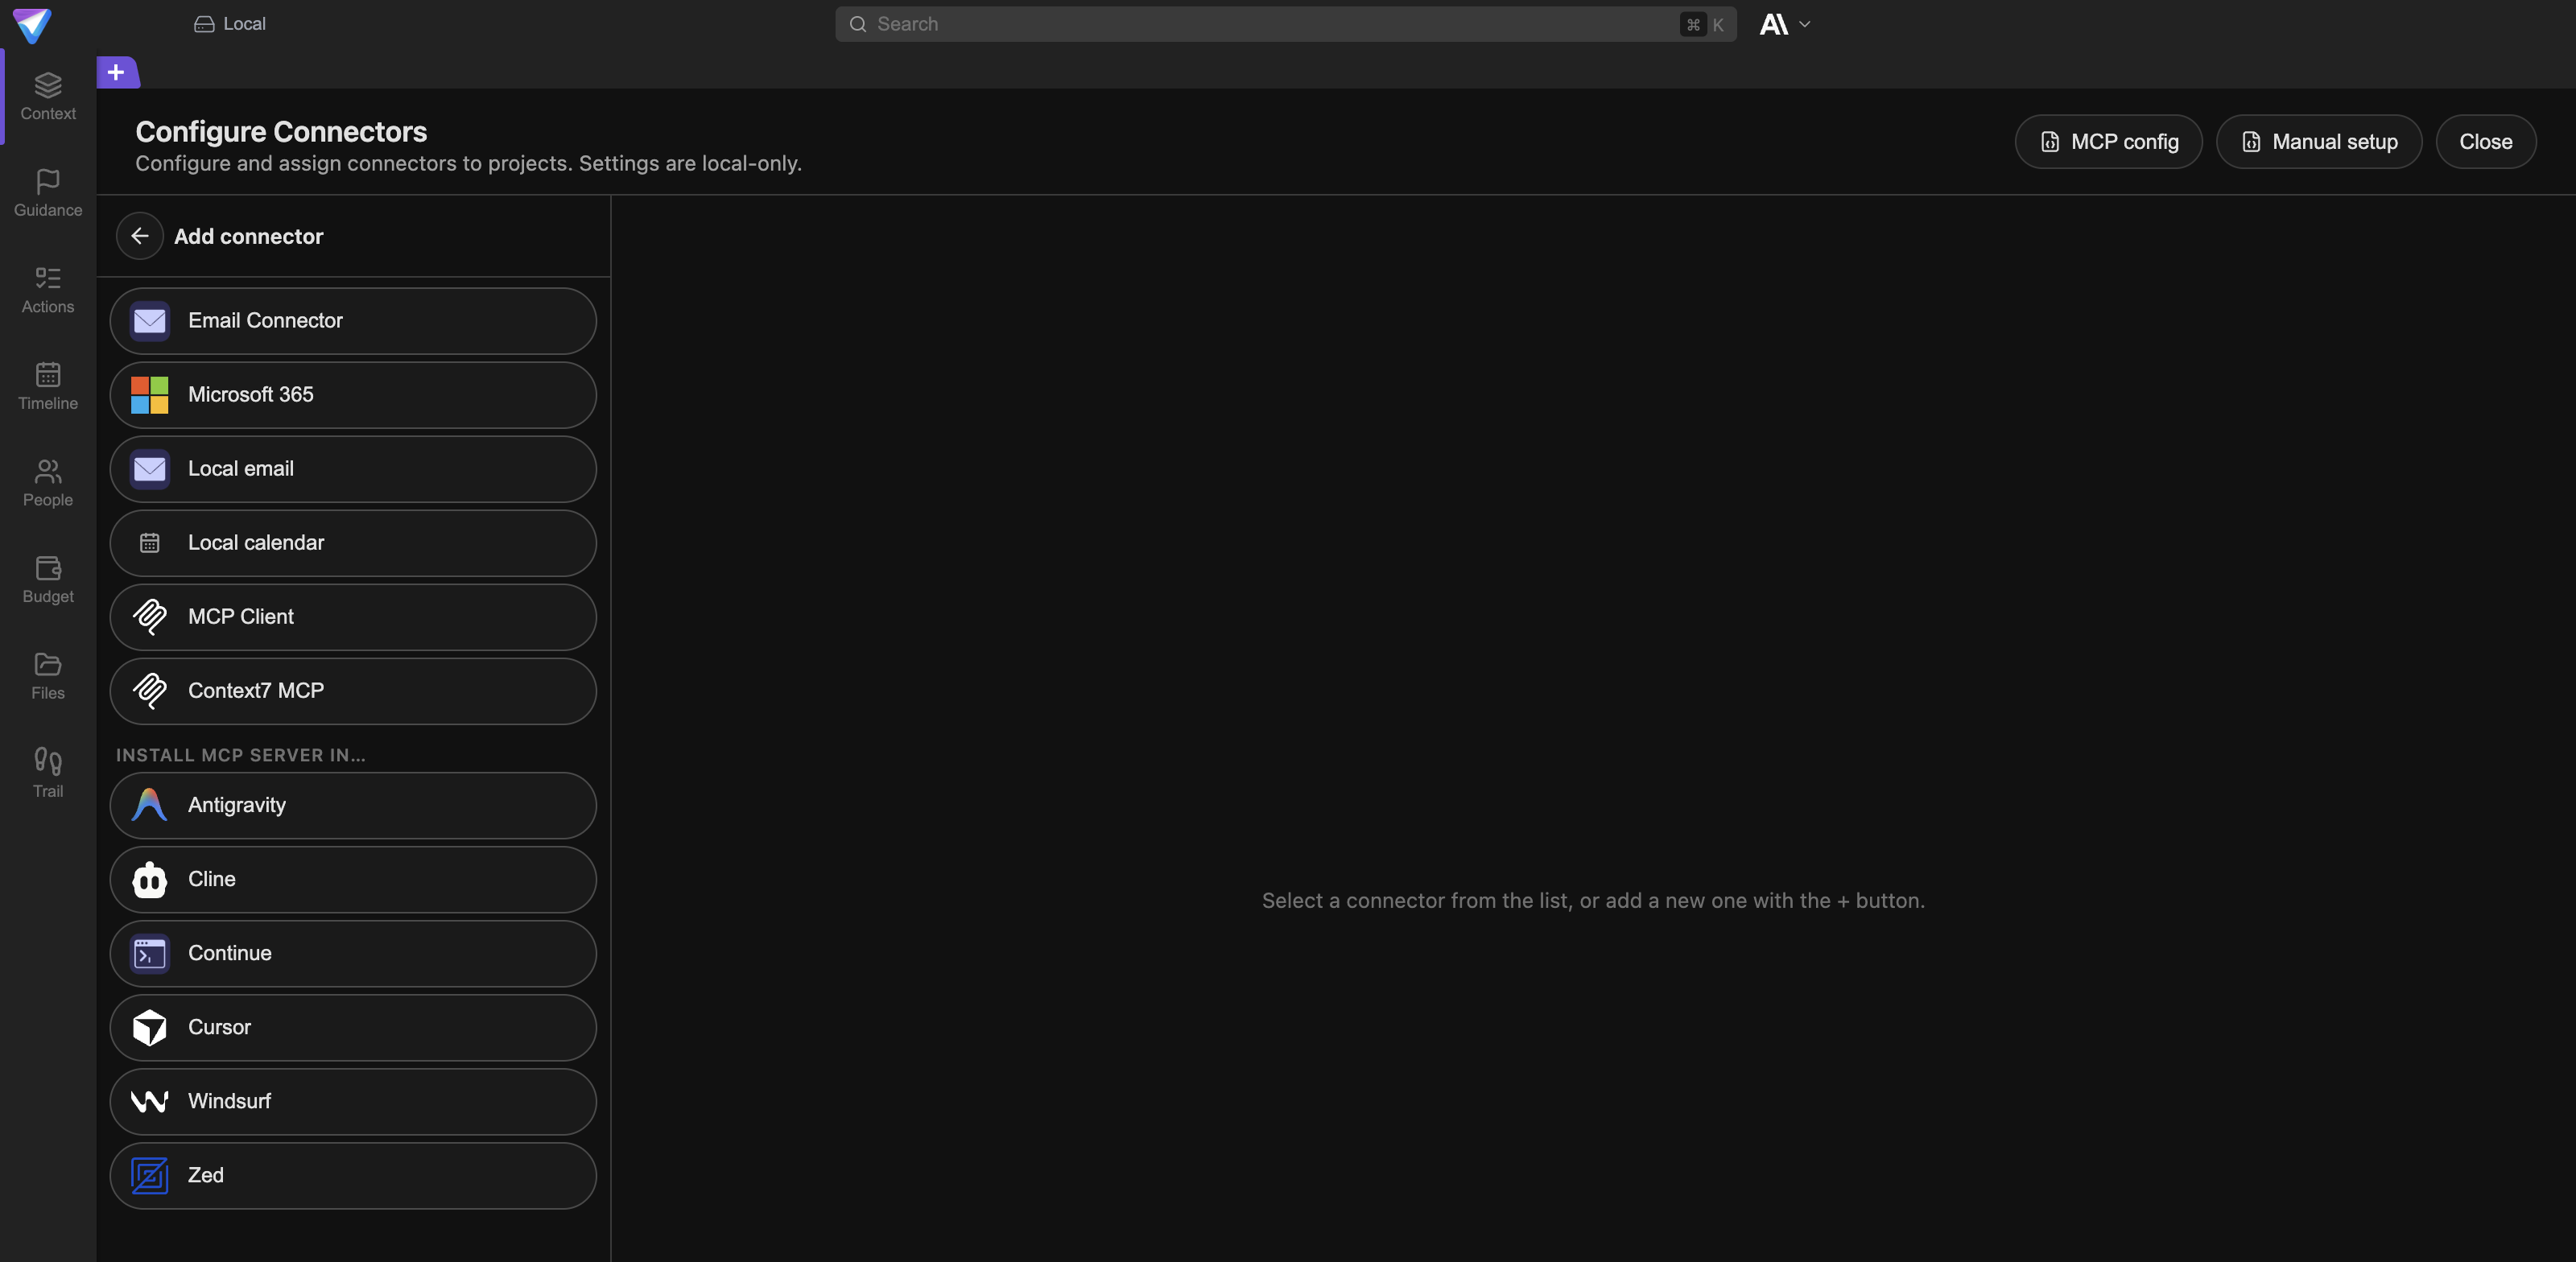
Not every entry appears on every machine. Connectors that cannot work on your operating system are not offered at all.
Local email
Good for: Your mailbox is already set up in a mail app and you would rather not hand TensorPM any passwords.
What you need: macOS and Apple Mail with at least one configured account, plus the macOS Full Disk Access permission for TensorPM.
Right now only Apple Mail is implemented. Outlook on Windows and Thunderbird are planned but not available yet. On a machine without a supported mail app this entry does not appear in the list at all.
Email over IMAP/SMTP
Good for: Any mailbox that can be connected the classic way, so Gmail, your own mail server, or a hosting provider.
What you need: The address, the server addresses for incoming (IMAP) and outgoing (SMTP) mail, and a password. For Gmail an app password rather than your normal account password.
This connector can both read and send.
Microsoft 365
Good for: Microsoft work or school accounts, calendar included.
What you need: A Microsoft work account and a browser sign-in. In tightly managed companies, IT may have to approve TensorPM first.
No password is stored. The sign-in stays on the device.
Local calendar
Good for: Reading and changing events without connecting a cloud account to TensorPM. The most private route to a calendar.
What you need: macOS with a configured, writable calendar and the macOS full calendar access permission.
So calendar access is not limited to Microsoft 365. On macOS, TensorPM reads the calendar straight from the machine.
Telegram
Good for: Chatting with TensorPM through Telegram, for example from your phone while on site.
What you need: A Telegram bot.
Important: Telegram is purely a chat bridge. Telegram messages do not become signals in the intake queue and never run through the relevance check or the Distiller. If you want project content read in automatically, use one of the email connectors.
MCP Client
Good for: Giving the TensorPM project agent extra tools, for example access to a file directory or a knowledge base.
What you need: A program that speaks the MCP protocol. MCP (Model Context Protocol) is a shared standard through which programs expose tools to AI assistants.
MCP Server
Good for: The opposite direction. Other AI programs such as Claude Desktop, Cursor, or Codex get access to your TensorPM project context.
What you need: The respective program on the same machine. Details are in Agent Integrations.
Set up local email
This is the most restrained route: TensorPM asks for no password and never talks to a mail server. It only reads the files your mail app already keeps on disk.
Pick Local email from the + menu. Setup has three steps, shown as tabs at the top: 1. Account, 2. Folders, and 3. Assign project.
Step 1: Account
TensorPM scans for configured mail apps by itself and lists what it found under Detected account. Select the account whose mail belongs to the project.
Below that you fill in:
Email address: the account address. It prevents the same message from being imported twice if you later also connect this mailbox over IMAP or Microsoft 365.Display name: a name you will recognize the connector by later.Initial Sync Lookback (days): how far back the first pass reaches. The suggestion is 30 days.
If TensorPM finds nothing, Search again helps.
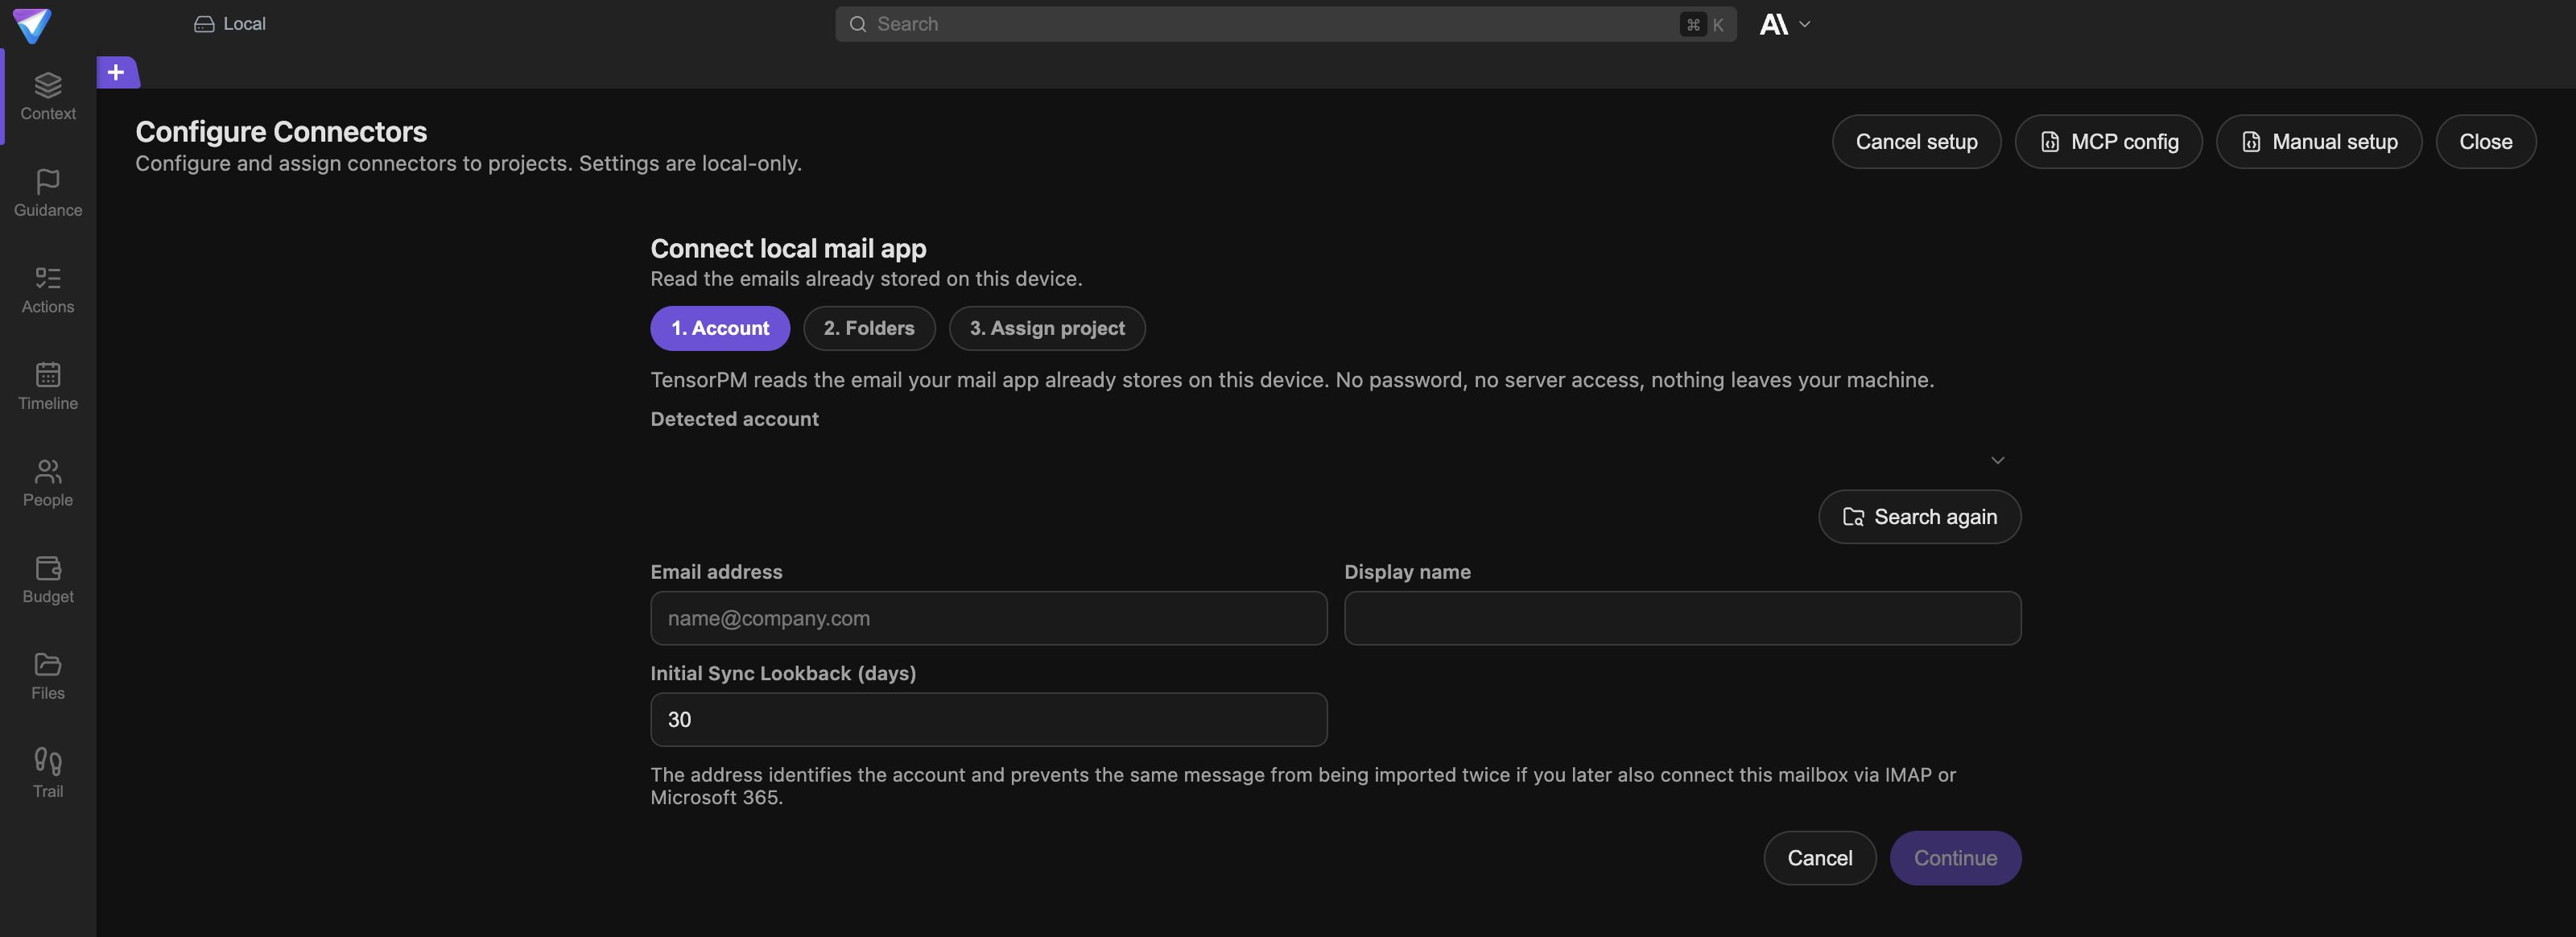
Next takes you to the following step.
Step 2: Folders
Now you decide which mail folders TensorPM may read at all. There is deliberately no select-all option: a local mail store holds everything you have ever received, including private and confidential material from other contexts.
Pick only the folders that belong to the project. One project folder per construction site is the normal case. You can change the selection later at any time.
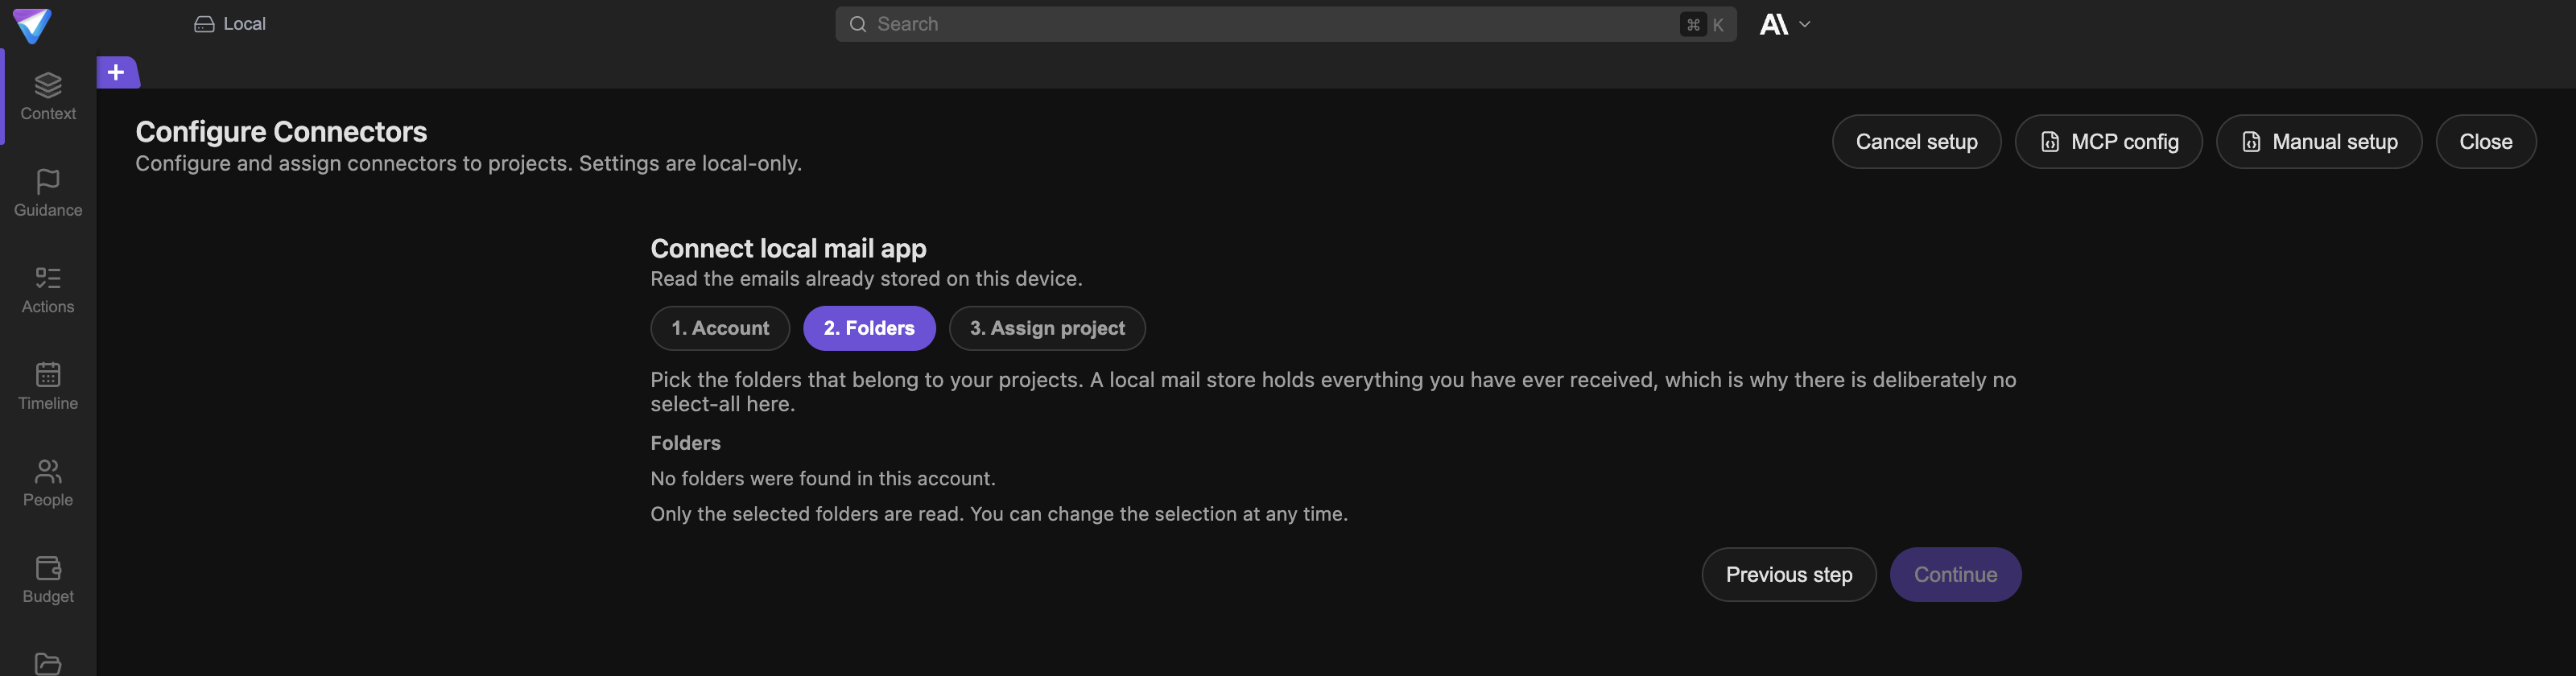
If you see "No folders were found in this account", the operating-system permission is usually missing. See the section below.
Step 3: Assign project
In the last step you decide which projects the mail shows up in as new signals. You can tick several projects.
Below that sits Input visibility with two values:
Private input: only you see the incoming signals from this connector.Workspace input: everyone in the workspace sees them.
This setting only affects the queue. Once a change is approved and applied, it belongs to the shared project.
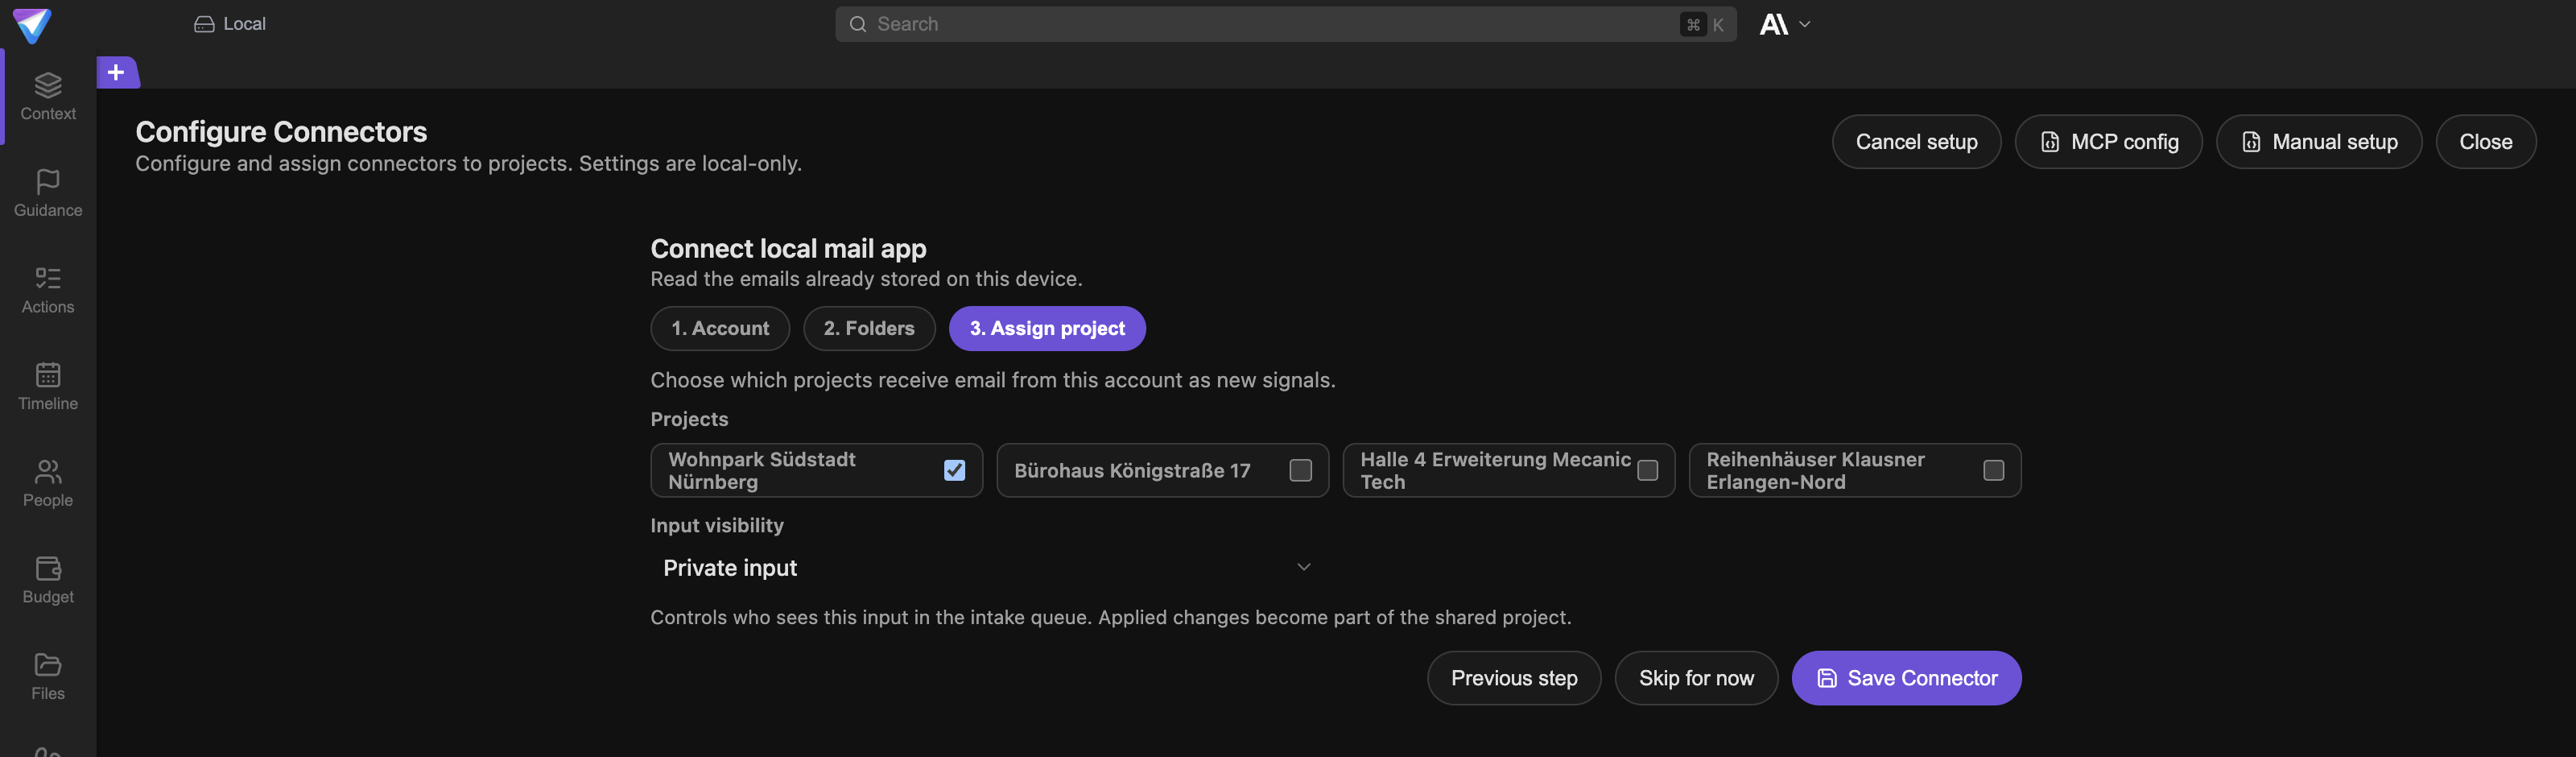
Finish with Save Connector. If you want to handle project assignment later, use Skip for now. Without a project assignment, though, the connector reads nothing.
When macOS blocks access
macOS protects the mail folder in particular. If TensorPM cannot look inside, setup shows macOS is blocking access to your mail folder. and offers Open System Settings.
Here is how to fix it:
- Click
Open System Settings. - Switch TensorPM on in the
Full Disk Accesslist. The check has already added TensorPM there. If the entry is missing, add it via the+button at the bottom left. - Quit TensorPM completely and start it again. Closing the window is not enough.
- Go back into setup and click
Check again.
Set up email over IMAP/SMTP
This connector talks directly to your mail server. It can read and send. Pick Email Connector from the + menu. Setup has two steps: 1. Create email and 2. Assign projects.
Step 1: Create email
The general details come first:
Display Name: anything you like, for example "My Work Inbox".Provider:Gmail,Outlook,IMAP, orOther. The choice pre-fills the server addresses.Email Account: your address.Initial Sync Lookback (days): how far back the first pass reaches.
Then comes the incoming section (IMAP Host, IMAP Port, IMAP Username, IMAP Password / App Password) and the Use TLS / SSL switch, which encrypts the connection and should stay on.
After that comes the outgoing section for sending: SMTP Host, SMTP Port, SMTP Username, SMTP Password, and Use SMTP TLS / SSL. If you leave the SMTP password empty, TensorPM reuses the IMAP password. With a custom mail provider, set the SMTP host explicitly.
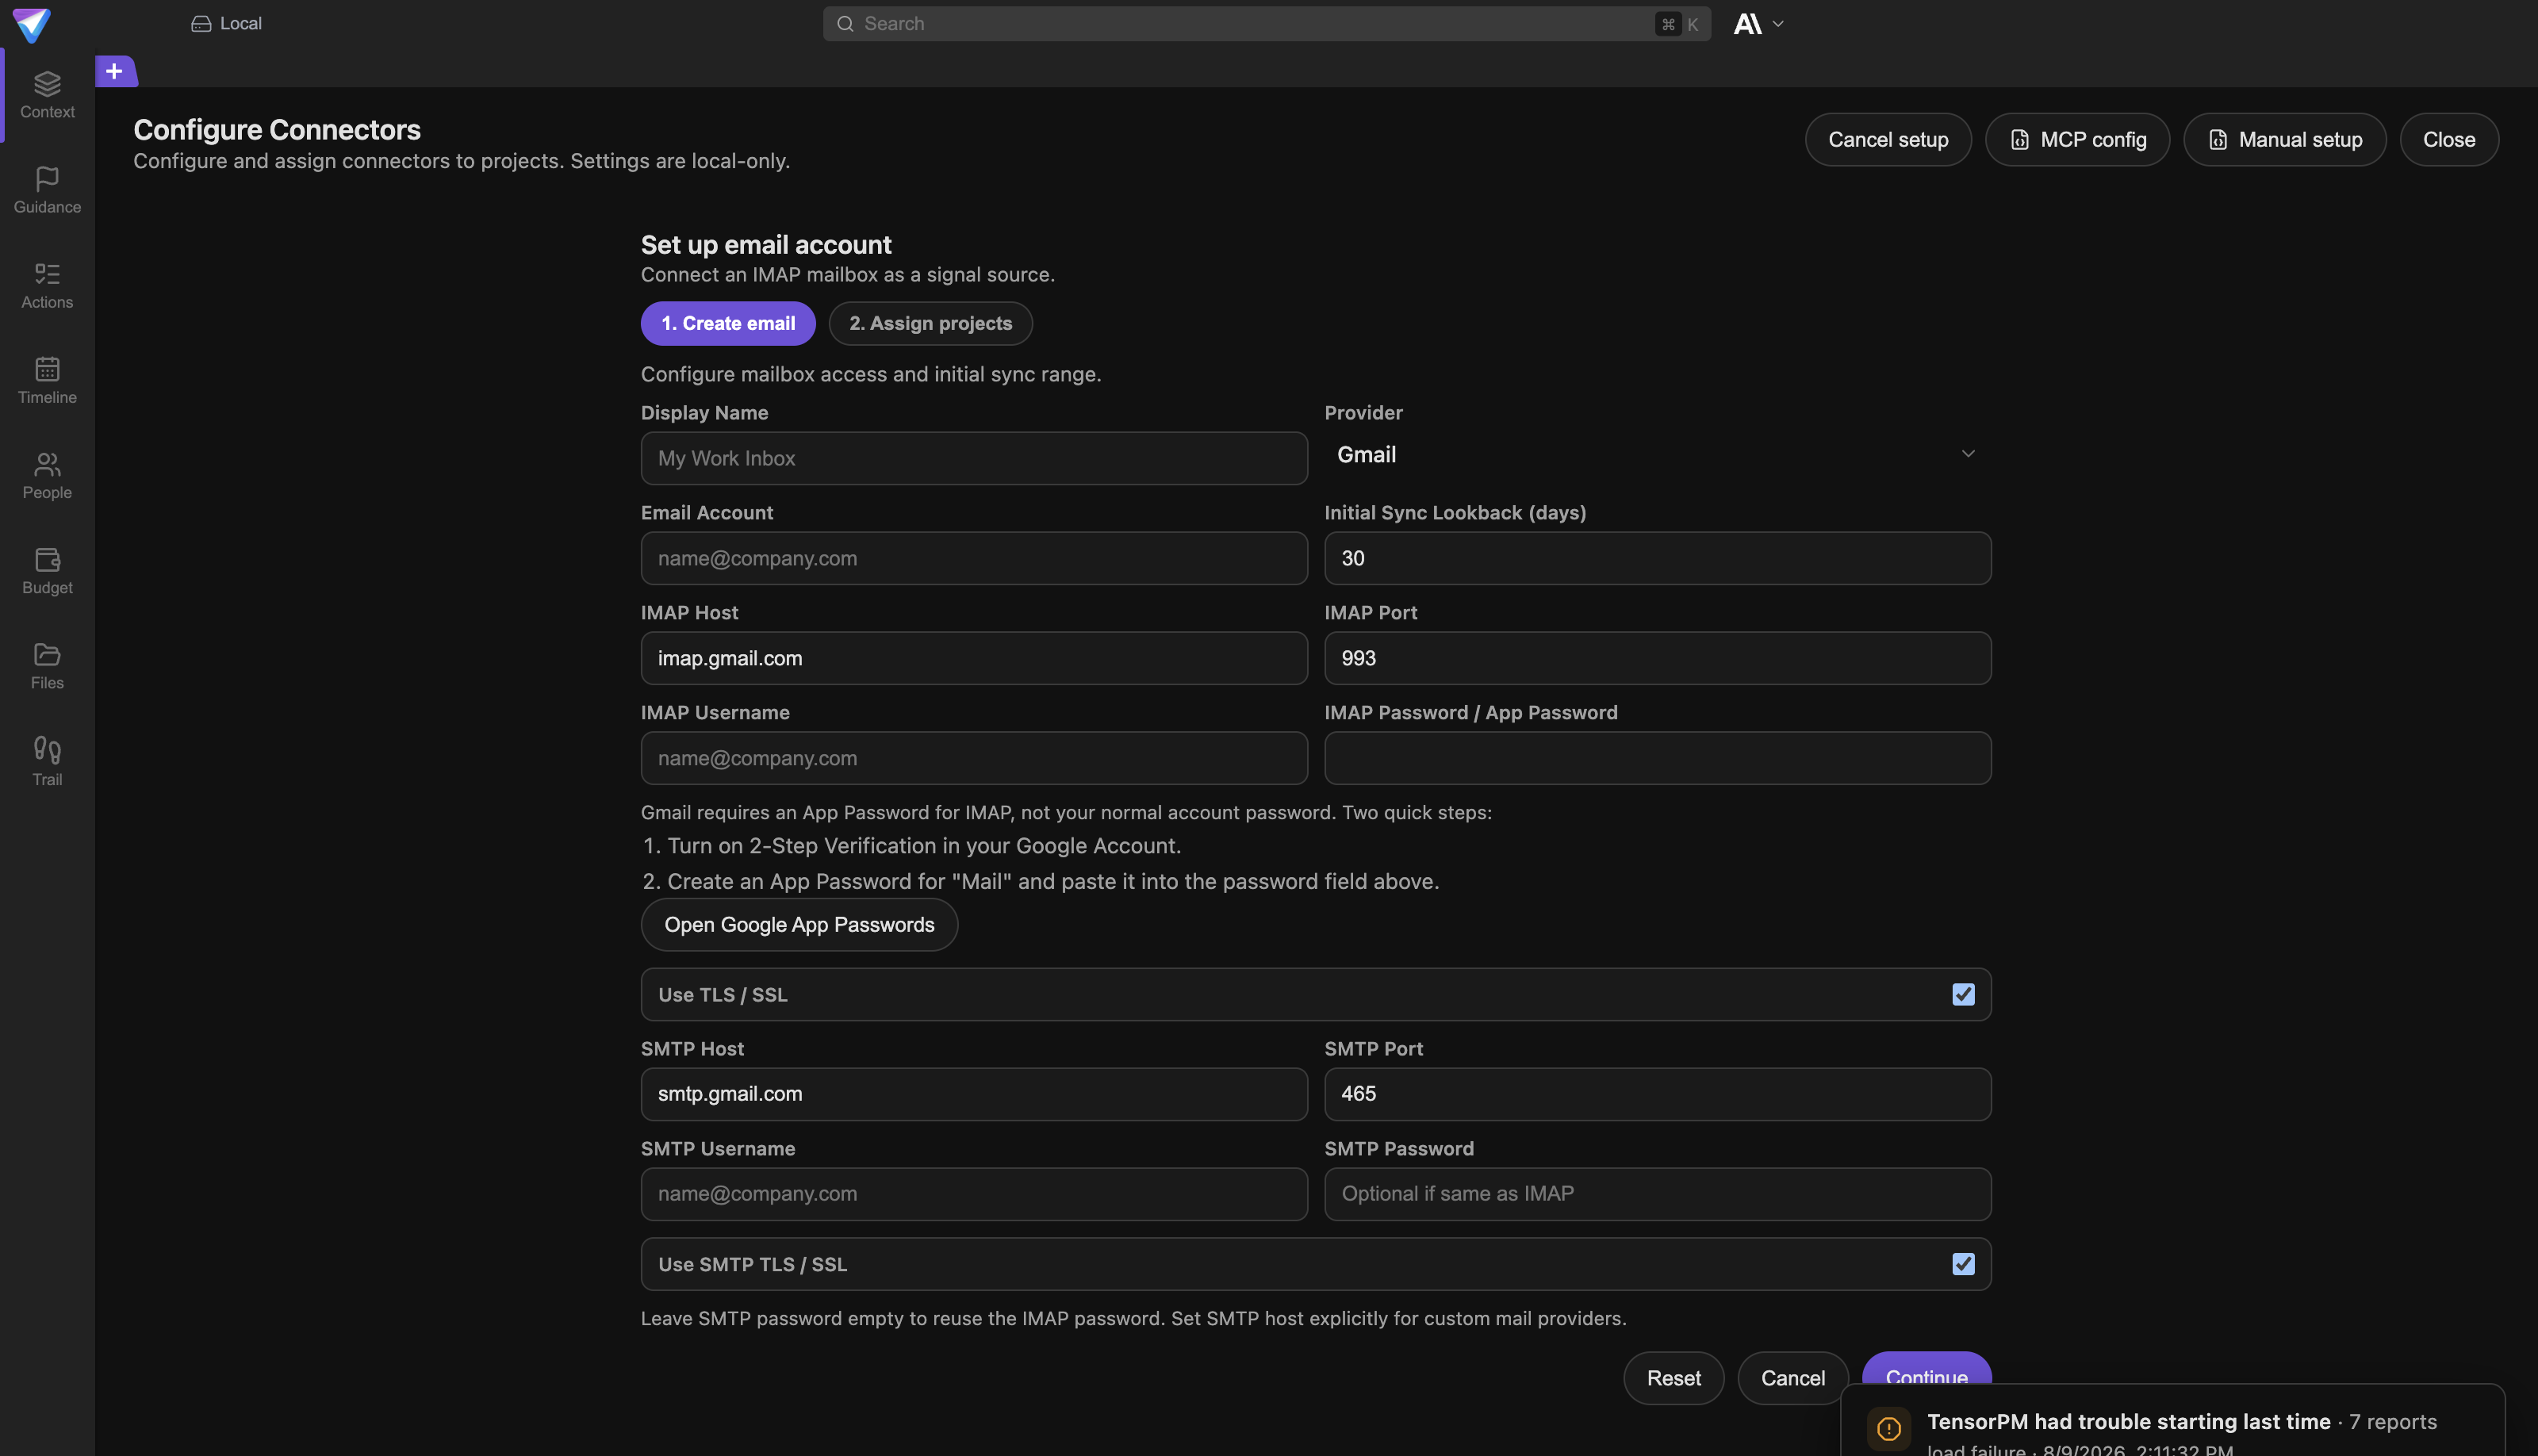
If a required field is missing, the form says so right above the button row, for example Please enter an email account. Fill it in and click Continue again.
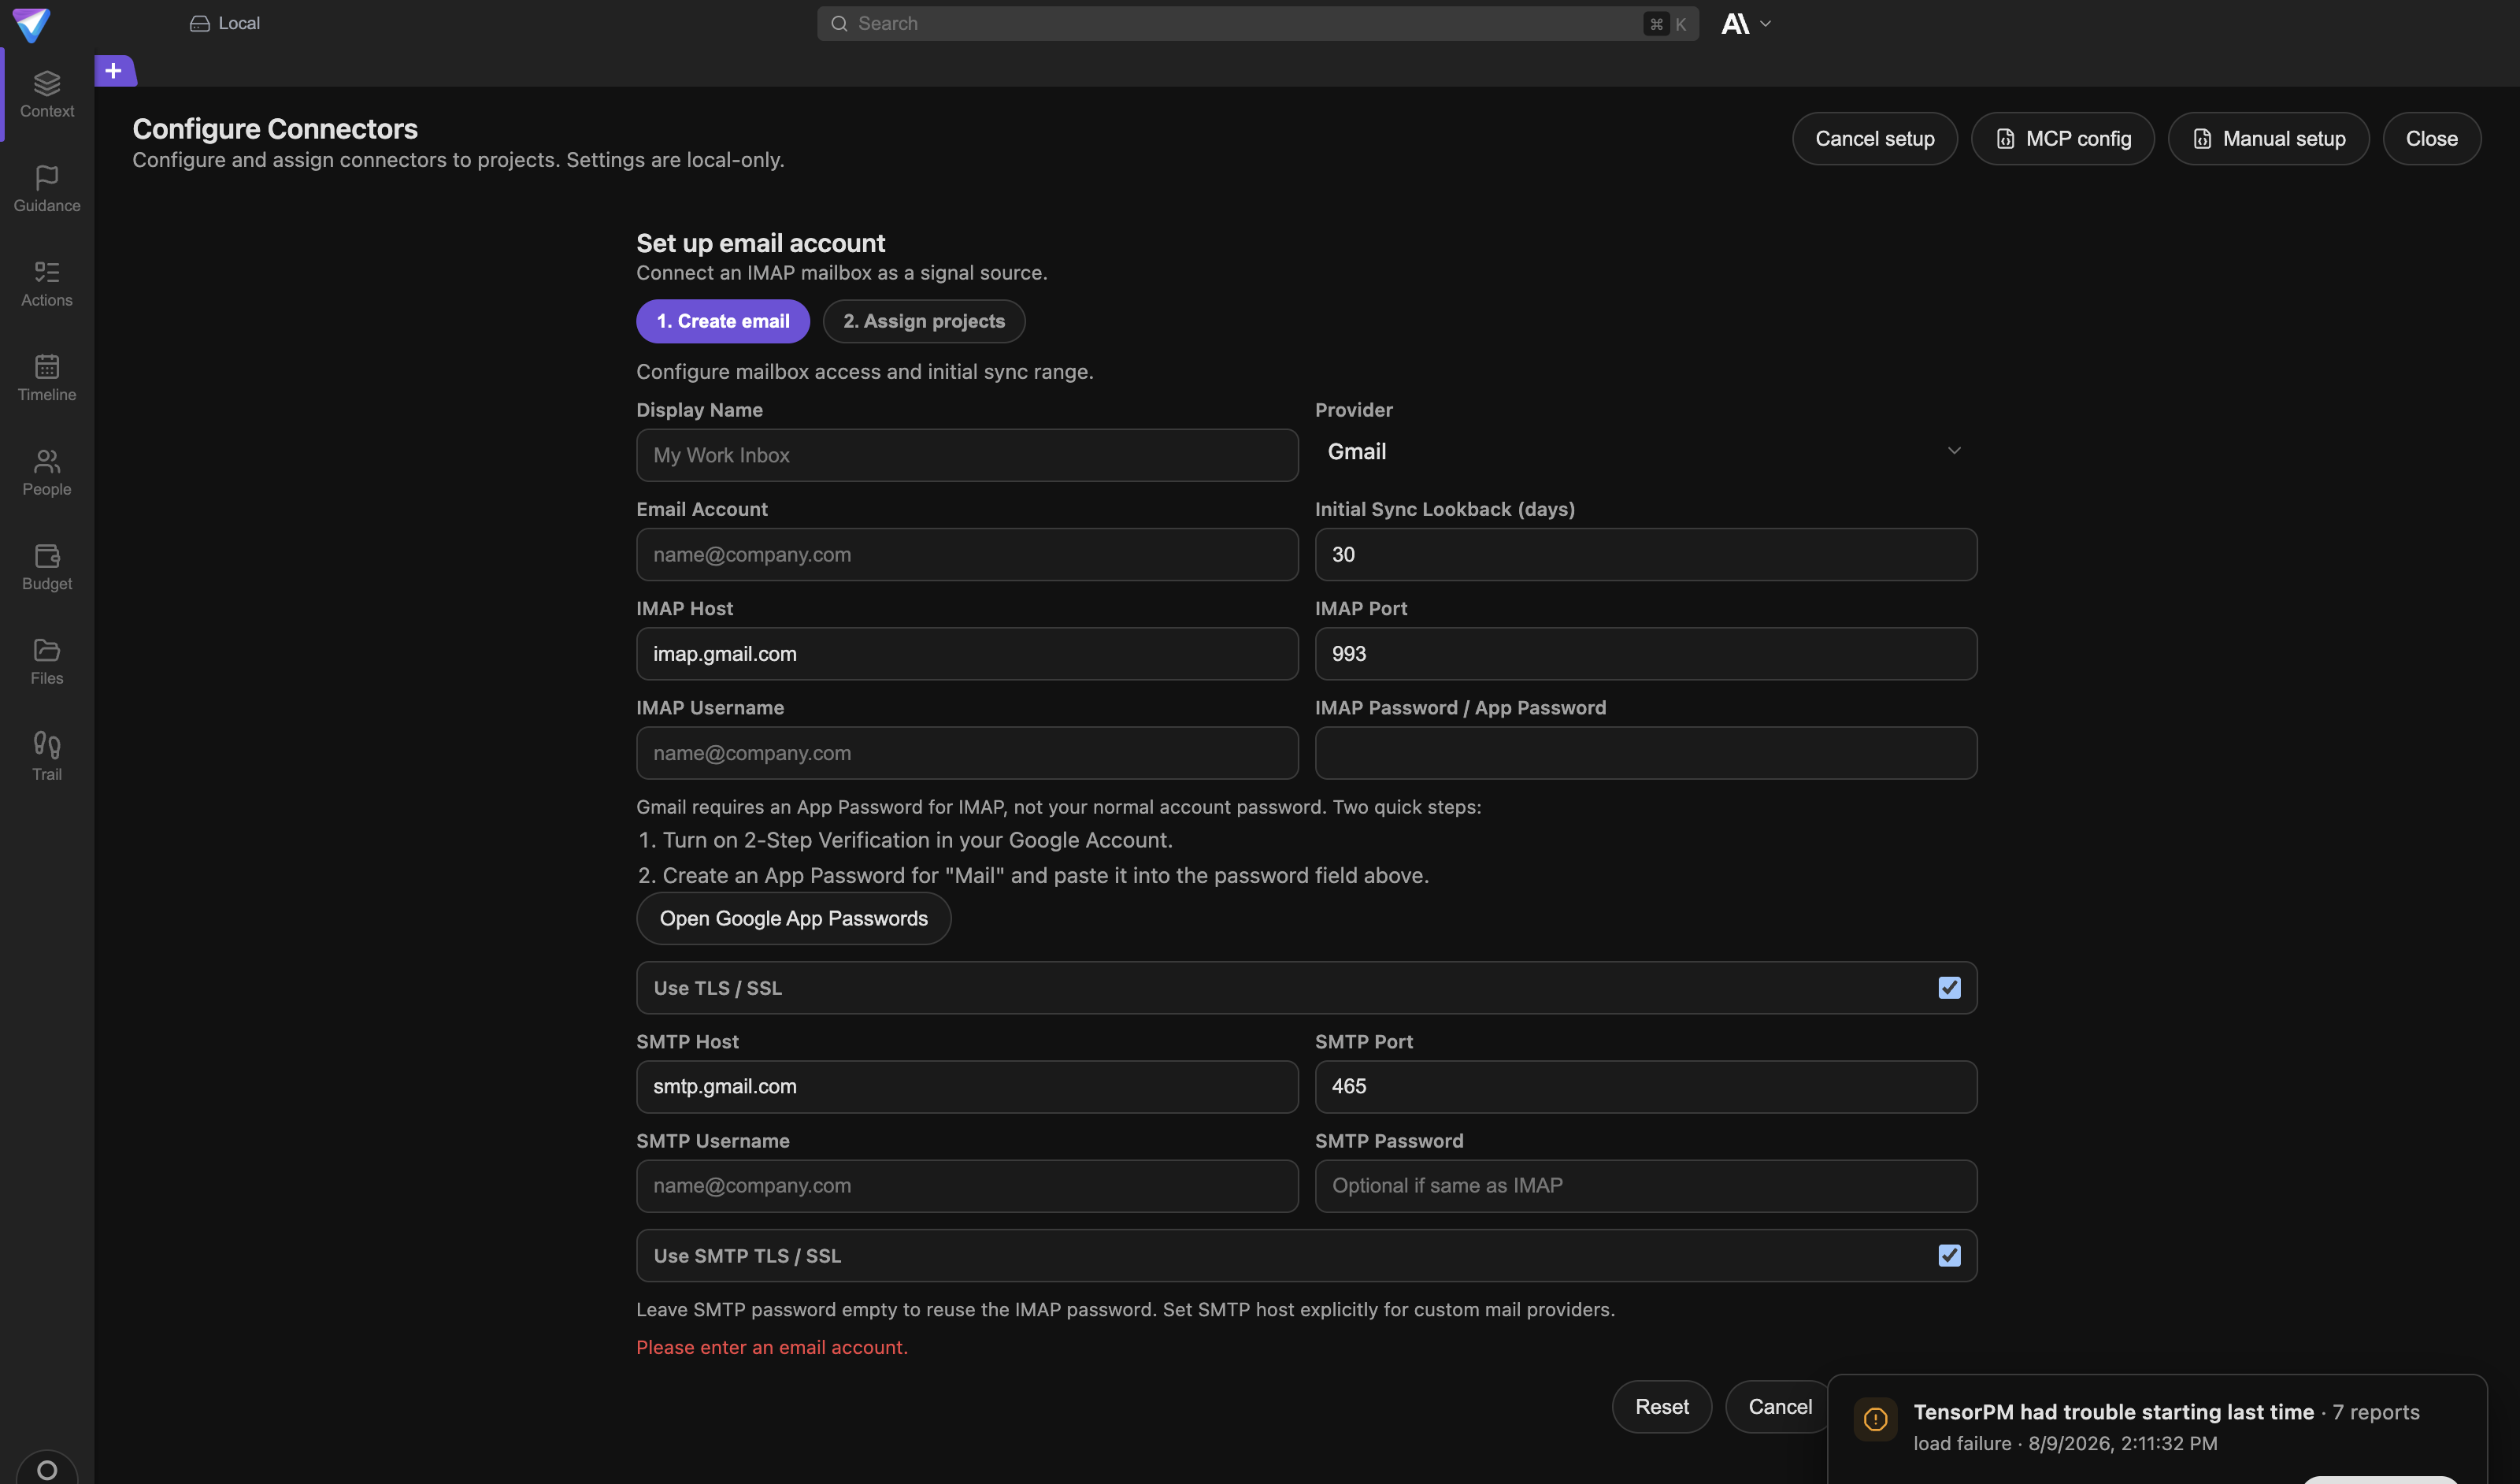
Step 2: Assign projects
As with the local connector, you pick the projects here and set Input visibility to Private input or Workspace input. Finish with Save Connector.
The first sync then runs in the background. TensorPM reports: Connector saved. Initial sync started in the background.
Gmail and app passwords
Gmail does not allow IMAP with your regular account password. You need an app password:
- Turn on 2-Step Verification in your Google Account.
- Create an app password for "Mail".
- Paste it into the
IMAP Password / App Passwordfield in TensorPM.
The Open Google App Passwords button in the form takes you straight to the right Google page.
Set up Microsoft 365
Pick Microsoft 365 from the + menu. Setup has two steps: 1. Microsoft account and 2. Assign project.
Step 1: Microsoft account
Enter a Display name, for example "Office Mailbox", and set the Initial Sync Lookback (days).
Then click Sign in with Microsoft. A browser window opens with the Microsoft sign-in. Complete it there and return to TensorPM afterwards. If everything worked, the form shows Connected as followed by your account address.
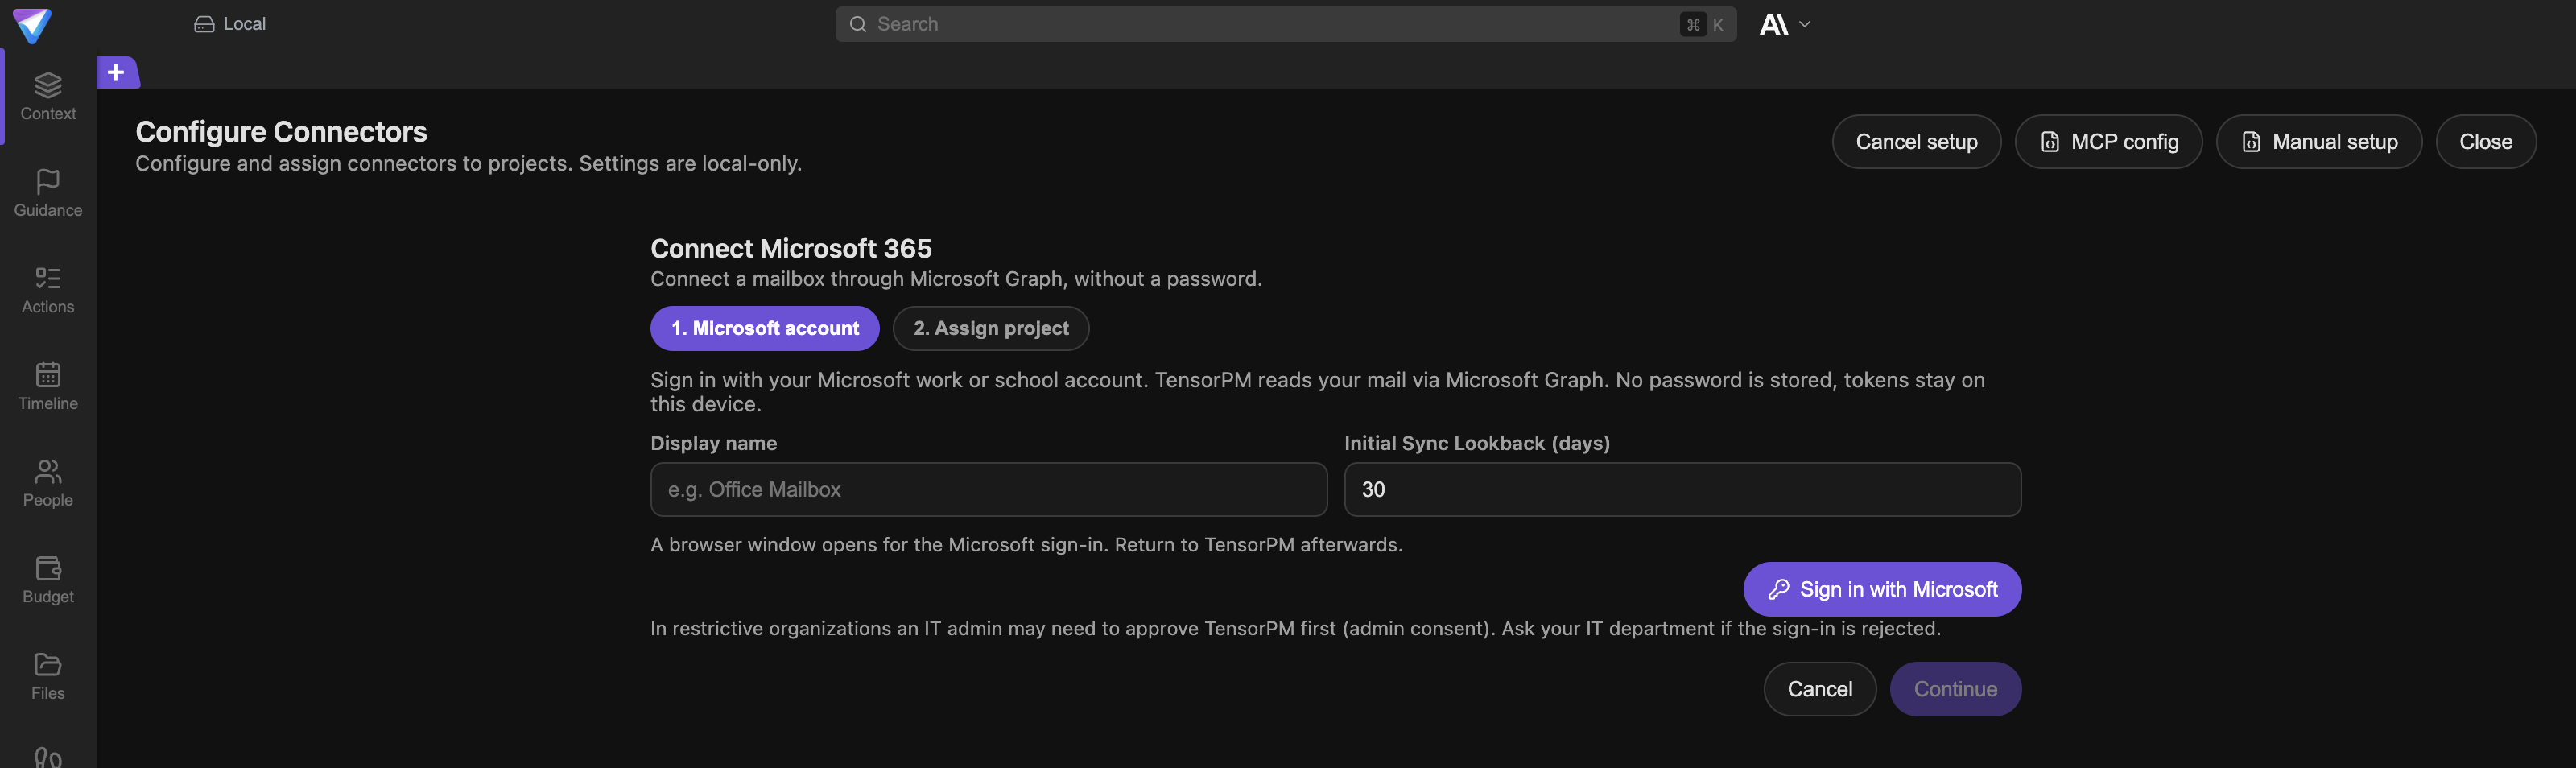
No password is stored in TensorPM. The sign-in stays on the device.
In tightly managed companies the sign-in may be rejected. IT then has to approve TensorPM first. The technical term for that is admin consent. Ask your IT department about it.
Step 2: Assign project
The second tab stays locked until a sign-in exists. Click Continue anyway and you get the message Please sign in with your Microsoft account first.
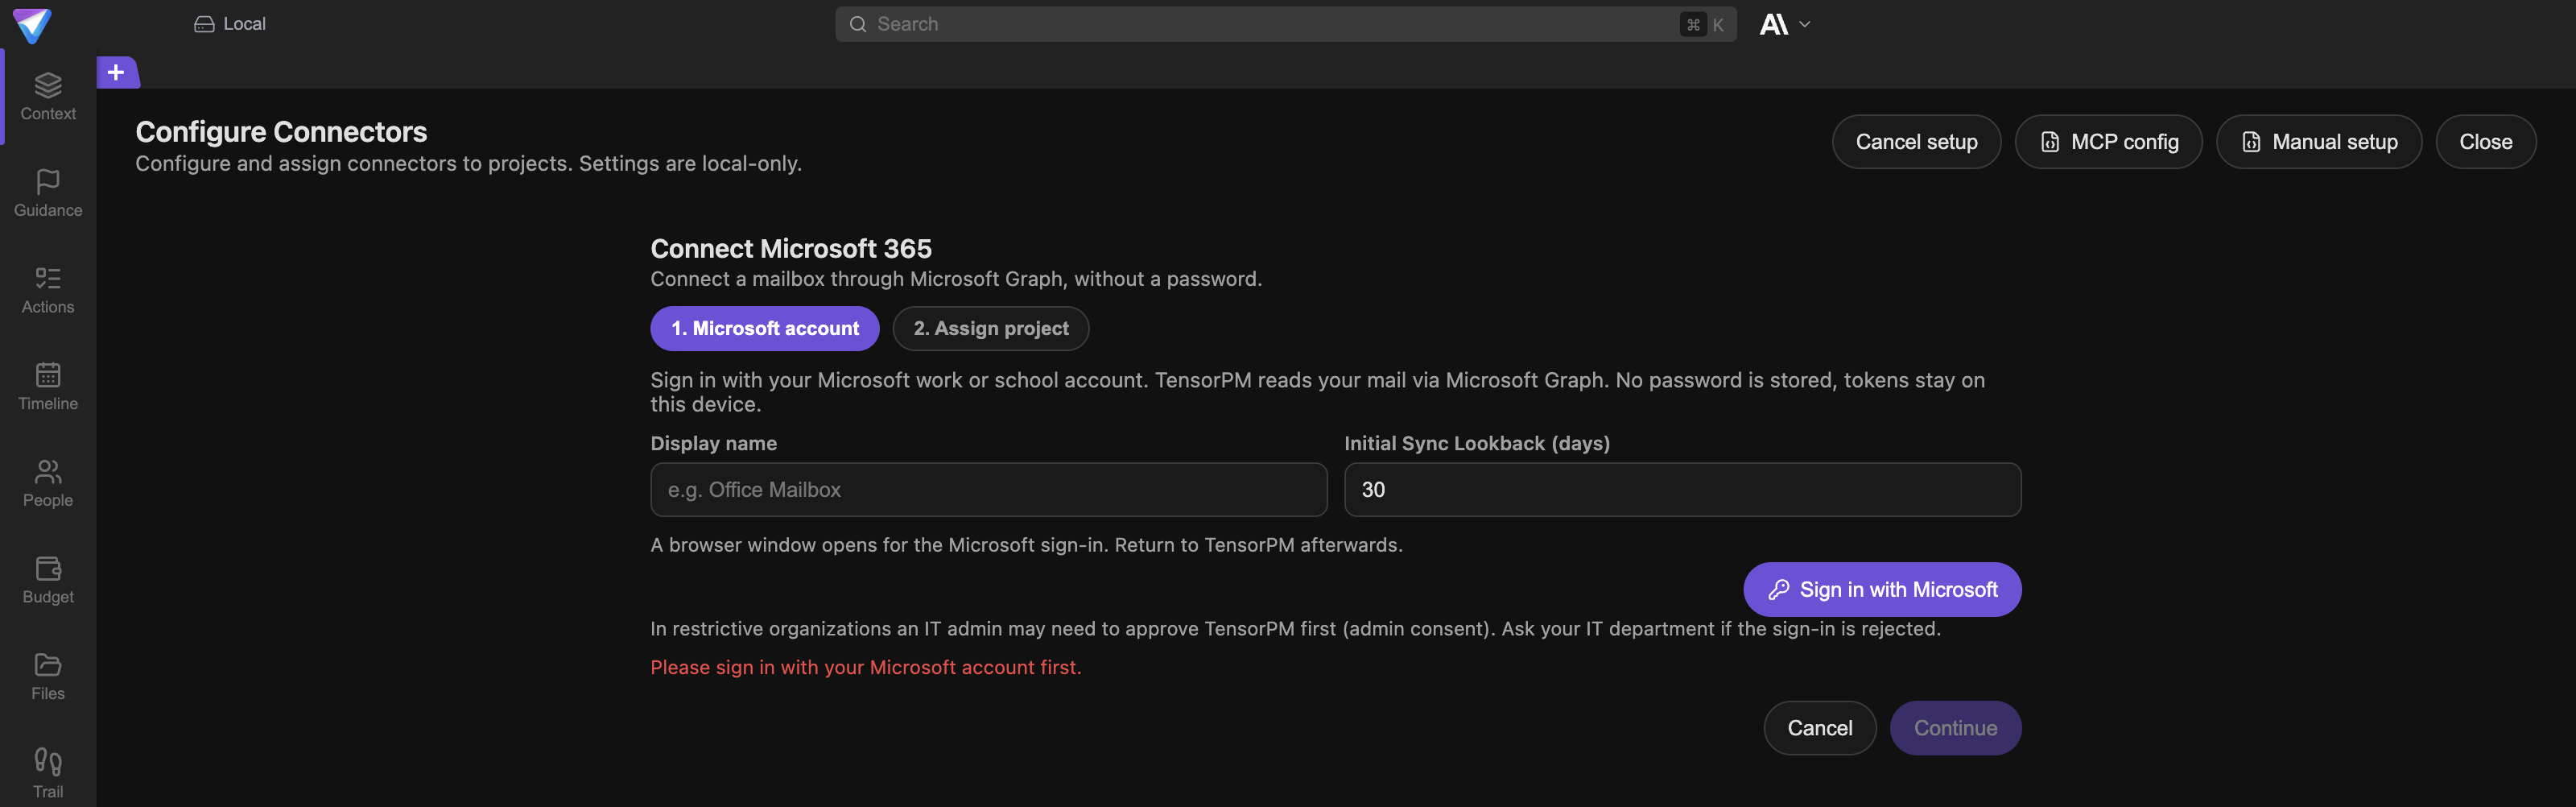
After signing in you pick projects and input visibility as usual, then Save Connector.
Enable calendar access afterwards
A Microsoft 365 connector can additionally expose the calendar. That is deliberately separate and off by default.
Open the saved connector in the list. The Calendar access section spells out what it means: the project agent may read the calendar and prepare events or changes. Every create and every change needs your approval in chat before it touches the real calendar.
Enable calendar starts an additional Microsoft sign-in that grants calendar access. The status then reads Enabled. Disable calendar takes it back.
Set up the local calendar
The local calendar reads events straight out of macOS, without you connecting a cloud account to TensorPM. Pick Local calendar from the + menu.
The setup screen explains the idea first: you select one calendar already configured in macOS. The TensorPM calendar agent can read it and prepare events or changes. Every write still requires your approval in chat.
As long as macOS has not granted access, you see a red message and the Allow Calendar access button.
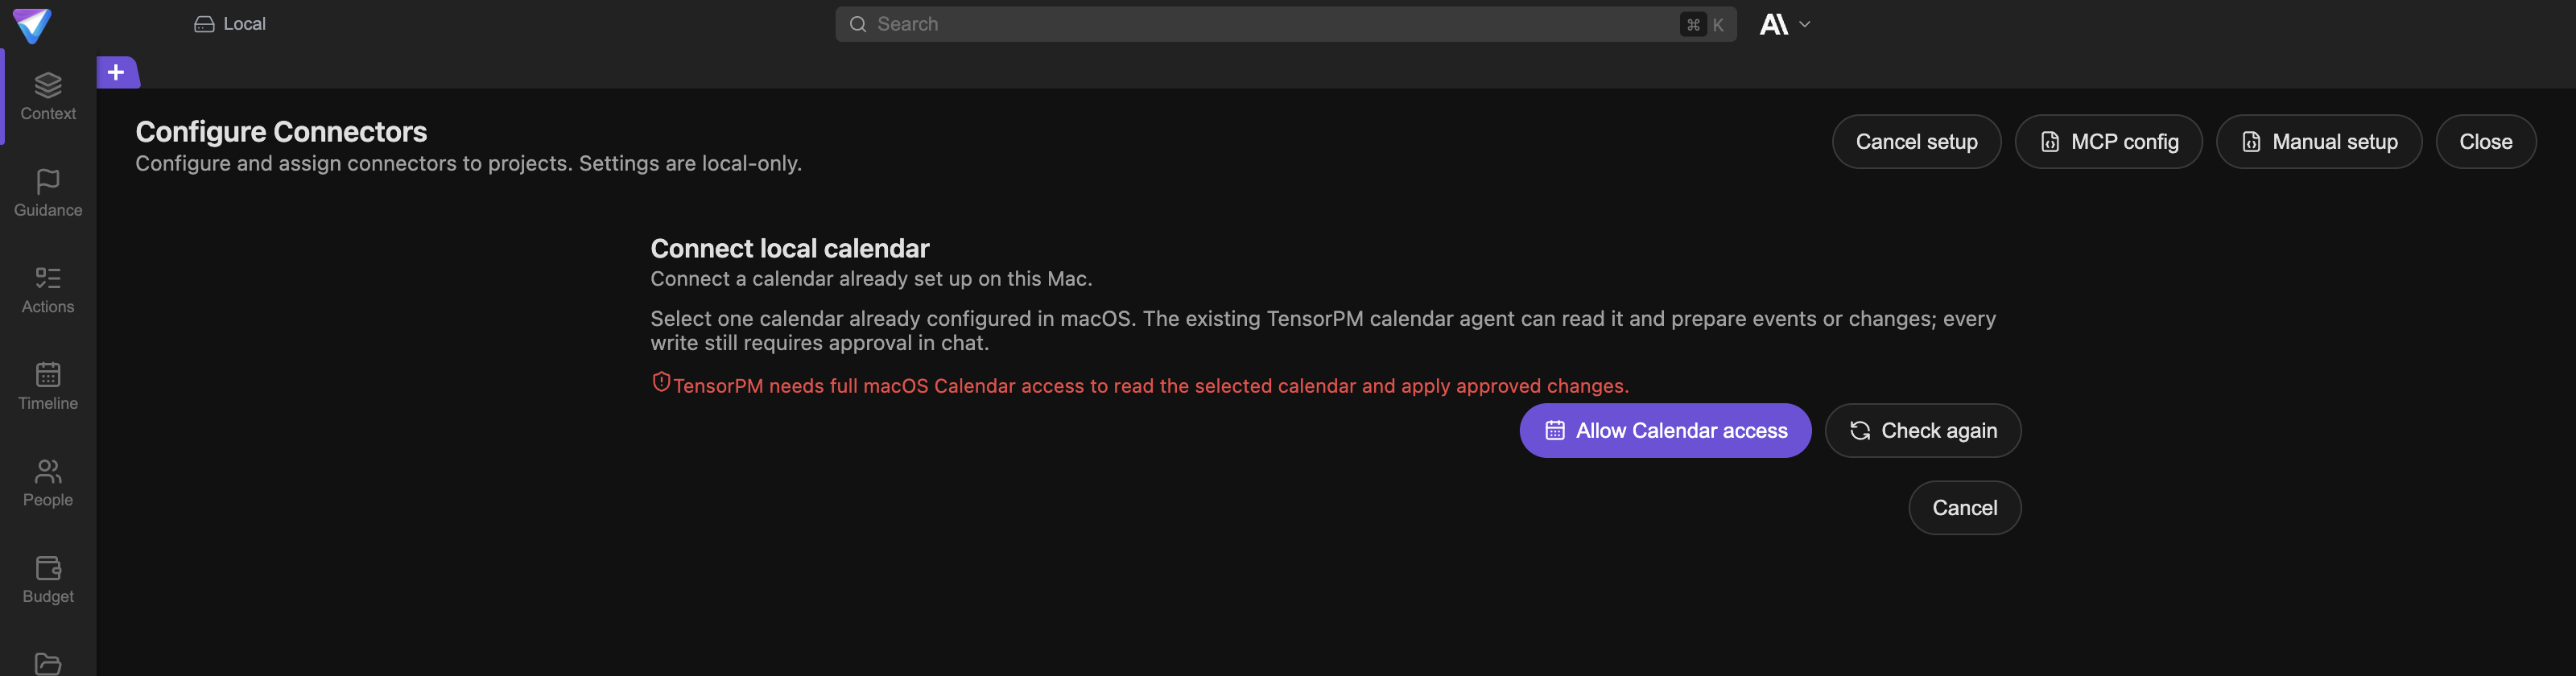
Here is the sequence:
- Click
Allow Calendar access. macOS shows its own permission prompt. - Grant full calendar access there. If no prompt appears, use
Open System Settingsto open the privacy section and switch TensorPM on by hand. - Click
Check again. The status changes toAccess granted. - Select exactly one calendar under
Calendar. Give it aDisplay nameif you like. - Tick the projects this calendar should apply to.
- Finish with
Save Connector.
If TensorPM finds no suitable calendar, it reports: No writable calendar was found. Subscribed, birthday, and other read-only calendars cannot be selected. Create your own writable calendar in the macOS Calendar app and check again.
What the local calendar can and cannot do
| Operation | Possible? |
|---|---|
| Read events | Yes |
| Create a new event | Yes, after approval |
| Change an existing event | Yes, after approval |
| Delete an event | No, deliberately not |
| Add or remove attendees | No, deliberately not |
The limits are intentional. A deletion cannot be undone as cleanly as a change, and invitations to third parties should not go out automatically.
One practical note: macOS then syncs approved changes onward through the configured calendar account. If your macOS calendar hangs off a company account, the event lands there as usual.
Set up an MCP Client
An MCP client connects another program to the TensorPM project agent so the agent can use that program's tools. Pick MCP Client from the + menu. The New MCP Client form appears on the right.
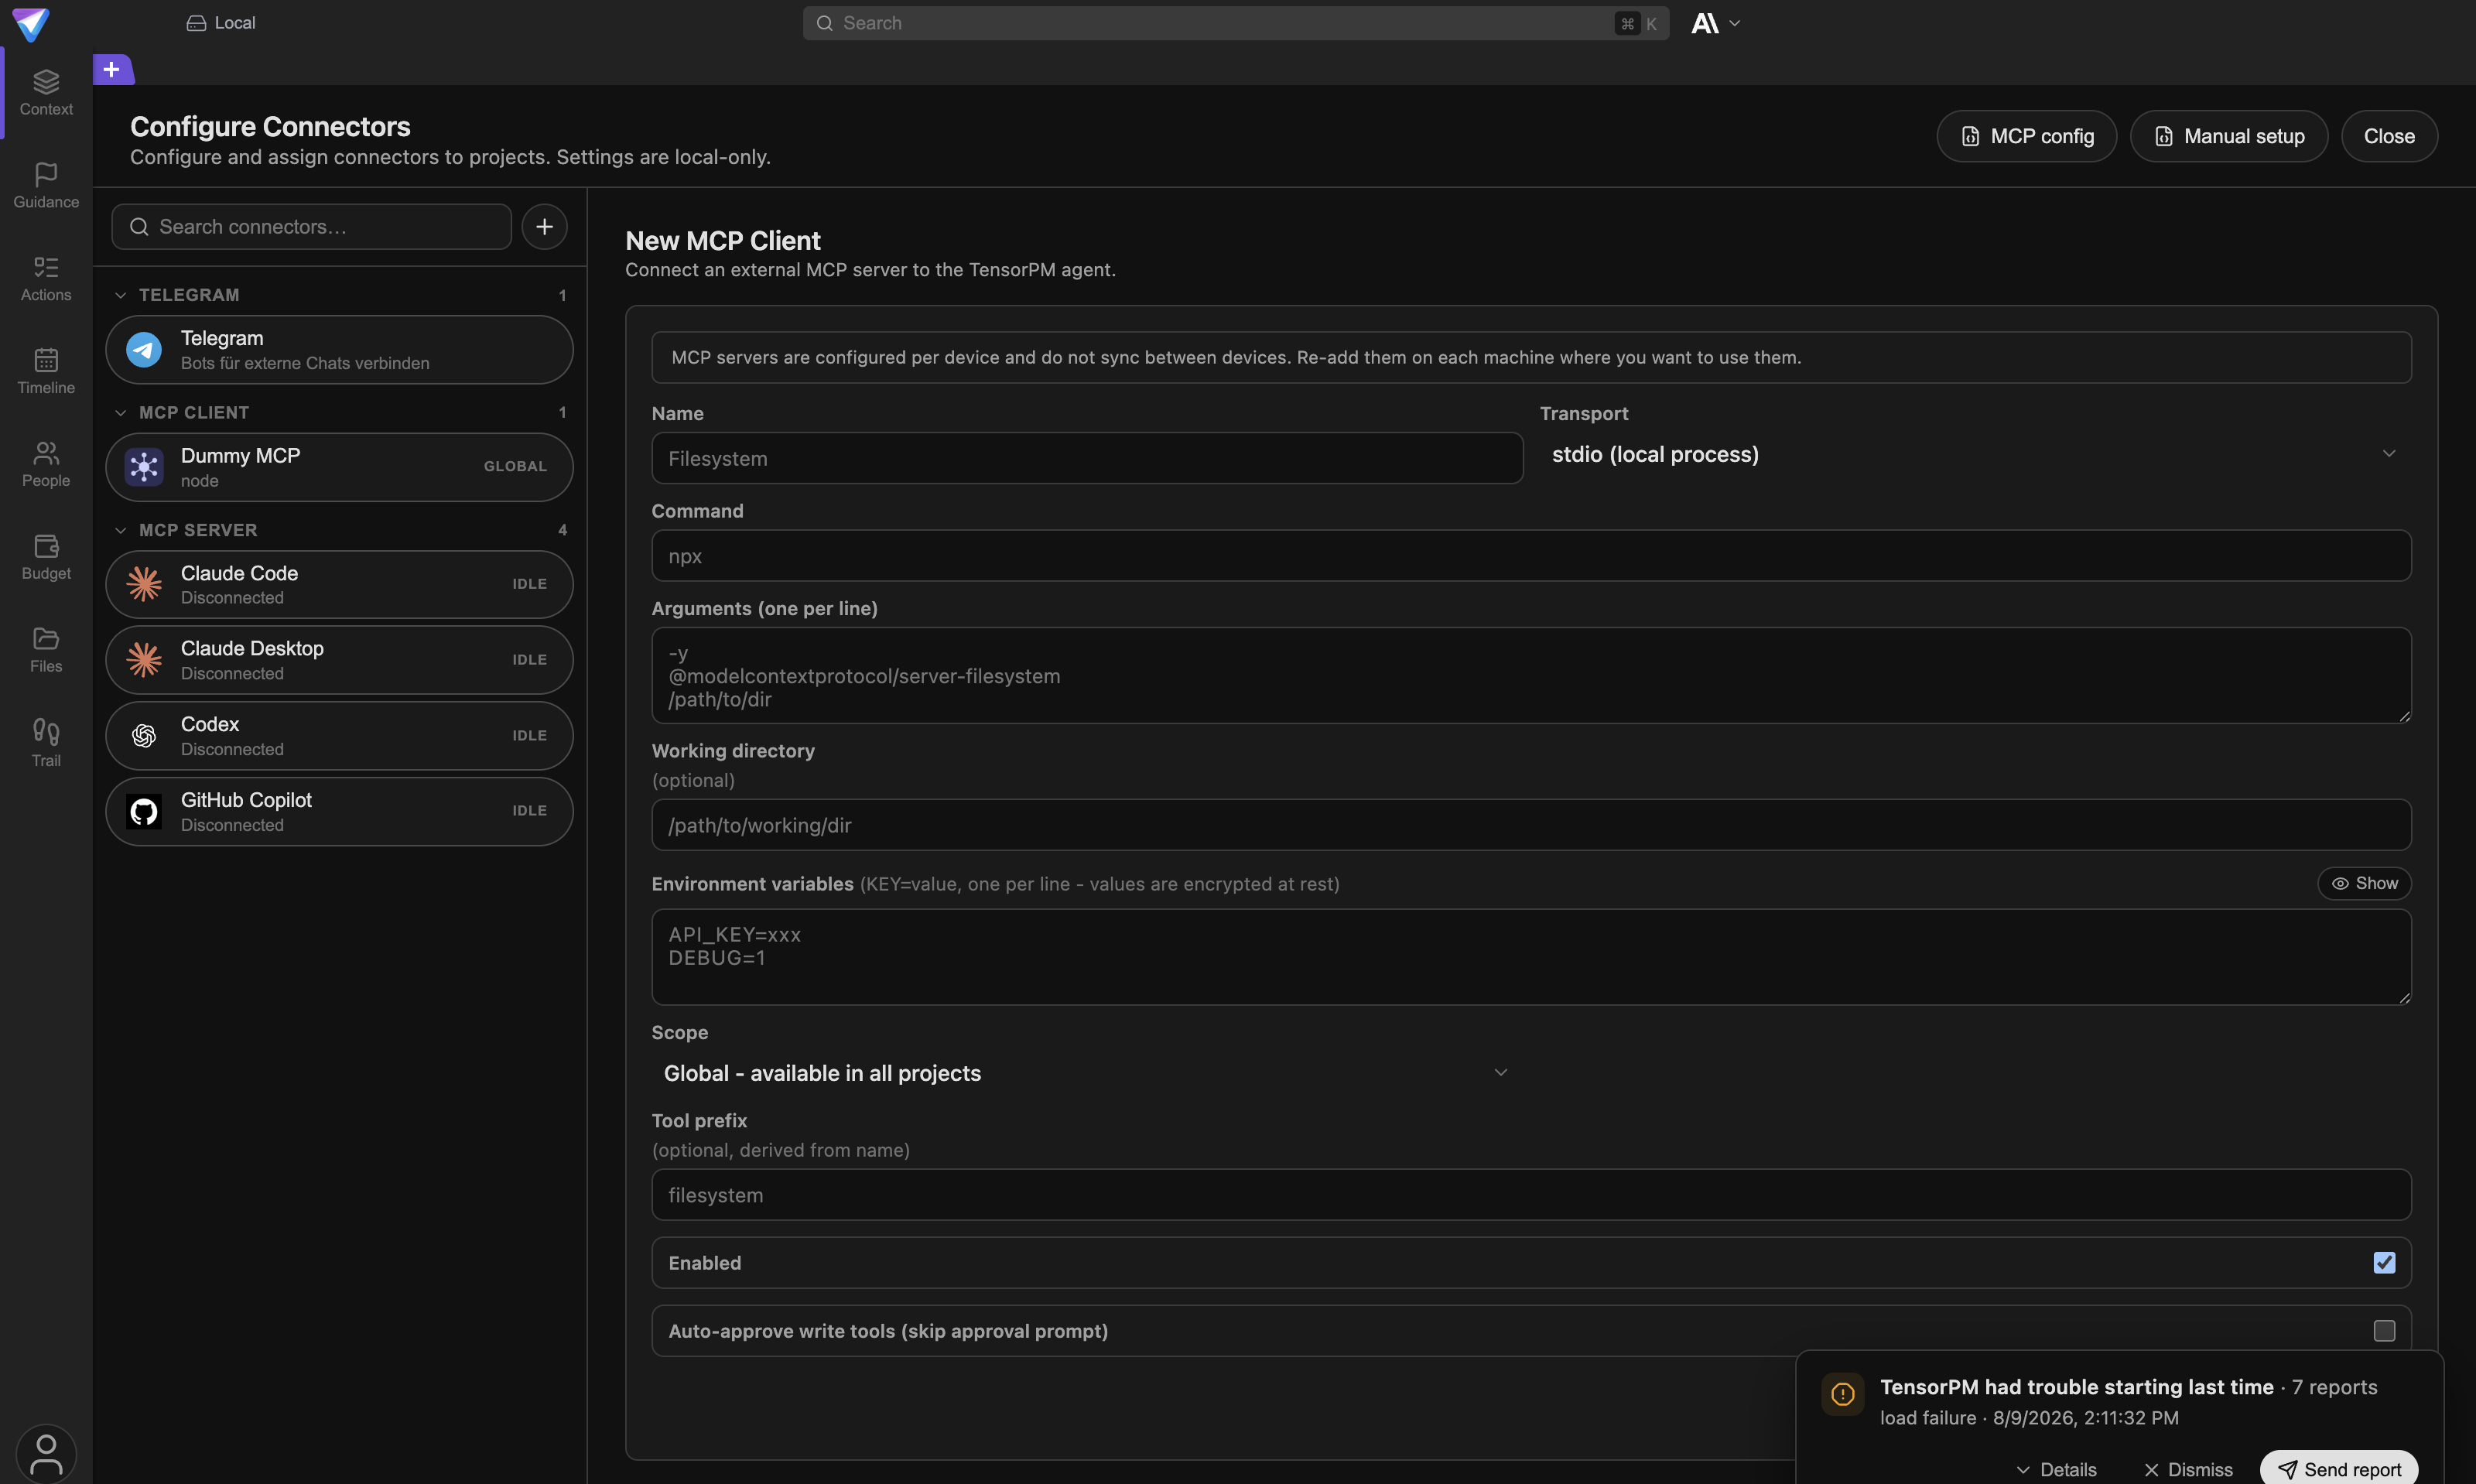
A note at the very top is easy to miss: MCP servers are configured per device and do not sync between devices. On a second machine you set them up again.
Fields in the form
Name: your own name for the connection, for example "Filesystem".Transport:stdio (local process)if the program runs on your machine, orHTTP (streamable)if it is reachable at a web address.CommandandArguments (one per line): the program to start and its startup details. The provider of the respective MCP server supplies these. With HTTP you getURLandHeadersinstead.Working directory: optional, the folder the program should work in.Environment variables: entries in the formKEY=value, one per line. Values are stored encrypted.ShowandHidecontrol whether they are visible in plain text.Scope:Global - available in all projectsorProject - only in selected project.Tool prefix: optional. A short marker put in front of this connection's tools so you can tell in chat where a tool came from.Enabled: switches the connection on or off.Auto-approve write tools (skip approval prompt): off by default, and rightly so.
Important: As long as
Auto-approve write tools (skip approval prompt)stays off, TensorPM asks in chat before every change this server would make. Only turn it on for connections you trust completely.
Save with Save MCP Client. Afterwards you can use Refresh in the detail area to load the tool list, and Available tools shows what this connection actually offers.
Manual setup for other programs
The Manual setup button in the top right goes the other way. It shows the configuration you use to register TensorPM inside another MCP-capable program that is not in the built-in installer list.
We deliberately show no screenshot of this view. It contains the install path and environment values of your specific machine, and those differ on every computer. Never copy such values out of a guide. Always copy them from the view itself.
The view contains:
MCP server binary: the path to the TensorPM server program, withCopyputting it on the clipboard.Bridge auth token: the key the other program signs in with. TensorPM manages it automatically in a protected file.Config snippet: the ready-made text block to paste, asJSON (Claude Desktop, Cursor, generic),TOML (Codex), orYAML (Continue).Copy snippetputs it on the clipboard.
Important: Do not put the token in your config file yourself. The MCP server reads it from disk at runtime. If it says
Token file missing, start the TensorPM app first.
For the common programs you do not need any of this. Antigravity, Cline, Continue, Cursor, Windsurf, and Zed are listed in the + menu under Install MCP Server in… and are set up with one click.
What happens to incoming messages
A connector never writes straight into your project context. The path always leads through a queue you control.
Incoming signals
Incoming content shows up as signals. You open them via the mailbox icon in the top right of the header bar. The number beside it says how much is waiting.
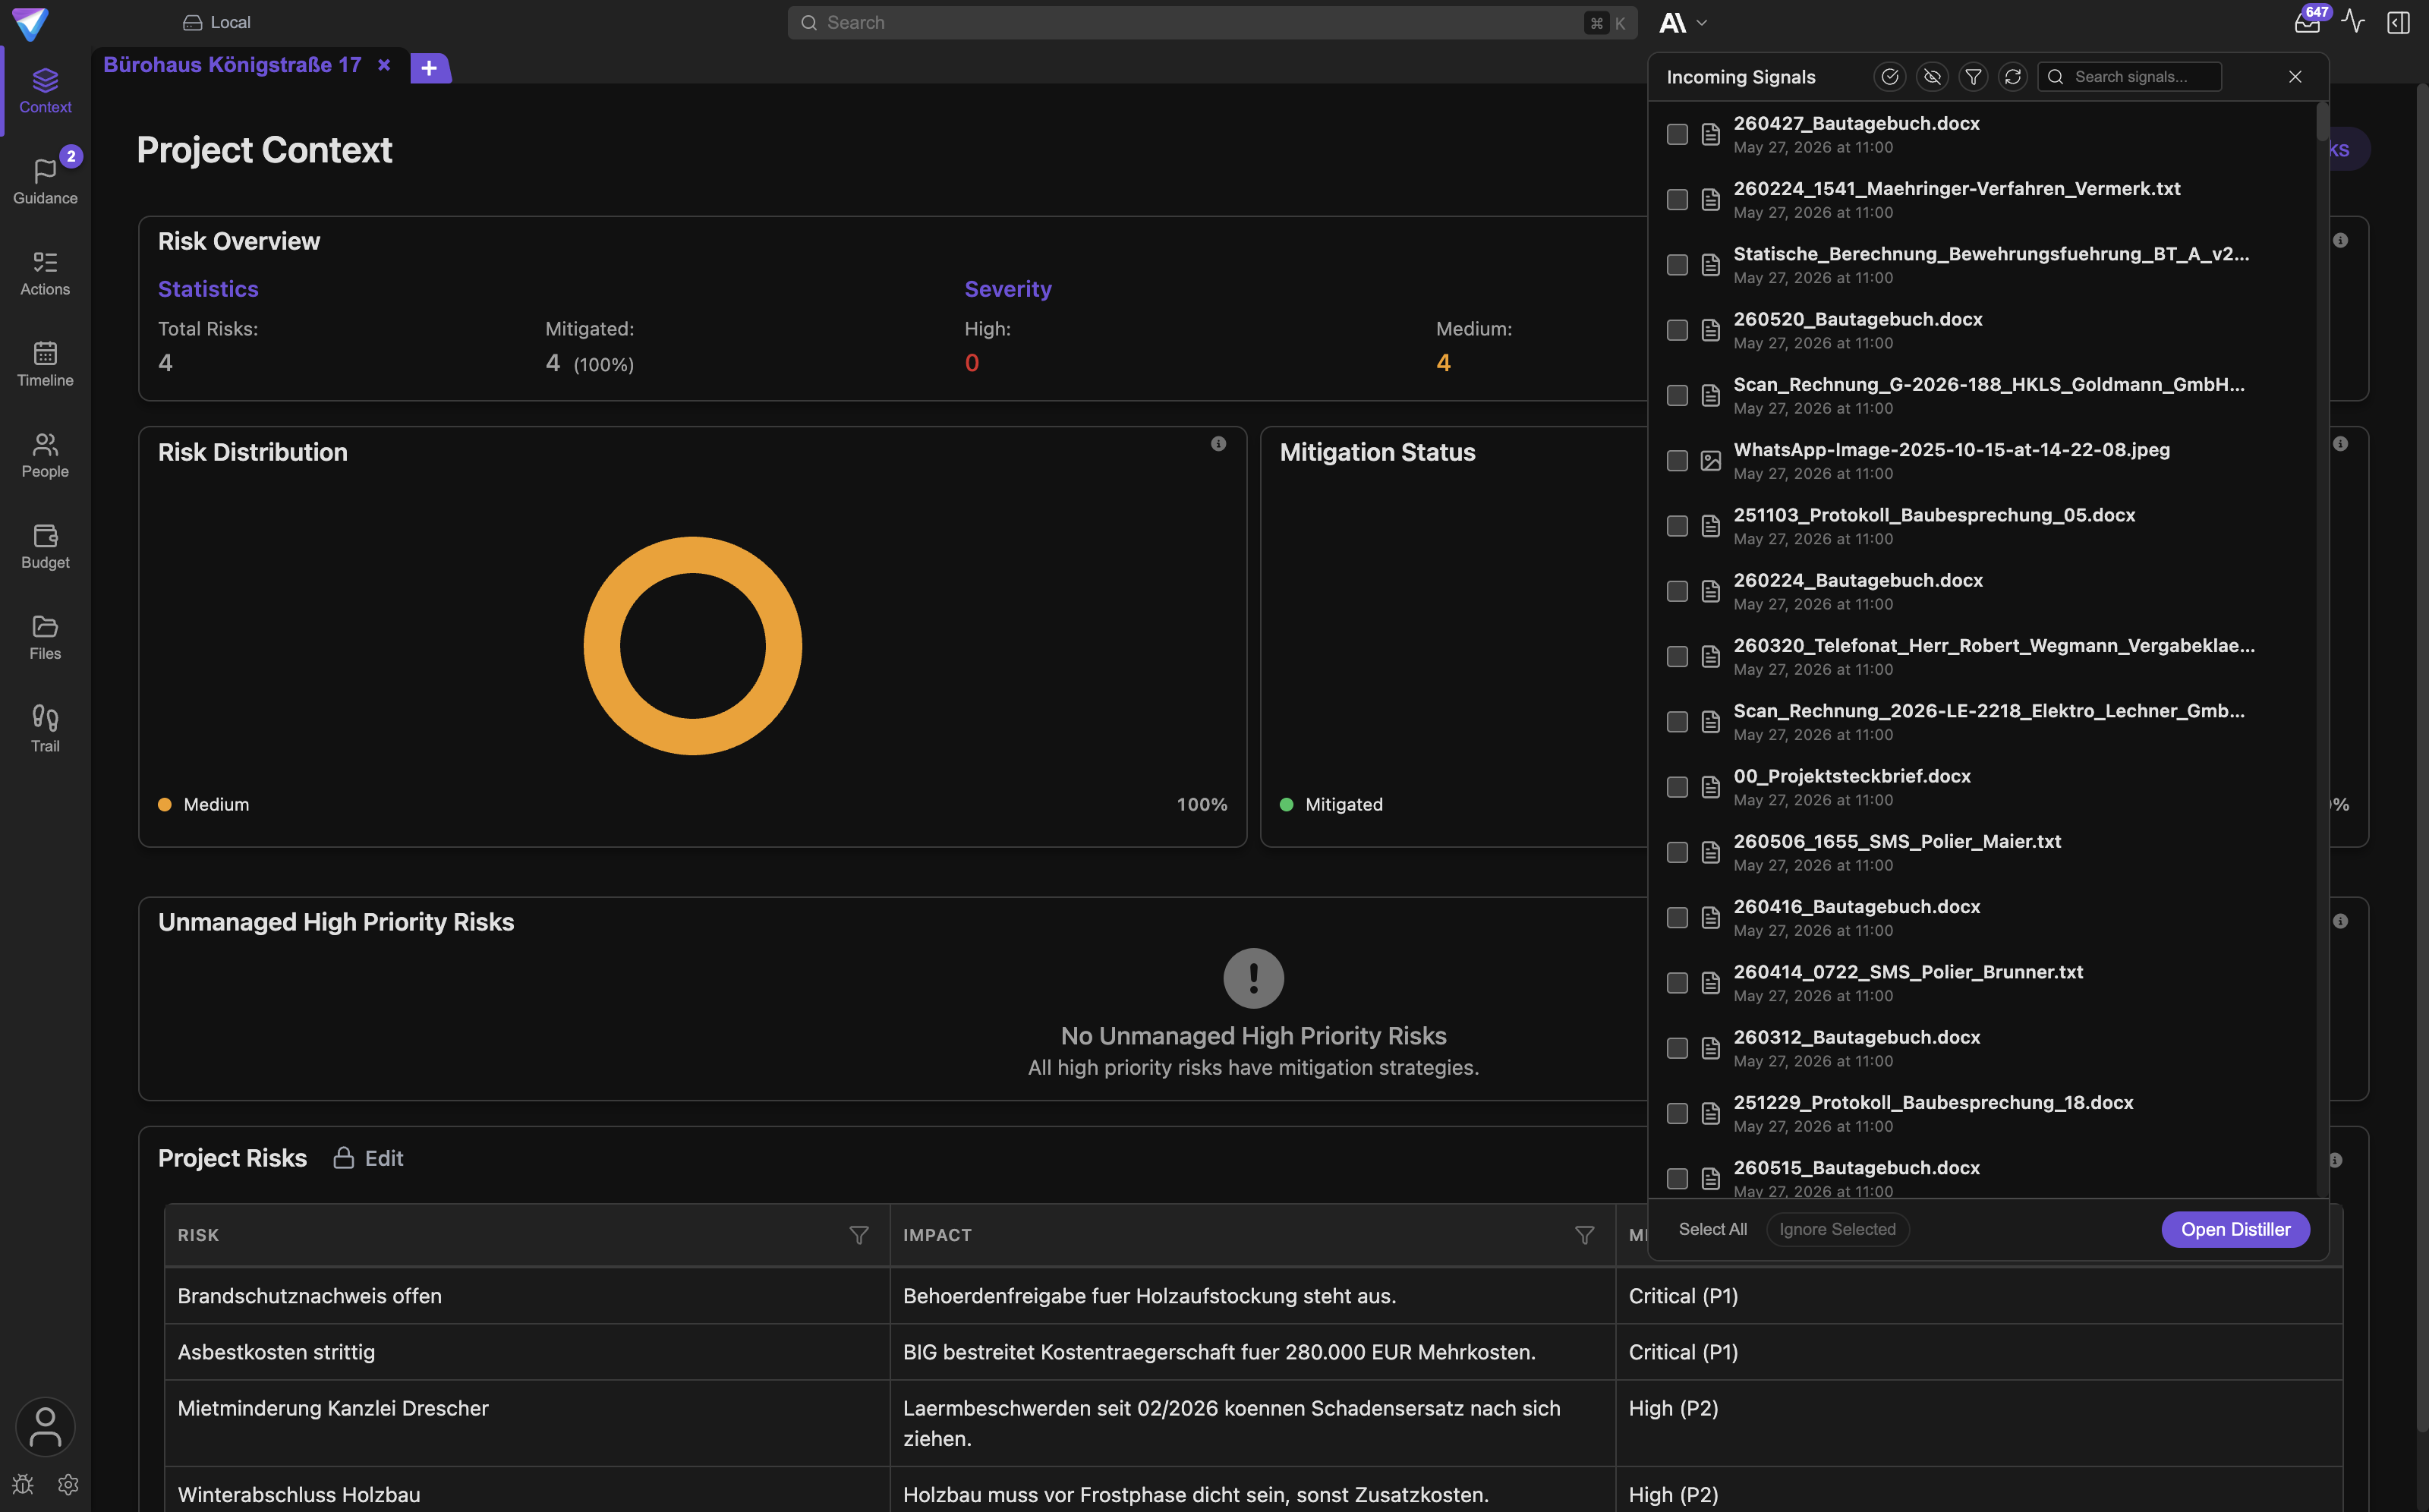
The panel has three views:
Incoming Signals: everything not yet assessed.Proposed Changes: what the Distiller made of it.Ignored Signals: what was sorted out.
Inside Incoming Signals you can filter by source: Files, Emails, and MCP Signals. That last filter shows that external programs can deliver signals over MCP too.
Per entry you can:
Ignore for distillation: sort the signal out.Include for distillation: bring an ignored signal back.- Select several and sort them out together with
Ignore Selected. Open Distiller: have the selected signals assessed.
Automatic relevance check
Settings -> General holds the Auto Relevance Check for Intakes switch. When it is on, a small AI pass checks every new connector email for relevance in the background.
Obvious noise and spam move into Ignored Signals together with the reason. You can restore any of them at any time. The result is carried forward, so nothing is checked twice.
The switch consumes AI credits, because it queries an AI provider. See Account & AI Modes for more.
Proposed changes
The Distiller turns the released signals into individual, clearly bounded proposed changes to the project context. Each proposal is small enough to accept or reject on its own: Approve, Append, or Skip.
Your project context only changes once you apply the proposals. Files, Intake & Trail describes how that works in detail.
Sending email: one approval per message
The project agent may search connected mailboxes, read messages, and prepare drafts or replies. Sending is a separate step.
A prepared draft appears as an Email Draft card in chat with the status Awaiting approval. The card shows you:
- the recipients
- the subject
- the full message body, not just a summary
- the plain-text alternative, if present
- the attachments
- the connector used, meaning which mailbox it would be sent from
Check all six points. Only then Approve & Send. The status then changes to Sent.
Why this is so strict: a sent email cannot be recalled. And the recipient list is the single most common place where an automatically generated draft gets it wrong.
If the draft is edited afterwards or replaced by a new one, the old approval loses its validity. The old draft gets the status Replaced. That way an approval you once gave can never authorize a different message.
If sending fails, the card reads Send failed. Fix the problem at the connector, for example an expired password, and use Retry Send. Only create a second draft if the content should actually change.
Changing the calendar: one approval per proposal
The same principle applies to the calendar, no matter whether it is connected through Microsoft 365 or the local macOS calendar.
The agent puts a proposal into chat as a card headed New Calendar Event or Calendar Event Change. The card shows subject, time range, and location. For a change you see what differs from the existing event. If the subject stays the same, it says (Subject unchanged).
You have two options:
Approve & Apply: the proposal is written into the real calendar.Discard: nothing happens, the calendar stays untouched.
The approval covers only this one proposal. It cannot be transferred to a different event.
If applying fails, the proposal stays in place. Repair the cause, for example revoked calendar access, and use Retry.
MCP tools: approval per action
When the project agent wants to use a tool from an MCP connection that could change data, an approval card headed Permission requested appears in chat.
The card states:
Connector: which connection the tool comes from.Action: what is about to happen.Inputs: with which values.Show detailsreveals them in full.- The warning
Changes data, respectivelyThis action could change or remove data.
You decide with:
Allow: this one time only.Don’t allow: the action is cancelled.Always allow: future actions from this server run without asking.
Always allow is convenient, and for exactly that reason it deserves care. Use it only for connections you set up yourself and whose scope you know.
Privacy and boundaries
- Connector credentials and sign-ins stay on the device. They are not synced to the cloud.
- The connector configuration itself is device-local. On a second machine you set it up again.
- Always pick the smallest useful slice: few folders, one calendar, a sensible lookback period.
- The project assignment controls which project new signals appear in.
Private inputandWorkspace inputonly control the visibility of the queue. Applied changes always belong to the shared project.- Incoming content is data, not instructions. No text in an email can replace an approval.
- Every outbound action needs a visible approval tied to that exact proposal.
- The local calendar cannot delete events and cannot change attendees.
- Telegram is a chat bridge and delivers no signals into the intake queue.
- Removing a connector stops future access. Signals already imported stay on the device. Decide separately whether you want to remove those too.
Encryption explains how synced data is protected.
Common questions
Do I have to give TensorPM my mail password?
For Local email, no, there TensorPM only reads what is already on your machine. For Microsoft 365 also no, there the sign-in runs through Microsoft itself. Only the Email Connector over IMAP/SMTP needs a password or app password.
Does TensorPM read my whole mailbox? No. With local email you pick the folders explicitly, and there is deliberately no select-all. With the IMAP connector, the lookback period additionally limits how far back it reaches.
Can TensorPM send an email without me?
No. Every send needs Approve & Send on a card that shows the full content.
Can I get calendar access without a Microsoft account?
Yes, on macOS through the Local calendar connector. It reads the calendar straight from the machine.
Why do I not see Local email or Local calendar in the list?
Because your operating system does not support them. Both require macOS, and local email additionally requires a configured Apple Mail.
Can I connect Outlook or Thunderbird locally? Not yet. Only Apple Mail is implemented today. Outlook on Windows and Thunderbird are planned. As an interim route, Outlook works over Microsoft 365 or over IMAP/SMTP.
Why do my Telegram messages not show up in the intake queue? Because Telegram is only a chat bridge. It exists so you can chat with TensorPM, not so it can read project content in.
Do my connectors sync to my second device? No. Connectors are device-local and are set up on each machine separately. The approved project changes they produce do sync normally, see Cloud Sync.
What happens to an ignored signal?
It stays in Ignored Signals and is not assessed. Include for distillation brings it back at any time.
When something goes wrong
The connector imports no signals. Check in this order:
- Does the entry carry a badge such as
DISABLED,RECONNECT,SIGN IN, orSELECT FOLDERS? Then handle exactly that first. - Is at least one project assigned? Without a project assignment the connector reads nothing.
- Do the selected folders and the lookback period fit? On an older project a 30-day default is quickly too short.
- Click
Sync now. The response reports how many items were scanned, imported, and skipped. - Check the filters in the signals panel and take a look at
Ignored Signals.
The status jumps to RECONNECT.
The provider sign-in expired or was revoked. Open the connector and click Reconnect. Sign in with the same account the connector was configured for. With a different account TensorPM reports a mismatch and stops.
The Microsoft sign-in is rejected. That is usually a company policy, not a fault. Your IT has to approve TensorPM (admin consent).
Local email finds no folders.
Almost always Full Disk Access is missing. Grant the permission, restart TensorPM completely, then Check again.
The local calendar shows Access missing.
Click Allow Calendar access. If macOS shows no prompt, use Open System Settings and set the permission by hand. Then Check again.
It says No writable calendar was found.
Subscribed calendars as well as holiday and birthday calendars are read-only. Create your own calendar in the macOS Calendar app.
The MCP client loads no tools.
Check whether Enabled is set, because a switched-off server delivers nothing. Then verify Command and Arguments, respectively URL. In the detail area, Last error shows the cause.
An approval card stops responding.
If the draft was replaced in the meantime, the old card is deliberately invalidated and carries the status Replaced. Continue with the new card.
More symptoms and fixes are in Troubleshooting.
Next steps
- Review and trace incoming changes: Files, Intake & Trail
- Connect external AI programs: Agent Integrations
- Understand which data leaves the device: Cloud Sync
- Configure AI usage and providers: Account & AI Modes
- Diagnose common issues: Troubleshooting