
Einstellungen & Backups
Kurz gesagt
Die Einstellungen sind der eine Ort, an dem du TensorPM auf dich einstellst: Darstellung, Sprache,
Verhalten der KI, Währung, Projektstrukturplan und das Backup deiner Datenbank. Der Dialog hat genau
drei Tabs: Allgemein, KI und Info. Ein Backup sichert die TensorPM-Datenbank, also alle
Projekte, Aufgaben, Personen, Budgets und Einstellungen. Es sichert nicht die Dateien in deinem
Projektordner. Dieser Artikel geht jede Gruppe und jeden Schalter durch und erklärt am Ende, wie eine
belastbare Datensicherung im Berufsalltag aussieht.
Wann du das brauchst
- Du willst die Oberfläche auf Deutsch oder Englisch stellen, oder du arbeitest lieber im hellen Design.
- Du willst wissen, welche KI-Funktionen von allein im Hintergrund laufen, und einige davon abschalten.
- Du willst wissen, wo deine Projektdateien auf der Festplatte liegen, oder sie auf ein anderes Laufwerk legen.
- Du planst einen großen Import, einen Umbau der Projektstruktur oder einen Gerätewechsel und willst vorher ein Backup.
- Du hast dir Daten zerschossen und willst einen älteren Stand zurückholen.
- Der Support fragt nach deiner Version, nach Protokolldateien oder nach einem Support-Paket.
Die Einstellungen öffnen
Unten links in der Seitenleiste stehen drei Symbole nebeneinander: der Konto-Button, der
Fehler-melden-Button und ein Zahnrad. Klick auf das Zahnrad. Der Tooltip lautet
Einstellungen öffnen. Es öffnet sich ein Bereich mit dem Titel Einstellungen und der Tab-Leiste
Allgemein, KI, Info.
Du musst dafür nicht über den Konto-Button gehen. Konto, Abo und Credits liegen im Konto-Popover,
nicht in den Einstellungen. Mehr dazu steht in Konto & KI-Modi.
Alle Einstellungen gelten für TensorPM auf diesem Gerät. Sie werden nicht in die Cloud
synchronisiert. Nur die wenigen Punkte, die ausdrücklich am geöffneten Projekt hängen (siehe
Projekt-Einstellungen und Währung), gehören zum Projekt.
Der Tab Allgemein
Der Tab Allgemein besteht aus aufklappbaren Gruppen. Klick auf eine Überschrift, um sie zu öffnen
oder zu schließen. Zwei Gruppen erscheinen nur, wenn ein Projekt geöffnet ist.
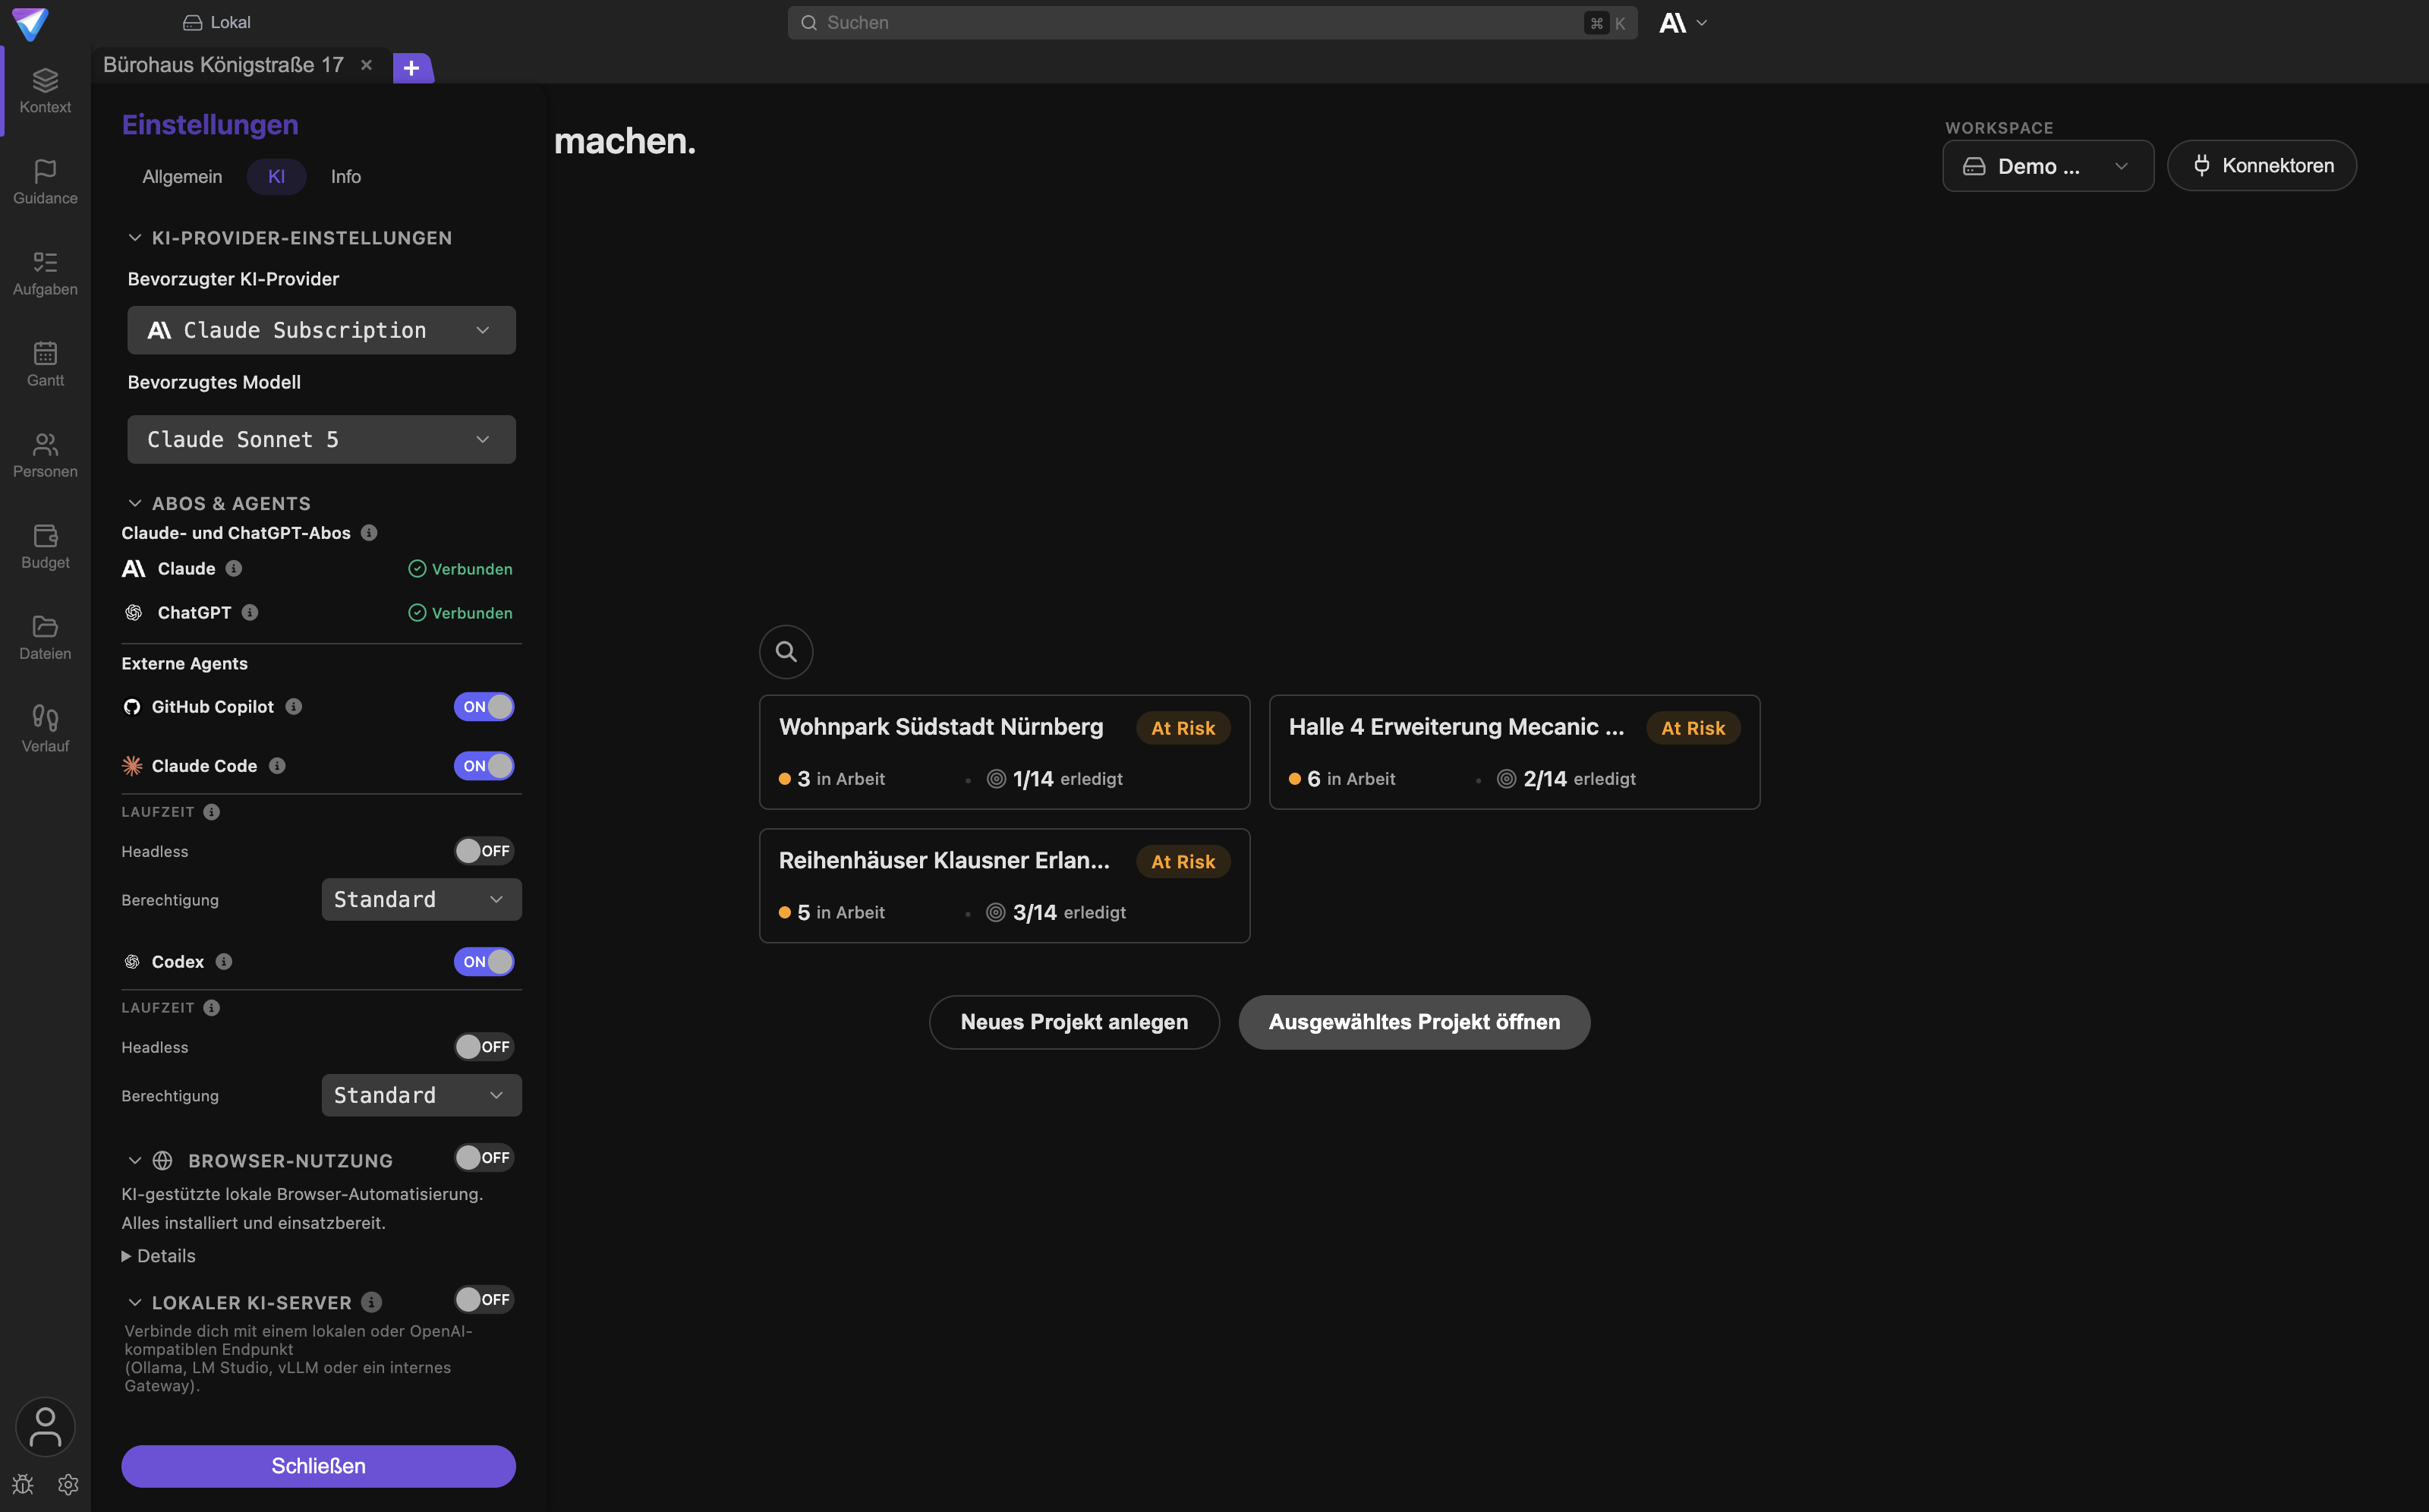
Dein Name
Hier trägst du deinen Anzeigenamen ein. Der Projektagent benutzt ihn, wenn du ihm das erlaubst
(siehe Schalter Mit Vornamen ansprechen). Der Name landet außerdem in Einträgen, die du erzeugst.
Trag den Namen ein, unter dem dich dein Team kennt.
Darstellung
| Schalter | Standard | Was er bewirkt |
|---|---|---|
Zeilenränder anzeigen |
an | Zieht in Listen und Tabellen dünne Trennlinien zwischen den Zeilen. Ausschalten wirkt ruhiger, macht lange Tabellen aber schwerer lesbar. |
Animationen anzeigen |
an | Blendet Panels und Menüs weich ein. Auf einem älteren Rechner lohnt sich Ausschalten. |
Theme |
Systemeinstellung verwenden |
Auswahl zwischen Systemeinstellung verwenden, Hell und Dunkel. |
Kompakte Seitenleiste |
aus | Zeigt die linke Navigation nur als schmale Symbolleiste. Die Beschriftungen erscheinen weiterhin, wenn du mit der Maus darüberfährst. Nützlich auf kleinen Bildschirmen. |
Vereinfachte Prioritätsskala |
aus | Zeigt Prioritäten als Zahl von 1 bis 10 statt von 1 bis 100. Das ist reine Anzeige. Intern rechnet die KI weiter mit der feineren Skala. |
KI
Diese Gruppe regelt, was die KI von allein tut. Jeder eingeschaltete Punkt kann KI-Credits verbrauchen, wenn du über TensorPM als Anbieter arbeitest.
| Schalter | Standard | Was er bewirkt |
|---|---|---|
Mit Vornamen ansprechen |
an | Der Projektagent redet dich mit deinem Anzeigenamen an. |
Automatische KI-Priorisierung |
an | Bewertet neue oder geänderte Aufgaben im Hintergrund und setzt ihre KI-Priorität. Ausschalten, wenn du Prioritäten ausschließlich selbst vergeben willst. |
Täglicher Projektstatus-Check |
aus | Bewertet einmal am Tag Status, Fortschritt und Risiken des aktiven Projekts, sobald ein KI-Anbieter erreichbar ist. |
Proaktive Projekt-Check-ins |
aus | Der Projektagent prüft aktive Projekte nach Zeitplan und meldet sich per Systembenachrichtigung, wenn etwas deine Aufmerksamkeit verdient. Nur mit Pro oder Business. |
Automatische Relevanzprüfung für Intakes |
aus | Prüft eingehende E-Mails aus Konnektoren mit einer kleinen, günstigen KI-Abfrage und schiebt offensichtliches Rauschen mit Begründung in Ignorierte Signale. Wiederherstellbar. |
KI-erstellte Einträge mit [AI] kennzeichnen |
aus | Neue Aufgaben und Kategorien, die die KI anlegt, bekommen [AI] in den Titel. Wirkt nur auf neue Einträge. |
Beim ersten Einschalten von Proaktive Projekt-Check-ins erscheint der Hinweis
Bevor du Check-ins aktivierst. Er sagt dir, dass jeder geplante Check-in eine KI-Anfrage pro
aktivem Projekt kostet und Projektkontext an deinen gewählten KI-Anbieter geht. Erst nach
Check-ins aktivieren läuft der Zeitplan.
Ist der Schalter aktiv, erscheinen darunter weitere Felder:
Häufigkeit:Zweimal täglich,Täglich,Alle 2 Tage,Wöchentlich. Standard istTäglich.Check-in-Zeit, Standard 07:30. BeiZweimal täglichkommtZweite Check-in-Zeitdazu.Wochentag, nur beiWöchentlich. Standard Montag.Manueller Check-inmit dem ButtonJetzt ausführen. Der läuft einmalig und ändert den Zeitplan nicht.- Ein Hinweis, dass Systembenachrichtigungen für TensorPM erlaubt sein müssen, mit dem Button
Einstellungen öffnenfür macOS und Windows.
System
| Einstellung | Standard | Was sie bewirkt |
|---|---|---|
Session beim Start wiederherstellen |
an | Öffnet beim Start wieder alle Projekt-Tabs, die beim Beenden offen waren. |
Sprache |
System |
System, English oder Deutsch. System folgt der Sprache deines Betriebssystems. |
Update-Channel |
Stable |
Stable installiert nur fertige Versionen. Beta installiert Vorabversionen mit frühen Funktionen, die noch Ecken und Kanten haben können. Auf einem Rechner, an dem echte Projekte hängen, bleibst du auf Stable. |
Erweiterte Projekt-Einstellungen |
zugeklappt | Ein Button, der den Projektordner einblendet. Der Button wechselt dann auf Ausblenden. |
Geführte Tour |
keine | Der Button Tutorial starten spielt die Einführungstour erneut ab. Du kannst sie jederzeit wiederholen. |
Projektstrukturplan
Hier schaltest du den Projektstrukturplan (PSP) ein und aus, wählst eine Vorlage wie
Bau / Gewerke oder Leer starten und legst das Code-Schema fest. Ist der PSP aktiv, erscheint in
der linken Navigation der Bereich Arbeitspakete. Deaktivieren behält alle Felder, du kannst also
gefahrlos zurückschalten. Der ganze Ablauf inklusive Bestätigung mit Übernehmen und aktivieren
steht in Arbeitspakete & Projektstrukturplan.
Kommunikations-Tools
Vier Schalter: Microsoft Teams, Slack, WhatsApp, Signal. Alle sind standardmäßig aus. Sie
schalten keine Verbindung frei und senden nichts. Sie blenden lediglich zusätzliche Einträge im
Kontextmenü der Personen-Ansicht ein, mit denen du eine Person direkt anschreibst. Teams und Slack
brauchen dafür eine hinterlegte E-Mail-Adresse, WhatsApp und Signal eine Telefonnummer. Mehr zur
Personen-Ansicht steht in Ressourcen & Personen.
Projekt-Einstellungen
Diese Gruppe erscheint nur, wenn ein Projekt geöffnet ist, und gilt nur für dieses Projekt.
Sie enthält einen Schalter: Verfügbaren Aufwand/Budget anzeigen, Standard aus. Eingeschaltet zeigt
die Aufgabenansicht zusätzlich, wie viel Aufwand und Budget noch frei sind.
Währung
Auch diese Gruppe braucht ein geöffnetes Projekt.
Anzeige-Währung: in welcher Währung Beträge im Projekt dargestellt werden.Währungssymbole anzeigen: aus zeigt Codes wie EUR, an zeigt Symbole. Standard ist der Code.Wechselkurse automatisch aktualisieren: Standard aus. Eingeschaltet holt TensorPM täglich Referenzkurse von einem kostenlosen Dienst. Übertragen werden nur Währungscodes, die Kurse liegen 24 Stunden lokal zwischen. Es sind Referenzkurse, keine Handelskurse.Erweiterte Währungs-Einstellungenblendet dieSpeicher-Währungein (Standard EUR) und den ButtonWechselkurse aktualisieren.
Wichtig: Ein Wechsel der
Speicher-Währungkonvertiert alle bestehenden Daten. Die App warnt dich mitAchtung: Das konvertiert alle bestehenden Daten.Mach vorher ein Backup.
Datenbank-Backup
Die letzte Gruppe im Tab Allgemein. Sie enthält die Buttons Backup erstellen und
Backup wiederherstellen, den Hinweistext, wie viele Backups verfügbar sind, den Button
Ordner öffnen und eine Liste der letzten fünf Backups mit Datum, App-Version und Betriebssystem.
Die Details stehen weiter unten in diesem Artikel.
Der Projektordner
Wo deine Projekte liegen
TensorPM trennt zwei Dinge sauber:
- Die Datenbank. Darin stehen alle strukturierten Daten: Projekte, Aufgaben, Arbeitspakete, Personen, Budgets, Entscheidungen, Verlauf und deine Einstellungen. Sie liegt im Datenordner der Anwendung und wird vom Backup erfasst.
- Der Projektordner. Das ist ein ganz normaler Ordner auf deiner Festplatte, in dem die Dateien
zu einem Projekt liegen: Pläne, Protokolle, Angebote, Fotos, erzeugte Dokumente. Diesen Ordner
siehst du auch im Finder oder Explorer, und du siehst ihn in der Ansicht
Dateien.
Es gibt einen Standard-Projektordner für neue Projekte und optional einen eigenen Ordner je Projekt.
Den Ordner ansehen und ändern
- Öffne
Einstellungen->Allgemein->System. - Klick auf
Erweiterte Projekt-Einstellungen. - Du siehst ein Feld mit dem aktuellen Pfad. Ist ein Projekt geöffnet, heißt es
Projektordner (<Projektname>), sonstProjektordner (Standard). - Ein Klick auf das Pfadfeld öffnet den Ordner im Finder oder Explorer.
- Der Button
Projektordner ändern(ohne geöffnetes Projekt:Standard-Projektordner ändern) öffnet die Ordnerauswahl deines Betriebssystems. - Hat ein Projekt einen eigenen Ordner, erscheint zusätzlich
Standardordner verwenden. Damit nimmst du die Sonderregel zurück und das Projekt fällt auf den Standardordner zurück.
Nach dem Ändern des Standardordners meldet die App:
Standard-Projektordner aktualisiert. Bitte starte TensorPM neu, damit die Änderung vollständig wirksam wird.
Was du dabei beachten musst
- Die Änderung verschiebt keine Dateien. TensorPM zeigt ab sofort den neuen Ort an. Vorhandene Dateien bleiben dort, wo sie waren. Wenn du sie mitnehmen willst, kopierst du sie vorher im Finder oder Explorer selbst an den neuen Ort.
- Netzlaufwerke und Cloud-Ordner sind erlaubt, aber heikel. Ein Ordner in OneDrive, Dropbox oder auf einem Serverlaufwerk funktioniert, solange er beim Start der App erreichbar ist. Ist er es nicht, siehst du leere Dateilisten. Prüfe bei so einem Ordner auch, ob dein Arbeitgeber das erlaubt.
- Ein Ordner pro Projekt hält Ordnung. Zeig nicht mehrere Projekte auf denselben Ordner.
- Der Projektordner ist nicht im Datenbank-Backup enthalten. Das ist der wichtigste Punkt und der Grund für den Abschnitt weiter unten.
Wie TensorPM Dateien liest, zusammenfasst und im Verlauf nachhält, steht in Dateien, Signale & Verlauf.
Der Tab KI
Der Tab KI bestimmt, welcher KI-Anbieter arbeitet und welche Zusatzwerkzeuge bereitstehen. Welche
Gruppen du siehst, hängt von deinem Tarif ab.
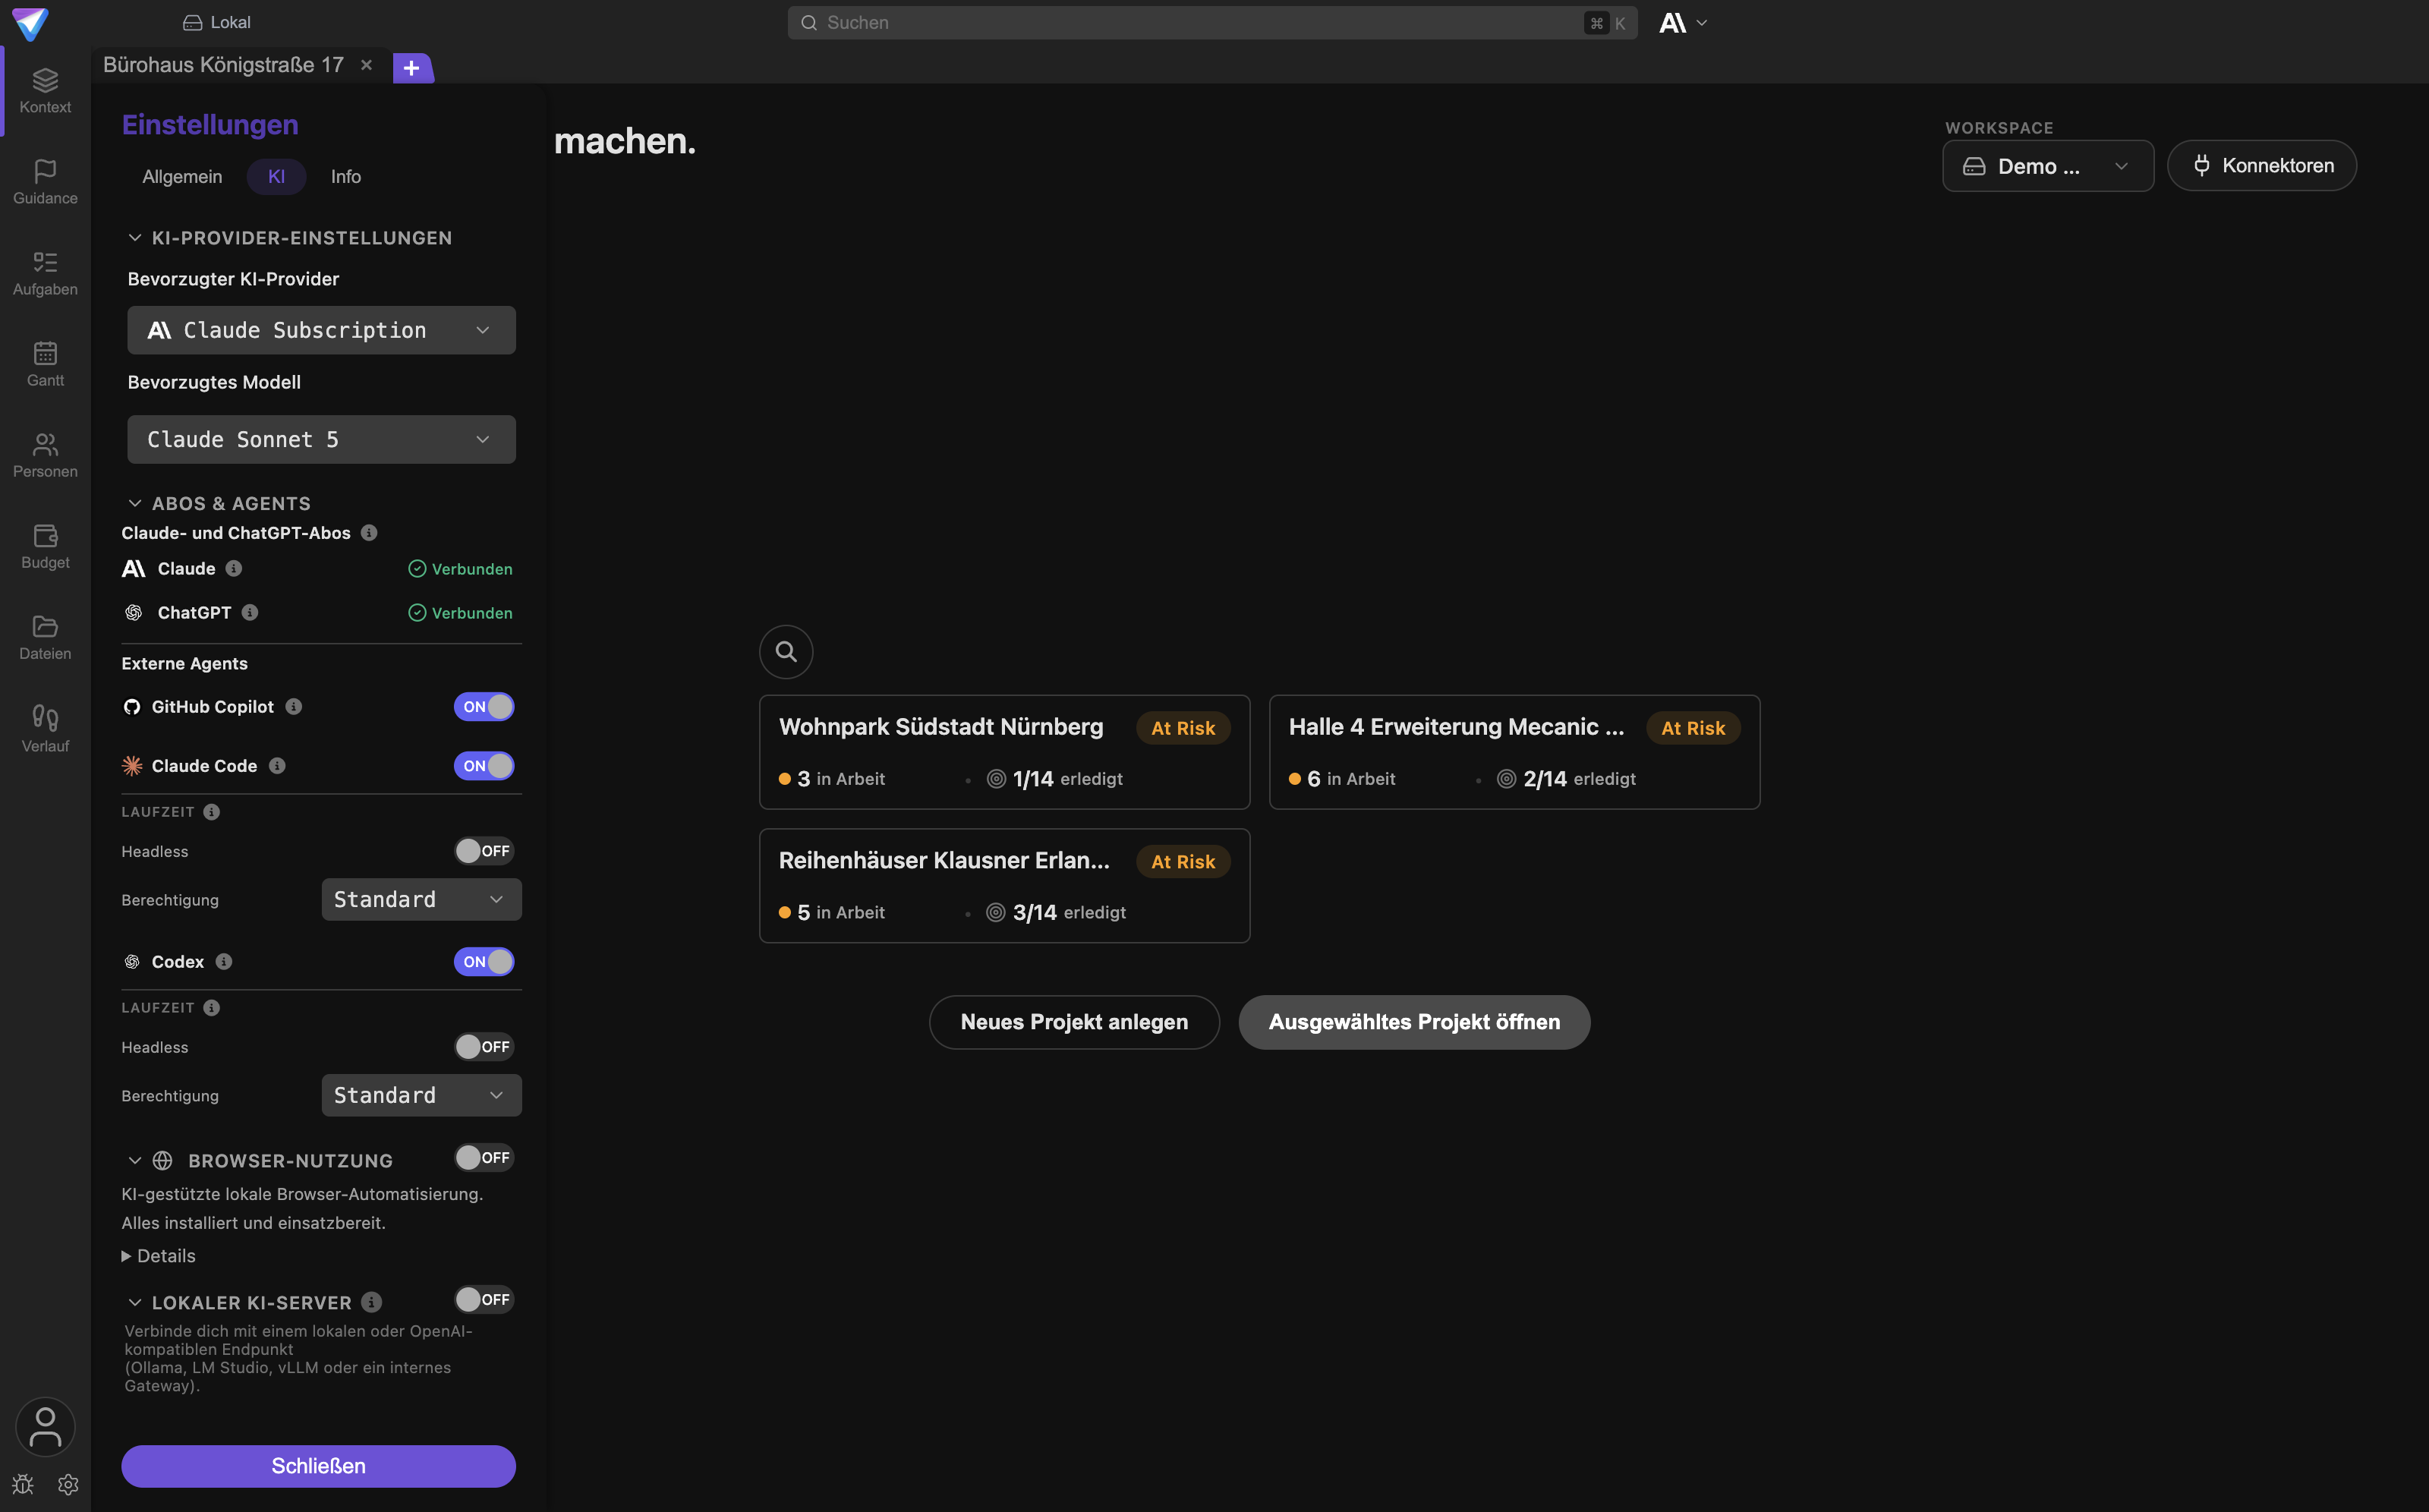
KI-Provider-Einstellungen
Hier wählst du unter Bevorzugter KI-Provider aus, wer die KI-Anfragen beantwortet, und unter
Bevorzugtes Modell, welches Modell dieser Anbieter benutzt. Bei Anthropic kommt ein Schalter
Thinking dazu, der ausführlicheres Nachdenken erlaubt.
Ist TensorPM als Anbieter aktiv und du angemeldet, siehst du hier auch deinen Credit-Stand. Ist gar
kein Anbieter eingerichtet, erscheint der Hinweis KI-Funktionen nicht verfügbar: mit den Wegen, die
dir offenstehen. Welche Wege es gibt und was sie kosten, steht in
Konto & KI-Modi.
Abos & Agents
Hier meldest du ein bestehendes Claude- oder ChatGPT-Abo an und schaltest externe Agents frei, an die TensorPM Programmier- und Repository-Aufgaben abgeben darf. Die Zugangsdaten bleiben bei der jeweiligen lokalen Anwendung. Details in Agent-Integrationen.
Browser-Nutzung
Schaltet die lokale, KI-gesteuerte Browser-Automatisierung frei. Die Gruppe prüft die
Voraussetzungen und bietet die Installation an. Der Schalter Headless bestimmt, ob der Browser
unsichtbar im Hintergrund läuft. Deaktiviere Headless, wenn du zusehen willst, was der Agent tut.
Lokaler KI-Server
Verbindet TensorPM mit einem lokalen oder OpenAI-kompatiblen Endpunkt, etwa Ollama, LM Studio oder vLLM. Du trägst die Adresse ein, lässt die Verbindung testen und wählst ein Modell. So bleiben alle Inhalte auf deinem Rechner.
KI-Keys und Websuche
Diese beiden Gruppen erscheinen nur im Tarif Business. Unter KI-Keys hinterlegst du eigene
Schlüssel für OpenAI, Anthropic, Google und Mistral. Der Schalter Verschlüsselung legt fest, ob die
Schlüssel zusätzlich lokal verschlüsselt abgelegt werden. Die Schlüssel gehen direkt an den jeweiligen
Anbieter und nie an TensorPM-Server. Unter Websuche trägst du einen Brave-Search-API-Key ein, der
automatisch genutzt wird, sobald er gültig ist.
Rate-Limits
Ebenfalls nur mit Business und nur mit eigenen Schlüsseln. Hier begrenzt du Anfragen pro Minute und
Tokens pro Minute je Anbieter, entweder von Hand oder über den Button Erkennen, der die Werte aus
den Antworten des Anbieters ausliest.
Der Tab Info
Der Tab Info ist die Auskunftsstelle: Version, Rechtliches und Support. Er hat drei Abschnitte.
Über
Zeigt das Logo und die Zeile Version <Nummer>. Direkt daneben steht der Update-Zustand. Mögliche
Anzeigen sind Suche nach Updates…, Du hast die neueste Version, Update auf <Version> verfügbar,
Wird heruntergeladen… <Prozent>% und Neu starten, sobald das Update fertig geladen ist. Der Button
Auf Updates prüfen erzwingt eine Prüfung und ignoriert frühere Erinnerungen. Bei Netzproblemen
erscheint Keine Verbindung mit Wiederholen.
Welcher Update-Kanal geprüft wird, hängt am Update-Channel im Tab Allgemein.
Rechtliches
Drei Links, die im Browser öffnen: AGB, Datenschutz und Impressum.
Mehr
Log-Ordner öffnen: öffnet den Ordner mit den Protokolldateien der Anwendung. Dort steht, was die App zuletzt getan hat. Das ist die erste Adresse, wenn der Support nach Details fragt.Support-Bundle exportieren: öffnet den DialogSupport-Paket exportieren. Er erzeugt eine ZIP-Datei mit Diagnose-Informationen. Zugangsdaten und Schlüssel sind nicht enthalten. Der HakenKI-Konversationsprotokolle einschließenist ausdrücklich gesondert zu setzen, denn diese Protokolle enthalten deine Projektinhalte. Setz ihn nur, wenn es um ein KI-Problem geht. Nach dem Export zeigt die App die Datei im Finder oder Explorer.Fehler melden: öffnet das Formular für einen Fehlerbericht direkt aus der App.App deinstallieren: öffnet den Deinstallations-Dialog mit den OptionenAlle Projektdateien entfernenundDatenbank entfernensowie der Sicherheitsabfrage, bei der duCONFIRMtippst. Der vollständige Ablauf je Betriebssystem steht in Deinstallation.
Wichtig: Prüfe vor dem Versand eines Support-Pakets, wohin du es speicherst, und schick es nur an den vorgesehenen Empfänger.
Danger Zone
Ganz unten im Dialog erscheint bei geöffnetem Projekt ein rot abgesetzter Bereich Danger Zone mit
dem Button Projekt löschen. Er entfernt das geöffnete Projekt. Mach vorher ein Backup, wenn du dir
nicht ganz sicher bist.
Ein Backup erstellen
Was im Backup steckt
Ein Backup ist eine einzelne Datei mit der Endung .gitdbackup. Sie enthält eine komprimierte,
vollständige Kopie der TensorPM-Datenbank und dazu ein paar Kopfdaten: Datenbankversion,
Erstellungszeit, App-Version, Betriebssystem und eine Prüfsumme.
Damit sind gesichert:
- alle Projekte samt Kontext, Zielen, Umfang, Risiken und Meilensteinen
- alle Aufgaben, Arbeitspakete, Abhängigkeiten und Termine
- Personen, Budgets, Materialien und Ausgaben
- Entscheidungen und der komplette Verlauf
- deine App-Einstellungen
Die App sagt es selbst so: Das Backup enthält alle Projekte, Aufgaben und Einstellungen. Beim Wiederherstellen werden alle aktuellen Daten ersetzt.
Was nicht im Backup steckt
- Die Dateien in deinem Projektordner. Pläne, Protokolle, Fotos und erzeugte Dokumente liegen als ganz normale Dateien auf der Festplatte. Das Datenbank-Backup fasst sie nicht an.
- Anmeldungen und Schlüssel im Schlüsselspeicher deines Betriebssystems. Nach dem Wiederherstellen auf einem anderen Gerät meldest du dich neu an.
- Cloud-Stände anderer Geräte. Ein Backup ist ein Abzug dieses einen Rechners zu einem Zeitpunkt.
Schritt für Schritt
- Öffne
Einstellungen->Allgemein->Datenbank-Backup. - Klick auf
Backup erstellen. Der Button zeigt währenddessenWird erstellt…. - Es öffnet sich der Speichern-Dialog deines Betriebssystems. Vorgeschlagen wird der Ordner
TensorPM Backupsin deinen Dokumenten und ein Dateiname ausbackup_plus Zeitstempel, zum Beispielbackup_2026-08-09T10-15-00-000Z.gitdbackup. - Du kannst Ordner und Namen ändern. Ein Name, der den Anlass nennt, hilft später, etwa
2026-08-09-vor-psp-umbau.gitdbackup. Behalte die Endung.gitdbackupbei. - Bestätige. Es erscheint kurz eine Erfolgsmeldung.
- Woran du erkennst, dass es geklappt hat: Die Liste unter den Buttons zeigt das neue Backup mit
Datum, App-Version und Betriebssystem. Mit
Ordner öffnenspringst du in den Ordner.
Die Liste in den Einstellungen zeigt nur Backups aus dem Standardordner TensorPM Backups und dort
höchstens die fünf neuesten. Backups, die du woanders speicherst, funktionieren genauso, tauchen in
dieser Liste aber nicht auf.
Gute Anlässe für ein Backup:
- vor einem großen Import oder einem Umbau der Projektstruktur
- vor dem Verschieben eines Projekts in einen anderen Workspace
- vor dem Wechsel der
Speicher-Währung - vor dem Löschen eines Projekts oder eines Workspace
- vor einem Gerätewechsel
- vor einem größeren Update, wenn ein kritisches Projekt läuft
Ein Backup wiederherstellen
Mach vorher ein frisches Backup
Eine Wiederherstellung ersetzt alle aktuellen Daten durch den Stand aus der Datei. Alles, was du seit dem Backup gemacht hast, ist danach weg. Deshalb gilt ohne Ausnahme: Erst ein frisches Backup des aktuellen Stands erstellen, dann wiederherstellen. Dann kannst du deine Entscheidung zurücknehmen.
Schritt für Schritt
- Beende laufende Arbeit. Warte ab, bis die Cloud-Synchronisierung
Livemeldet und keine Uploads mehr ausstehen. Mehr dazu in Cloud-Synchronisierung. - Erstelle ein Backup des aktuellen Stands, wie oben beschrieben.
- Öffne
Einstellungen->Allgemein->Datenbank-Backupund klick aufBackup wiederherstellen. - Wähle im Dateidialog die gewünschte
.gitdbackup-Datei. Prüfe Datum und Uhrzeit. - Wurde das Backup mit einer neueren Datenbankversion erstellt, warnt die App und fragt nach, ob sie trotzdem fortfahren soll. Brich im Zweifel ab und aktualisiere zuerst TensorPM.
- Bestätige. TensorPM legt automatisch eine Sicherheitskopie des aktuellen Stands an, prüft die Prüfsumme der Datei und spielt sie ein.
- Starte TensorPM neu, wenn du dazu aufgefordert wirst.
- Öffne die wichtigsten Projekte und prüfe die letzten Änderungen. Erst wenn das passt, ist die Wiederherstellung wirklich fertig.
Arbeitest du in einem Cloud-Workspace mit anderen zusammen, stimm die Wiederherstellung vorher im Team ab. Spiel keinen alten Stand ein, während andere Geräte weiter Änderungen schreiben. Sonst kämpfen zwei Stände gegeneinander.
Was die App im Hintergrund absichert
- Vor dem Einspielen legt TensorPM eine Sicherheitskopie des aktuellen Stands im temporären Ordner an.
- Beim Einspielen wird die Prüfsumme geprüft. Passt sie nicht, bricht die App mit einem Hinweis auf eine beschädigte Datei ab.
- Geht beim Einspielen etwas schief, spielt TensorPM automatisch die Sicherheitskopie zurück.
Das ist ein Notnagel, kein Ersatz für dein eigenes Backup. Die Sicherheitskopie liegt im temporären Ordner und wird nach erfolgreicher Wiederherstellung gelöscht.
Was ein Backup nicht ersetzt
Ein Datenbank-Backup schützt gegen einen Fehlertyp: Du hast in TensorPM etwas kaputt gemacht und willst zurück. Es schützt nicht gegen einen defekten Rechner, gegen einen Diebstahl, gegen einen verschlüsselnden Schadprogramm-Befall und nicht gegen den Verlust deiner Projektdateien. Und ein Backup, das auf derselben Festplatte liegt wie das Original, ist bei einem Hardwaredefekt genauso weg wie alles andere.
Eine Datensicherung für den Berufsalltag
Was sich in der Praxis bewährt hat, in dieser Reihenfolge:
- Die Dateiablage deiner Organisation nutzen. Leg den Projektordner dorthin, wo eure IT ohnehin sichert: auf ein Netzlaufwerk, in ein Dokumentenmanagementsystem oder in einen betrieblich freigegebenen Cloud-Ordner. Damit sind die eigentlichen Projektdokumente abgedeckt, ohne dass du etwas tun musst.
- Die TensorPM-Datenbank mitsichern. Sorge dafür, dass der Ordner
TensorPM Backupsin deinen Dokumenten von der Datensicherung deines Rechners erfasst wird. Time Machine, Windows-Dateiversionsverlauf oder das Backup-Werkzeug deiner IT reichen aus. - Ein Backup an einem zweiten Ort. Mindestens eine Kopie darf nicht auf demselben Gerät liegen. Eine externe Festplatte, die du nach dem Kopieren abziehst, oder ein Serverordner tun es.
- Vor jeder riskanten Aktion ein Backup von Hand. Umbau, Import, Löschung, Währungswechsel, Gerätewechsel.
- Bei einem aktiven, rein lokalen Projekt einmal pro Woche ein datiertes Backup. Arbeitest du in einem Cloud-Workspace, hast du zusätzlich eine synchronisierte Kopie, aber Sync ist kein Backup: Ein gelöschter Eintrag ist auf allen Geräten gelöscht.
- Einmal im Quartal einen Rückspieltest. Nimm ein aktuelles Backup und prüfe wenigstens, ob es sich in der App auswählen und lesen lässt. Ein Backup, das nie geprüft wurde, ist eine Hoffnung, kein Plan.
- Vor dem Gerätewechsel sicherst du, prüfst und meldest dich danach von Konten ab.
Als Faustregel taugt die alte Dreierregel: drei Kopien, auf zwei verschiedenen Medien, eine davon außer Haus.
Was im Hintergrund passiert
Ein Backup ist technisch eine gepackte Kopie der Datenbankdatei mit ein paar Zusatzangaben. TensorPM schließt dafür die Datenbank kurz, liest die Datei, berechnet eine Prüfsumme, packt alles zusammen und öffnet die Datenbank wieder. Das dauert je nach Datenmenge einige Sekunden. Währenddessen ist die App kurz beschäftigt.
Beim Wiederherstellen läuft derselbe Weg rückwärts: entpacken, Prüfsumme vergleichen, Datei zurückschreiben, Datenbank neu öffnen und prüfen, ob die zurückgespielte Datenbank gültig ist. Erst wenn diese Prüfung durchläuft, meldet die App Erfolg.
Deine Einstellungen liegen in derselben Datenbank. Deshalb bringt ein Backup auch deine Einstellungen mit zurück.
Häufige Fragen
Sind meine Einstellungen auf allen Geräten gleich? Nein. Einstellungen gelten pro Gerät und werden nicht synchronisiert. Auf einem neuen Rechner stellst du sie neu ein oder du spielst ein Backup ein.
Werden meine Projektdateien mitgesichert? Nein. Das Backup enthält nur die Datenbank. Dateien im Projektordner brauchen eine eigene Datensicherung.
Wie groß wird eine Backup-Datei? Sie wächst mit der Menge deiner Projektdaten. Da sie gepackt wird, bleibt sie meist im einstelligen bis niedrigen zweistelligen Megabyte-Bereich. Große Dateianhänge treiben sie nicht in die Höhe, weil Dateien nicht in der Datenbank liegen.
Kann ich ein Backup von einem Mac auf einem Windows-Rechner einspielen? Ja. Die Datei merkt sich zwar das Betriebssystem, in dem sie entstanden ist, aber der Inhalt ist plattformunabhängig. Prüfe danach die Pfade deiner Projektordner, denn die sehen auf jedem System anders aus.
Löscht TensorPM alte Backups von allein?
Nein, nicht automatisch im normalen Betrieb. Räum den Ordner TensorPM Backups gelegentlich selbst
auf und behalte einige datierte Stände.
Ersetzt Cloud-Synchronisierung ein Backup? Nein. Sync hält Geräte auf demselben Stand, auch bei einem Fehler. Ein Backup hält einen alten Stand fest, zu dem du zurückkehren kannst.
Was passiert mit meinen KI-Credits, wenn ich ein altes Backup einspiele? Nichts. Credits und Abo hängen an deinem Konto auf dem Server, nicht an der lokalen Datenbank.
Muss ich für ein Backup angemeldet sein?
Nein. Backup und Wiederherstellung funktionieren rein lokal, auch im Tarif Trial und ohne Internet.
Wenn etwas nicht klappt
Backup erstellen tut scheinbar nichts.
Der Speichern-Dialog liegt möglicherweise hinter dem Hauptfenster. Prüfe deine Fenster. Der Button
zeigt währenddessen Wird erstellt….
Die Meldung sagt, ein anderer Vorgang laufe bereits. Es läuft noch ein Backup oder eine Wiederherstellung. Warte, bis der Vorgang fertig ist, und versuch es erneut. Starte nicht zwei Vorgänge parallel.
Die Wiederherstellung meldet eine beschädigte Datei. Die Prüfsumme passt nicht zum Inhalt. Die Datei wurde beim Kopieren oder Übertragen beschädigt. Nimm eine andere Datei aus deinem Bestand.
Die App warnt vor einer neueren Datenbankversion.
Das Backup stammt aus einer neueren TensorPM-Version als der installierten. Brich ab, aktualisiere
TensorPM über Einstellungen -> Info -> Auf Updates prüfen und versuch es danach erneut.
Die Liste zeigt kein Backup an, obwohl ich eins erstellt habe.
Die Liste liest ausschließlich den Ordner TensorPM Backups in deinen Dokumenten. Hast du woanders
gespeichert, nimm beim Wiederherstellen den Dateidialog und such die Datei von Hand.
Nach dem Ändern des Projektordners sind die Dateien verschwunden.
Sie sind nicht verschwunden. Das Ändern verschiebt nichts. Setz den Ordner zurück oder kopiere die
Dateien an den neuen Ort. Bei einem einzelnen Projekt hilft Standardordner verwenden.
Die KI-Gruppen im Tab KI fehlen.
KI-Keys, Websuche und Rate-Limits gibt es nur im Tarif Business. Welche Wege dir sonst
offenstehen, steht in Konto & KI-Modi.
Nach dem Wiederherstellen fehlen Cloud-Projekte oder der Sync hakt. Die Wiederherstellung hat den lokalen Stand ersetzt. Prüfe die Anmeldung und den Sync-Status und lass die Synchronisierung durchlaufen. Die Schritte stehen in Cloud-Synchronisierung und Fehlerbehebung.
Nächste Schritte
- Projektordner und Dateien verstehen: Dateien, Signale & Verlauf
- Cloud-Kopien und Sync-Status: Cloud-Synchronisierung
- Was verschlüsselt wird und wie: Verschlüsselung
- KI-Anbieter, Credits und Tarife: Konto & KI-Modi
- Projektstrukturplan einrichten: Arbeitspakete & Projektstrukturplan
- App sauber entfernen: Deinstallation
- Ein konkretes Problem lösen: Fehlerbehebung