
Aufgaben & wiederkehrende Arbeit
Kurz gesagt
Eine Aufgabe ist ein einzelnes Stück Arbeit mit einem erkennbaren Ergebnis, zum Beispiel „Brandschutzkonzept freigeben“. Der Bereich Aufgaben sammelt alle diese Einträge eines Projekts und zeigt sie in vier Ansichten: als Liste, als Kanban-Board, nach Priorität sortiert und als Vorlagen für wiederkehrende Arbeit. Jede Aufgabe trägt Status, Termine, Verantwortung, Aufwand und Budget. Genau diese Angaben nutzen die Analysen und Gantt, um dir zu sagen, was als Nächstes dran ist.
Wann du das brauchst
- Du willst festhalten, wer bis wann was liefert, ohne dafür eine zweite Liste außerhalb von TensorPM zu führen.
- Du willst sehen, welche Arbeit gerade blockiert ist und woran es liegt.
- Du hast wiederkehrende Pflichten wie die wöchentliche Baubesprechung oder die monatliche Rechnungsprüfung und willst sie nicht jedes Mal neu eintippen.
- Du willst Reihenfolgen abbilden: Erst die Freigabe, dann die Bestellung.
- Du willst dem Projektagenten erlauben, aus einem Protokoll oder einer E-Mail Aufgaben abzuleiten, und diese danach selbst prüfen.
Aufgabe oder Arbeitspaket
Diese beiden Begriffe werden leicht verwechselt, weil beide nach „Arbeit“ klingen.
Ein Arbeitspaket ist ein Ordner im Projektstrukturplan (PSP). Es beschreibt einen abgegrenzten Liefergegenstand, zum Beispiel „Rohbau Erdgeschoss“. Es hat einen eigenen Status, einen eigenen Fortschritt und einen eigenen Code. Arbeitspakete legst du im Bereich Arbeitspakete an.
Eine Aufgabe ist die konkrete Tätigkeit darin, zum Beispiel „Bewehrungsabnahme mit Prüfstatiker terminieren“. Aufgaben legst du im Bereich Aufgaben an.
Die Verbindung läuft über die Kategorie: Jede Aufgabe liegt in genau einer Kategorie, und in einem PSP-Projekt ist eine Kategorie entweder ein Strukturknoten oder ein Arbeitspaket. Aufgaben dürfen nur in Arbeitspaketen und in der Sammelkategorie Allgemein liegen, nicht direkt auf einem Strukturknoten. TensorPM verhindert das beim Anlegen und schiebt die Aufgabe sonst nach Allgemein. Der Grund ist einfach: Ein Strukturknoten rechnet nur zusammen, was unter ihm liegt. Eine Aufgabe direkt an ihm würde in keiner Summe auftauchen.
In Projekten ohne PSP gibt es diese Unterscheidung nicht. Dort ist eine Kategorie einfach eine frei benannte Gruppe.
Die Ansichtsmodi
Oben in der Ansicht Aufgaben liegen drei Reiter: Liste, Board und Wiederkehrend. Hinter Board steht rechts eine Auswahl, mit der du zwischen Kanban und Priorität umschaltest. Ein Dashboard gibt es in diesem Bereich nicht.
Rechts oben findest du außerdem ein Zahnrad. Es enthält den Schalter Abgeschlossene ausblenden. Der Schalter erscheint nur in Liste und in Priorität.
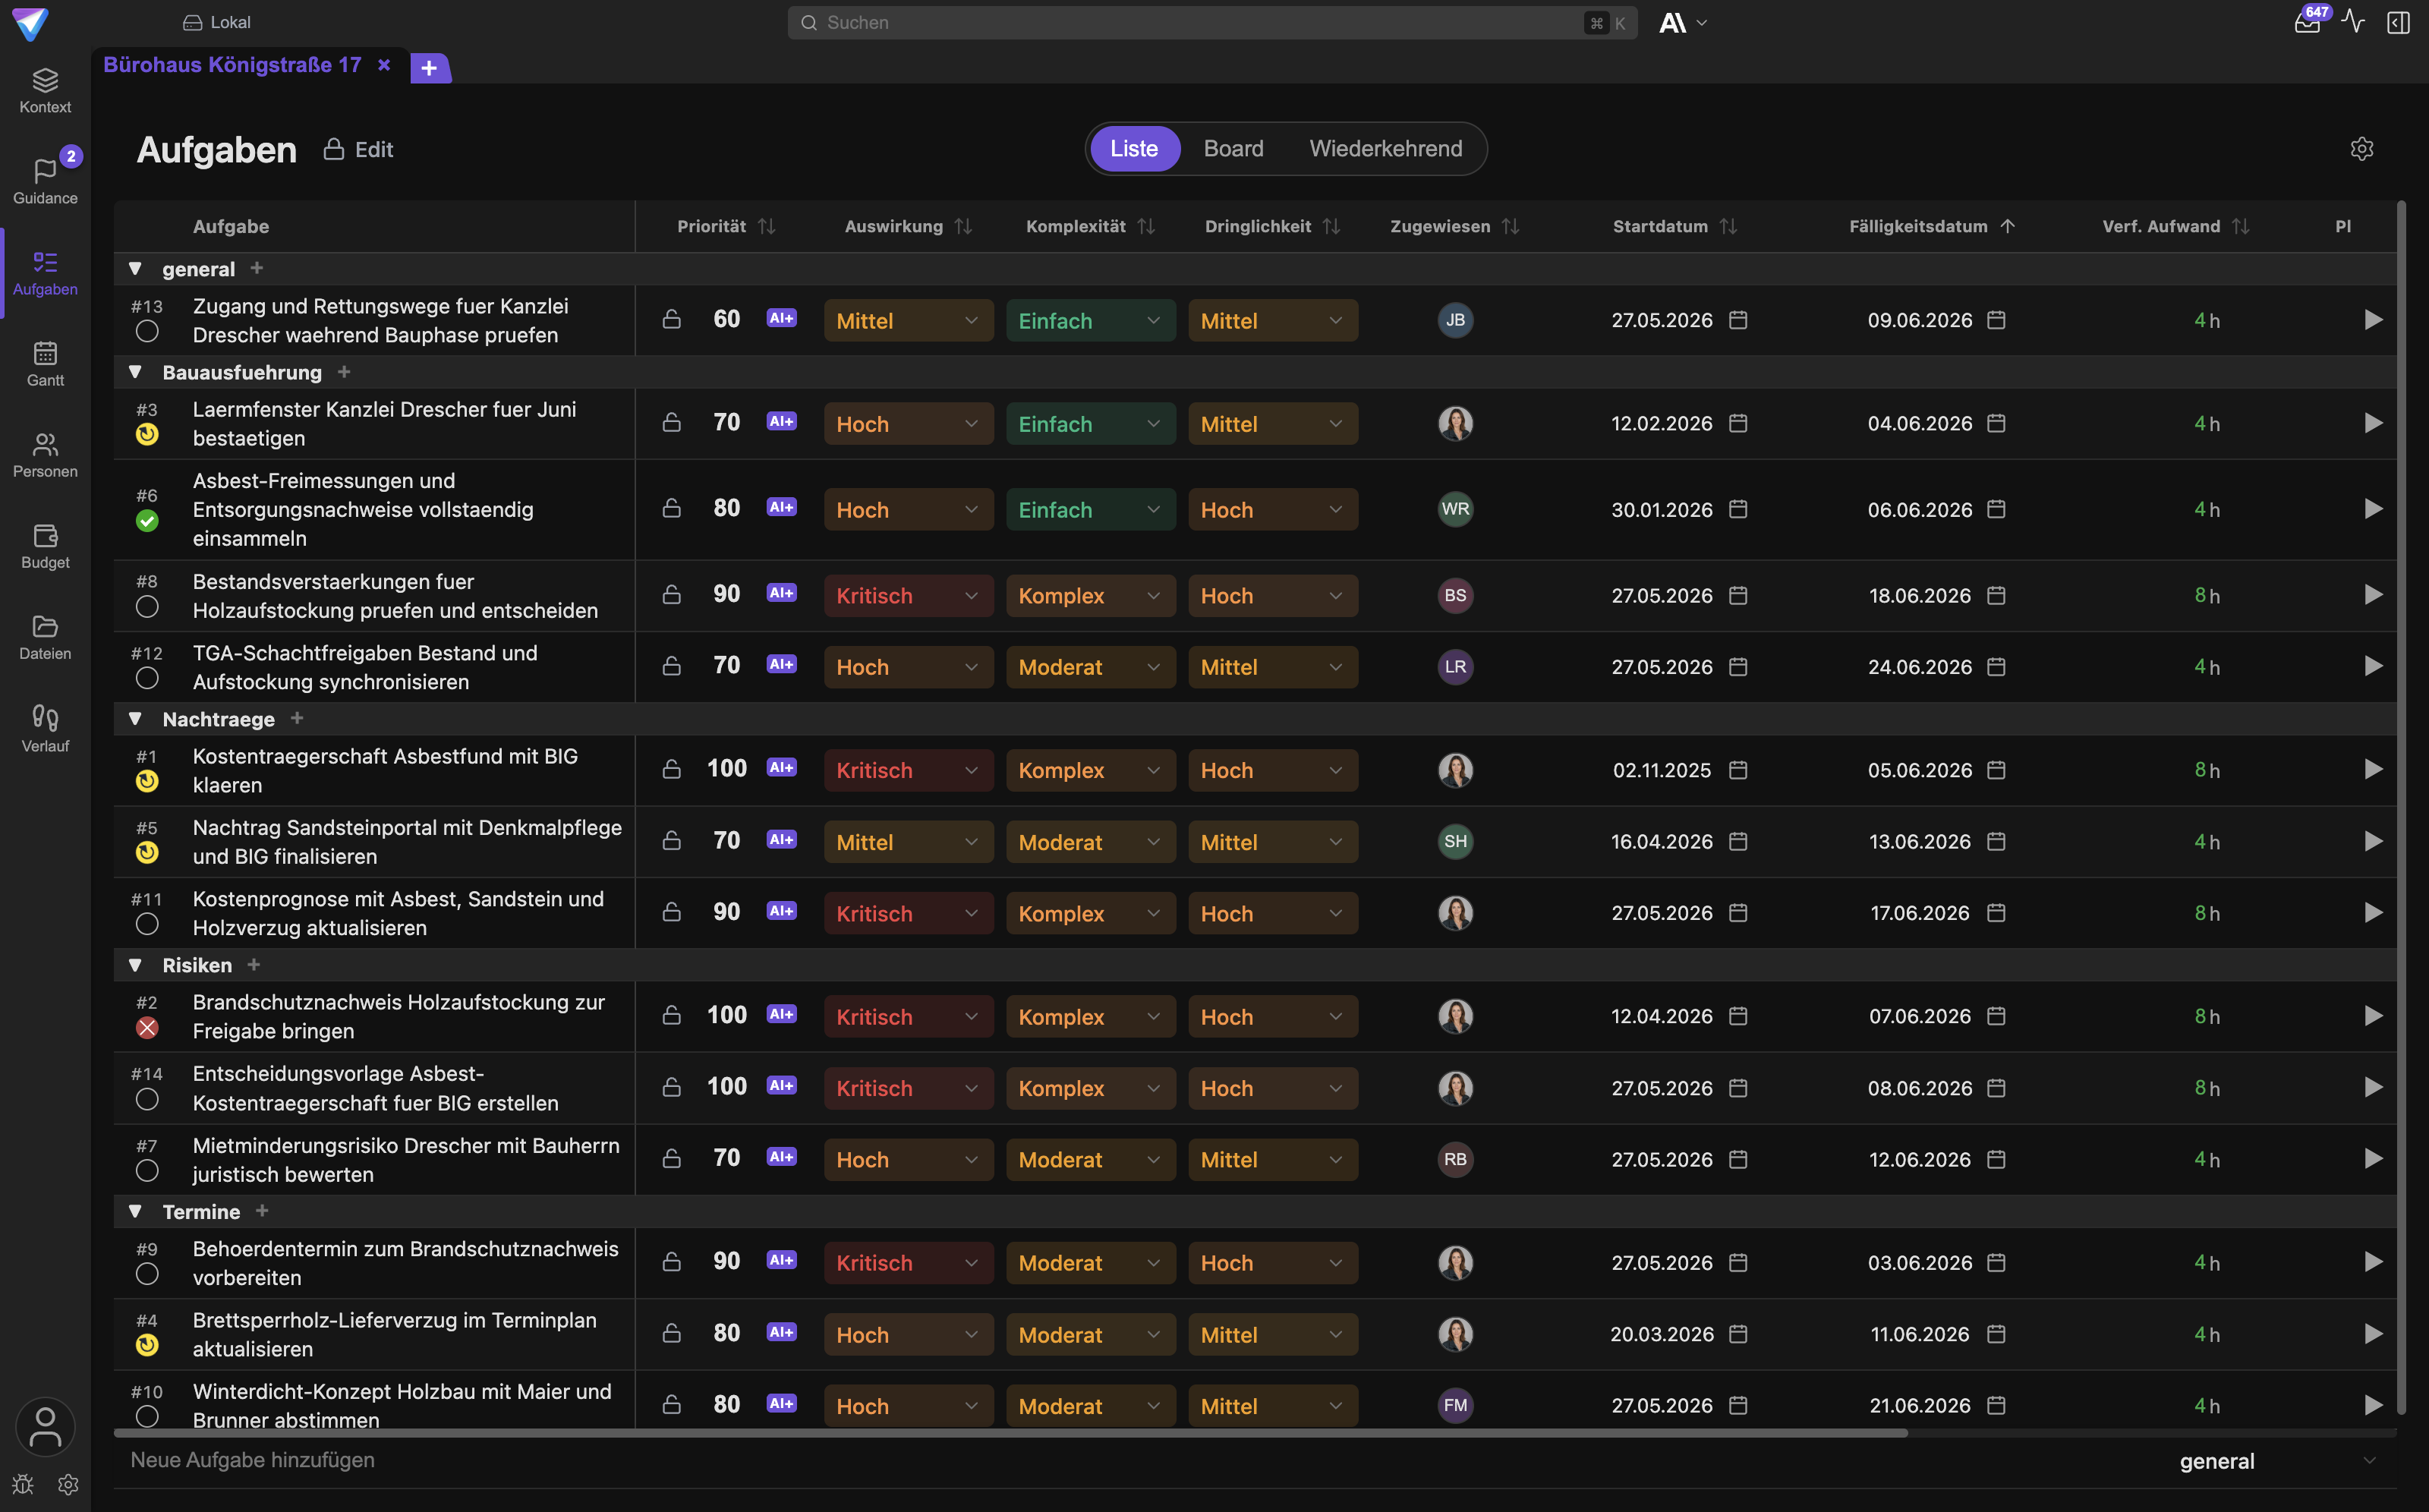
Die Liste ist die einzige Ansicht, in der du alle Felder gleichzeitig siehst und bearbeiten kannst.
Liste
Die Liste ist eine Tabelle, gruppiert nach Kategorien. Sie ist der Ort für genaue Arbeit: Felder ändern, Spalten ein- und ausblenden, filtern, mehrere Einträge auf einmal auswählen.
Klicke auf das Stift-Symbol neben dem Titel Aufgaben, um den Bearbeitungsmodus einzuschalten. Erst dann kannst du Aufgaben ankreuzen, mit Alle auswählen die gefilterte Menge markieren und mit Ausgewählte löschen entfernen. Schalte den Bearbeitungsmodus danach wieder aus, damit du nicht versehentlich weiterklickst.
Ein Klick auf eine Zeile öffnet die Detailansicht Eintragsdetails. Dort liegen Beschreibung, Zuweisungen, Termine, Aufwand, Budget, angehängte Dateien und die Abhängigkeiten. Ein Rechtsklick auf eine Zeile öffnet ein Kontextmenü mit den häufigsten Änderungen: Status, Priorität, Zuweisen an, Kategorie, Blockiergrund hinzufügen, ID kopieren und Löschen.
Kategorien lassen sich per Doppelklick umbenennen, ein- und ausklappen und mit den Pfeiltasten umsortieren. Löschst du eine Kategorie, die noch Aufgaben enthält, fragt TensorPM, ob die Aufgaben mitgelöscht oder nach Allgemein verschoben werden sollen.
Board -> Kanban
Kanban zeigt vier Spalten, eine je Status: Offen, In Arbeit, Blockiert, Abgeschlossen. Du ziehst eine Karte in eine andere Spalte, um den Status zu ändern. Das ist der schnellste Weg für die tägliche Runde: Was ist angefangen, was hängt fest, was ist fertig.
Am unteren Rand erscheint beim Ziehen eine Ablagefläche Hier ablegen zum Löschen. Ziehe eine Karte dorthin, wenn sie weg soll.
Kanban ist bewusst schmal: Auf den Karten stehen nur Titel, Priorität, Fälligkeit und wenige Symbole. Für alles andere wechsle in die Liste.
Board -> Priorität
Priorität zeigt ebenfalls vier Spalten, aber sortiert nach Wichtigkeit statt nach Status: Niedrig, Mittel, Hoch, Sehr hoch. Die Spalten entsprechen festen Bereichen des Prioritätswerts: 1 bis 25, 26 bis 50, 51 bis 75, 76 bis 100.
Ziehst du eine Karte in eine andere Spalte, setzt TensorPM den Prioritätswert auf die Mitte des neuen Bereichs. Aus einer Karte in Hoch wird also der Wert 63. Das ist gewollt grob: Die Ansicht ist zum Vergleichen da, nicht zum Feinjustieren. Den genauen Wert stellst du in der Liste ein.
Diese Ansicht beantwortet die Frage: Haben wir zu viele „sehr wichtige“ Aufgaben? Wenn die rechte Spalte überquillt, ist die Priorisierung wertlos geworden.
Wiederkehrend
Wiederkehrend zeigt keine Aufgaben, sondern Vorlagen. Jede Vorlage beschreibt eine Pflicht, die sich in festem Takt wiederholt. Aus einer Vorlage entstehen später echte Aufgaben, die dann in Liste und Board auftauchen. Die Vorlage selbst bleibt hier und wird nie „erledigt“.
Eine Aufgabe anlegen
- Öffne in der Sidebar den Tab
Aufgaben. - Wähle die Ansicht
Liste. - Klappe die Kategorie auf, in die die Aufgabe gehört.
- Klicke in das Feld
Neue Aufgabe hinzufügenam Ende der Kategorie, tippe den Titel und bestätige mit der Eingabetaste. - Die neue Zeile erscheint sofort mit Status
Offenund Priorität 50. - Klicke die Zeile an, um
Eintragsdetailszu öffnen, und ergänze nur die Felder, die du wirklich steuern willst.
Formuliere den Titel als Ergebnis, nicht als Thema. „Brandschutzkonzept freigeben“ ist prüfbar. „Brandschutz“ ist es nicht. Du merkst den Unterschied spätestens, wenn du entscheiden musst, ob die Aufgabe abgeschlossen ist.
Alle Felder einer Aufgabe
Kein Feld ist Pflicht außer dem Titel. Jedes zusätzlich gefüllte Feld erhöht die Qualität der Analysen und des Gantt, aber nur, wenn es gepflegt bleibt. Ein veraltetes Feld ist schlechter als ein leeres.
Titel
Der eine Satz, der das Ergebnis benennt. Er steht in der Spalte Aufgabe und auf jeder Karte. Halte ihn kurz und aktiv.
Weglassen kannst du ihn nicht. Ohne Titel gibt es keine Aufgabe.
Beschreibung
Formatierter Text für alles, was nicht in den Titel passt: Randbedingungen, Abnahmekriterium, Ansprechpartner, Verweis auf ein Protokoll. Du bearbeitest sie in Eintragsdetails; als Spalte Beschreibung lässt sie sich auch in der Liste einblenden.
Lass sie leer, wenn der Titel für sich steht. Nutze sie, sobald du sonst mündlich erklären müsstest, was gemeint ist.
Status
Vier Werte, mehr gibt es nicht:
Offen: noch nicht begonnen.In Arbeit: jemand arbeitet gerade daran.Blockiert: es geht nicht weiter. Trage immer einenBlockiergrundnach, sonst ist der Status nur ein Gefühl.Abgeschlossen: das im Titel genannte Ergebnis liegt vor.
Setze eine Aufgabe nicht auf Abgeschlossen, weil eine E-Mail rausgegangen ist. Erst wenn das benannte Ergebnis existiert. TensorPM merkt sich den Zeitpunkt und zeigt ihn auf der Karte als Abgeschlossen am mit Datum.
Weglassen kannst du den Status nicht. Er steht immer auf einem der vier Werte.
Priorität
Eine Zahl von 1 bis 100. Höher heißt wichtiger. Du stellst sie in der Liste über das Zahlenfeld in der Spalte Priorität ein, im Kontextmenü grob über Niedrig, Mittel, Hoch, Sehr hoch oder im Board durch Ziehen.
Wenn dir 100 Stufen zu fein sind, schalte unter Einstellungen -> Allgemein die Vereinfachte Prioritätsskala ein. Dann siehst du 1 bis 10. Das ist reine Anzeige, intern und für die KI bleibt es 1 bis 100.
Neben dem Zahlenfeld sitzt ein Schloss-Symbol. Schließt du es, kann die Priorität nicht mehr geändert werden, auch nicht von der KI. Nutze das für Werte, die aus einer Zusage stammen und nicht verhandelbar sind.
Weglassen im Sinne von „nicht anfassen“ ist völlig in Ordnung. Jede neue Aufgabe startet bei 50. Priorität hilft nur, wenn sie bei konkurrierender Arbeit tatsächlich eine Auswahl ermöglicht.
KI-Priorität
Zusätzlich zu deinem Wert kann die KI einen eigenen Prioritätswert berechnen. Er beruht auf dem gesamten Projektkontext: Ziele, Termine, Risiken, Abhängigkeiten, Zusagen. Existiert ein solcher Wert, kannst du im Zahlenfeld zwischen beiden umschalten. Der kleine Marker daneben zeigt user oder ai+, damit du immer weißt, welchen Wert du gerade siehst. Liegt eine Begründung vor, erscheint sie als Tooltip.
Es gibt zwei Wege zu diesem Wert. Erstens: Einstellungen -> Allgemein -> Automatische KI-Priorisierung. Ist der Schalter an, bewertet die KI jede neu erstellte oder geänderte Aufgabe im Hintergrund. Zweitens: die Schnellaktion Neu bewerten im KI-Panel für ausgewählte Aufgaben.
Beides verbraucht KI-Credits. Lass die automatische Priorisierung aus, wenn du sparsam bleiben willst, und bewerte stattdessen einmal pro Woche gezielt eine Auswahl neu.
Behandle den KI-Wert als Empfehlung, nicht als Entscheidung. Er kennt keine Zusagen, die du gestern am Telefon gegeben hast.
Komplexität
Fünf Stufen: Sehr einfach, Einfach, Moderat, Komplex, Sehr komplex. Sie beschreibt, wie schwer die Arbeit inhaltlich ist, nicht wie lange sie dauert.
Der Wert hilft der KI beim Vorschlagen von Aufteilungen und dir beim Verteilen von Arbeit auf Personen. Lass ihn leer, wenn alle Aufgaben im Projekt ähnlich gelagert sind.
Auswirkung
Fünf Stufen: Minimal, Niedrig, Mittel, Hoch, Kritisch. Sie beschreibt, was passiert, wenn die Aufgabe nicht erledigt wird.
Nutze das Feld, wenn du Wichtigkeit von Dringlichkeit trennen willst. Eine Aufgabe kann kritisch sein und trotzdem noch drei Monate Zeit haben. Lass es leer, wenn du ohnehin nur mit der Prioritätszahl arbeitest.
Dringlichkeit
Fünf Stufen: Sehr niedrig, Niedrig, Mittel, Hoch, Überfällig. Sie beschreibt den Zeitdruck.
Auswirkung und Dringlichkeit ergeben zusammen ein brauchbares Bild: Hoch und hoch heißt sofort, kritisch und niedrig heißt planen statt rennen. Lass die Dringlichkeit leer, wenn du das Fälligkeitsdatum ohnehin pflegst. Dann sagt der Termin dasselbe genauer.
Verantwortliche: Personen und Agents
Eine Aufgabe kann bis zu zehn Zuweisungen haben. Zugewiesen werden können zwei Arten von Beteiligten:
- Personen aus dem Bereich
Personen. TensorPM schlägt unterVorgeschlagene Personendie passenden zuerst vor. - Agents, also lokale KI-Werkzeuge, die auf deinem Rechner eingerichtet sind. Sie erscheinen unter
Verfügbare Agentenmit einer Rolle: Reviewer („Überprüft abgeschlossene Arbeit“), Architect („Definiert Architektur und technischen Ansatz“) oder Developer („Implementiert Funktionen, behebt Fehler und aktualisiert technische Artefakte“). Ein Agent, der auf diesem Gerät nicht installiert ist, wird alsAuf diesem Gerät nicht verfügbarangezeigt.
Weise zu, sobald eine echte Person die Verantwortung übernommen hat. Weise nicht „vorsorglich“ zu, sonst wird die Spalte Zugewiesen an bedeutungslos. Unzugewiesene Arbeit ist ein ehrliches Signal und taucht in den Vorschlägen auf.
Bevor du eine Aufgabe an einen Agent delegierst: Ergebnis und Abnahmekriterium in die Beschreibung schreiben, relevante Dateien anhängen, Ergebnis danach selbst prüfen. Erst nach der Prüfung auf Abgeschlossen setzen.
Kategorie
Jede Aufgabe liegt in genau einer Kategorie. In einem Projekt ohne PSP ist das eine frei benannte Gruppe, zum Beispiel „Genehmigungen“. In einem PSP-Projekt ist es das Arbeitspaket, zu dem die Aufgabe gehört.
Du änderst die Kategorie per Rechtsklick über Kategorie oder indem du die Zeile in der Liste in eine andere Gruppe ziehst.
Weglassen geht nicht. Ohne eigene Wahl landet die Aufgabe in Allgemein. Das ist als Eingangskorb gedacht, nicht als Dauerlösung.
Termine
Zwei Datumsfelder: Startdatum und Fälligkeitsdatum.
Das Fälligkeitsdatum ist das wichtigere. Es steuert die Sortierung, die Überfälligkeitsanzeige auf den Karten (zum Beispiel „3 T spät“) und die Warnungen in den Vorschlägen. Das Startdatum brauchst du, sobald die Aufgabe im Gantt als Balken erscheinen soll, denn ein Balken braucht zwei Enden.
Lass das Startdatum leer bei kurzen Erledigungen, bei denen nur der Endtermin zählt. Setze beide, sobald die Aufgabe Dauer hat und in der Terminplanung mitlaufen soll.
Farbe
Jede Aufgabe kann eine Farbe tragen. Sie wirkt ausschließlich im Gantt, wo der Balken dann in dieser Farbe erscheint. Du setzt sie dort per Rechtsklick auf den Balken über Farbe ändern und wählst Blau, Grün, Orange, Rot, Lila, Grau oder Benutzerdefiniert….
Nutze Farbe für ein einziges, klar erklärtes Schema, zum Beispiel eine Farbe je Gewerk. Lass sie weg, wenn niemand das Schema kennt. Ein bunter Gantt ohne Legende hilft keinem.
Geplanter und tatsächlicher Aufwand
Zwei Felder mit jeweils Zahl und Einheit, wahlweise Stunden oder Tage:
Planaufwand: was du vorher schätzt.Ist-Aufwand: was tatsächlich angefallen ist. Der Wert setzt sich aus manuellen Eingaben und der Zeit zusammen, die über den Timer erfasst wurde. Den Timer startest und stoppst du auf der Aufgabenkarte überTimer startenundTimer stoppen; laufende Timer zeigt die Kopfleiste unterAktive Timer.
Nutze beide Felder nur, wenn im Projekt jemand den Ist-Wert tatsächlich pflegt. Eine ehrliche Schätzung im Planaufwand und ein leeres Ist-Feld sind besser als ein Ist-Feld, das seit sechs Wochen nicht angefasst wurde.
In manchen Ansichten heißen die beiden Spalten Verf. Aufwand statt Ist-Aufwand. Dann zeigen sie den verbleibenden Rest gegen den Plan statt des Verbrauchs.
Geplantes und tatsächliches Budget
Zwei Geldfelder, Planbudget und Ist-Budget. Sie werden immer in der Speicherwährung des Projekts gehalten und in deiner Anzeigewährung dargestellt. Beides stellst du unter Einstellungen -> Allgemein -> Währung ein.
Wichtig: Ein Wechsel der Speicherwährung rechnet alle bestehenden Beträge um. Das betrifft Aufgaben, Material und Budget gleichermaßen. Mach das nicht nebenbei.
Übersteigt das Ist-Budget den Plan, hebt TensorPM den Wert hervor. Lass die Budgetfelder auf Aufgabenebene leer, wenn du Kosten ohnehin im Bereich Budget führst. Doppelte Kostenführung an zwei Orten geht fast immer auseinander.
Blockiergrund
Ein kurzer Text, der nur zusammen mit dem Status Blockiert sinnvoll ist. Du trägst ihn per Rechtsklick über Blockiergrund hinzufügen oder in Eintragsdetails ein. Fehlt er, zeigt das Statussymbol Kein Blockiergrund angegeben.
Schreib hinein, worauf du wartest und von wem. „Wartet auf Freigabe Statik durch Büro Meier“ ist nützlich. „Blockiert“ ist es nicht.
Angehängte Dateien
In Eintragsdetails kannst du unter Angehängte Dateien neue Dateien hochladen (Neue Dateien hochladen) oder bereits im Projekt vorhandene auswählen (Vorhandene Dateien auswählen). Die Dateien bleiben mit der Aufgabe verknüpft und sind auch im Bereich Dateien sichtbar.
Häng an, was zum Erledigen gebraucht wird: den Planauszug, das Angebot, das Protokoll. Häng nicht das ganze Projektarchiv an.
Abhängigkeiten
Eine Abhängigkeit hältst du fest, wenn eine Aufgabe den Zeitpunkt einer anderen bestimmt. Du findest sie in Eintragsdetails in zwei Blöcken: Ausgehende Abhängigkeiten (diese Aufgabe steuert eine andere) und Eingehende Abhängigkeiten (eine andere steuert diese). Angelegt werden sie über + Ausgehende Abhängigkeit hinzufügen beziehungsweise + Eingehende Abhängigkeit hinzufügen. Du wählst die zweite Aufgabe und die Beziehung.
Es gibt vier Typen. Die Kürzel FS, SS, FF und SF stehen für die englischen Bezeichnungen und tauchen auch im Gantt auf.
Ende-zu-Start (FS)
Die abhängige Aufgabe kann erst starten, wenn diese Aufgabe abgeschlossen ist.
Beispiel vom Bau: „Bewehrung abnehmen“ muss fertig sein, bevor „Decke betonieren“ beginnt. Das ist der mit Abstand häufigste Fall. Wenn du unsicher bist, ist es fast immer FS.
Start-zu-Start (SS)
Die abhängige Aufgabe kann erst starten, wenn diese Aufgabe startet.
Beispiel: „Baustelleneinrichtung beginnen“ und „Verkehrsführung stellen“ laufen parallel, aber die Verkehrsführung darf nicht vor der Baustelleneinrichtung anfangen. Beide dürfen gleichzeitig loslegen, keine muss auf das Ende der anderen warten.
Ende-zu-Ende (FF)
Die abhängige Aufgabe kann erst abgeschlossen werden, wenn diese Aufgabe abgeschlossen ist.
Beispiel: „Mängelliste abarbeiten“ kann nicht abgeschlossen werden, bevor „Begehung mit Bauherr“ abgeschlossen ist, denn erst dann steht fest, dass keine neuen Mängel dazukommen. Angefangen wird an beidem längst parallel.
Start-zu-Ende (SF)
Die abhängige Aufgabe kann erst abgeschlossen werden, wenn diese Aufgabe startet.
Beispiel: „Provisorische Bauheizung betreiben“ darf erst abgeschlossen werden, wenn „Festinstallierte Heizung in Betrieb nehmen“ gestartet ist. Es geht um Übergaben, bei denen etwas Altes so lange laufen muss, bis das Neue anläuft. Dieser Typ ist selten. Setze ihn nur, wenn du genau diese Übergabe meinst.
Wenn eine Abhängigkeit verletzt wird
TensorPM prüft jede Abhängigkeit vor dem Speichern und verwirft sie, wenn eine der folgenden Regeln bricht:
- Die Aufgabe hängt von sich selbst ab. Wird abgelehnt.
- Keine der beiden Seiten ist die Aufgabe, die du gerade bearbeitest. Wird abgelehnt.
- Eine der beiden Aufgaben existiert nicht mehr. Wird abgelehnt, zum Beispiel nach dem Löschen der Gegenseite.
- Dieselbe Beziehung zwischen demselben Paar zweimal. Der zweite Eintrag wird abgelehnt.
- FS und SF zwischen demselben Paar. Diese beiden schließen sich gegenseitig aus. Der zweite Eintrag wird abgelehnt.
- Ein Kreis. Wenn A auf B wartet, B auf C und C wieder auf A, kann keine der drei je anfangen. TensorPM erkennt den Kreis und entfernt genau die Kanten, deren beide Enden im Kreis liegen. Der Rest bleibt bestehen.
Verworfene Abhängigkeiten werden nicht gespeichert. Es erscheint keine Fehlermeldung mitten in deiner Arbeit, der Vorgang wird nur protokolliert. Wenn eine gerade eingetragene Abhängigkeit nach dem Neuladen fehlt, ist sie an einer dieser Regeln gescheitert. Prüfe dann zuerst auf einen Kreis.
Ein zweiter, wichtigerer Fall von „verletzt“: Der Plan sagt, die Vorgängeraufgabe muss fertig sein, aber die Nachfolgeaufgabe steht schon auf In Arbeit. Das blockiert TensorPM nicht. Es ist Alltag auf der Baustelle. Es wird aber sichtbar: Die Ausführungsanalyse greift Reihenfolgeprobleme auf, und im Gantt siehst du die Verbindungslinie gegen die Zeit laufen. Das ist der Moment, an dem du entweder den Plan oder die Wirklichkeit korrigierst.
Trage Abhängigkeiten sparsam ein. Jede Verbindung will gepflegt werden. Nimm die, die wirklich Termine steuern, nicht jede thematische Nähe.
Wiederkehrende Aufgaben
Eine Vorlage anlegen
- Wechsle in die Ansicht
Wiederkehrend. - Klicke
+ Wiederkehrende Aufgabe hinzufügen. - Trage unter
Aufgabe eingeben *den Titel ein. Er wird später wortgleich für jede erzeugte Aufgabe verwendet. - Stelle unter
Wiederholen alleden Takt ein: eine Zahl und eine Einheit (Tag(e),Woche(n),Monat(e),Jahr(e)). - Setze
Startdatum *undEnddatum *. Beide sind Pflicht. Das Enddatum ist der Punkt, an dem die Vorlage aufhört, Arbeit zu erzeugen. - Öffne bei Bedarf
▶ Zusätzliche Eigenschaften festlegen. Dort legst du Kategorie, zugewiesene Person, Komplexität, Auswirkung, Dringlichkeit, Aufwand, Budget und Beschreibung fest. Alles davon wird an jede erzeugte Aufgabe weitergegeben. - Klicke
Wiederkehrende Aufgabe speichern.
Über Details anzeigen siehst du die Einstellungen einer bestehenden Vorlage, über Bearbeiten änderst du sie. Zum Löschen musst du zweimal klicken, der zweite Klick heißt Löschen bestätigen.
Wie die Wiederholung tatsächlich funktioniert
Das ist der Teil, der am häufigsten missverstanden wird. TensorPM legt keine Serie in die Zukunft. Es holt Fälligkeiten nach.
- TensorPM merkt sich zu jeder Vorlage, bis wann es zuletzt erzeugt hat. Beim ersten Mal ist das das Startdatum.
- Der nächste Termin ist immer der letzte erzeugte Termin plus ein Intervall. Am Startdatum selbst entsteht noch keine Aufgabe. Bei einer wöchentlichen Vorlage mit Start am 1. ist die erste Aufgabe am 8. fällig.
- Erzeugt wird nur, was fällig ist, also alles bis einschließlich heute. Für nächste Woche liegt noch nichts in der Liste.
- Liegt der nächste Termin am Enddatum oder danach, hört die Vorlage auf.
- Zu jedem Termin entsteht höchstens eine Aufgabe. Löschst du eine erzeugte Aufgabe, wird sie nicht neu angelegt.
Die erzeugte Aufgabe bekommt Titel, Fälligkeitsdatum, Dringlichkeit, Kategorie, Zuweisungen, Beschreibung, angehängte Dateien, Komplexität, Auswirkung, Planaufwand und Planbudget aus der Vorlage. Sie startet mit Status Offen und Priorität 50. Sie hat kein Startdatum, keine Farbe und keine Abhängigkeiten. Wenn du das brauchst, ergänze es an der erzeugten Aufgabe.
Geprüft wird beim Start der App und danach etwa alle 15 Minuten, aber höchstens einmal pro Tag und Projekt. Wenn du eine Vorlage anlegst oder änderst, prüft TensorPM dieses Projekt sofort erneut.
Eine Vorlage beenden
Setze das Enddatum auf einen Termin in der Vergangenheit, wenn die Pflicht wegfällt. Die Vorlage bleibt als Nachweis stehen, erzeugt aber keine Arbeit mehr. Bereits erzeugte Aufgaben bleiben unverändert bestehen, auch die noch offenen.
Prüfe alle paar Monate die Liste der Vorlagen. Eine vergessene Vorlage produziert leise weiter Aufgaben, die niemand mehr erledigt, und verwässert damit jede Auswertung über offene Arbeit.
Aufgaben von der KI erzeugen lassen
Der Projektagent kann Aufgaben vorschlagen und anlegen. Das spart Tipparbeit, ersetzt aber nicht dein Urteil.
Neue Aufgaben erstellen
Öffne das KI-Panel und wechsle zu den Schnellaktionen. In der Zeile Erstellen wählst du Aufgaben oder Kategorien und über die Schaltflächen Erhöhen und Verringern die gewünschte Anzahl. Ein Klick auf Erstellen leitet aus dem Projektkontext neue Aufgaben ab und legt sie direkt an. Unter Eigene Anweisungen kannst du vorher eingrenzen, worum es gehen soll, zum Beispiel „nur Aufgaben zur Genehmigungsplanung“.
Alternativ beschreibst du es im Chat, etwa: „Lies das Protokoll vom 12. und leg für jede offene Zusage eine Aufgabe an.“ Der Projektagent nutzt dafür dieselben Werkzeuge.
Wenn du unter Einstellungen -> Allgemein den Schalter KI-erstellte Einträge mit [AI] kennzeichnen aktivierst, tragen neu erzeugte Aufgaben und Kategorien ein [AI] im Titel. Das ist beim Einstieg nützlich: Du erkennst auf einen Blick, was noch niemand geprüft hat. Den Vorsatz kannst du beim Prüfen von Hand entfernen.
Große Aufgaben aufteilen
Eine Aufgabe wie „Genehmigungsverfahren durchführen“ ist keine Aufgabe, sondern ein Vorhaben. Sie lässt sich nicht abschließen, nicht schätzen und nicht sinnvoll zuweisen.
So teilst du sie:
- Wechsle in die Ansicht
Listeund schalte den Bearbeitungsmodus ein. - Wähle die zu große Aufgabe aus. Mehrere gleichzeitig gehen auch.
- Öffne im KI-Panel die Schnellaktionen.
- Wähle
Automatisch aufteilen, wenn die KI die Anzahl selbst bestimmen soll, oderManuell aufteilen in:und gib die gewünschte Anzahl vor. - Klicke
Aufteilen.
Ohne Auswahl ist die Aktion nicht verfügbar; der Hinweis lautet dann Aufgaben zum Aufteilen auswählen.
Eine gute Größe ist erreicht, wenn eine Person die Aufgabe in überschaubarer Zeit abschließen kann und du am Ende zweifelsfrei sagen kannst, ob sie fertig ist.
Neu bewerten
Neu bewerten lässt die KI Priorität und Einschätzungen ausgewählter Aufgaben anhand des aktuellen Projektkontexts neu berechnen. Auch diese Aktion braucht eine Auswahl im Bearbeitungsmodus, sonst erscheint Im Bearbeitungsmodus Aufgaben auswählen, um neu zu bewerten.
Nutze sie nach größeren Änderungen: nach einer Terminverschiebung, nach einem neuen Risiko, nach einer Entscheidung im Steuerungstermin.
Was du prüfen musst
Geh nach jeder KI-Erzeugung diese fünf Punkte durch:
- Dubletten. Gibt es die Aufgabe schon unter anderem Namen? Zusammenführen, nicht doppelt führen.
- Titel. Beschreibt er ein Ergebnis oder nur ein Thema?
- Kategorie. Liegt die Aufgabe im richtigen Arbeitspaket? Alles, was in
Allgemeingelandet ist, gehört einsortiert. - Termine und Verantwortung. Die KI rät hier oft. Ein geratenes Datum ist schlimmer als kein Datum.
- Abhängigkeiten. Vorgeschlagene Reihenfolgen sind Hypothesen. Prüfe sie gegen deine Bauabläufe.
Alle KI-Aktionen verbrauchen KI-Credits, sofern du über den TensorPM-Provider arbeitest. Ihren Verbrauch siehst du im Konto-Popover unten links.
Filtern, Sortieren, Spalten, Suchen
Filter
Klicke in der Liste auf Filter. Es öffnet sich Einträge filtern mit Feldern für Eintragsname, Beschreibung, Status, Priorität, Auswirkung, Komplexität, Dringlichkeit, Zugewiesen an, Startdatum, Fälligkeitsdatum, Ist-Aufwand (Stunden), Planaufwand (Stunden), Ist-Budget und Planbudget.
Bei Zahlenfeldern wählst du zusätzlich die Art des Vergleichs: Exakter Wert, Bereich (von - bis), Größer als oder Kleiner als. Alle löschen setzt sämtliche Filter zurück.
Zwei Filter lohnen sich fast immer: Status Blockiert, um Hindernisse zu sehen, und Fälligkeitsdatum bis heute, um Überfälliges zu finden.
Sortieren
Klicke auf eine Spaltenüberschrift, um nach dieser Spalte zu sortieren. Ein zweiter Klick dreht die Richtung um. Der Pfeil in der Überschrift zeigt den aktuellen Zustand.
Innerhalb einer Kategorie kannst du Zeilen auch von Hand per Ziehen anordnen. Diese Reihenfolge bleibt gespeichert und gilt je Ansicht getrennt.
Spalten
Klicke auf Spalten, um Spalten verwalten zu öffnen. Dort blendest du Spalten über das Augensymbol ein und aus und ordnest sie per Ziehen. Mit den Pfeiltasten verschiebst du, mit Leertaste oder Eingabetaste schaltest du um. Alle ausblenden, Alle anzeigen und Auf Standard zurücksetzen gelten für die ganze Liste.
Status und Titel bleiben immer sichtbar, sie sind als fixiert markiert. Spaltenbreiten änderst du direkt am Trennstrich zwischen zwei Überschriften. Alle diese Einstellungen werden je Projekt gespeichert.
Blende aus, was du nicht steuerst. Eine Liste mit vier gepflegten Spalten ist brauchbarer als eine mit vierzehn halbleeren.
Suchen
Das Suchfeld in der Kopfleiste durchsucht das gesamte Projekt, nicht nur Aufgaben. Es findet auch Personen, Kategorien, Entscheidungen, Dateien und Ordner. Ein Klick auf ein Aufgaben-Ergebnis springt direkt in die Liste und markiert die Zeile.
Nutze die Suche, wenn du einen Titel kennst. Nutze die Filter, wenn du eine Menge suchst.
Was im Hintergrund passiert
Aufgaben liegen in der lokalen Projektdatenbank auf deinem Rechner. In einem Cloud-Workspace werden sie zusätzlich verschlüsselt synchronisiert, sodass sie auf deinen anderen Geräten und bei eingeladenen Personen erscheinen.
Jede Änderung an einer Aufgabe landet im Verlauf unter Änderungen, zusammen mit der Herkunft. Du kannst dort nachlesen, ob ein Feld von dir, von einer synchronisierten Person oder von der KI geändert wurde. Kam die Änderung aus einem Chat, kommst du über den Quellen-Chip zurück an die auslösende Nachricht.
Der Prüflauf für wiederkehrende Vorlagen läuft im Hintergrundprozess der App, nicht auf einem Server. Ist die App zwei Wochen geschlossen, holt der erste Start alle fälligen Termine auf einmal nach.
Häufige Fragen
Kann ich eine Aufgabe mehreren Personen zuweisen? Ja, bis zu zehn Zuweisungen je Aufgabe. Personen und Agents zusammen gerechnet. Bedenke trotzdem: Vier Verantwortliche heißt in der Praxis oft, dass sich niemand verantwortlich fühlt.
Warum kann ich eine Aufgabe nicht in eine bestimmte Kategorie legen? Das Projekt läuft im PSP-Modus und die Kategorie ist ein Strukturknoten. Strukturknoten rechnen nur zusammen. Wähle das Arbeitspaket darunter.
Wo ist der Unterschied zwischen Priorität und Dringlichkeit? Priorität ist eine Zahl von 1 bis 100 und dient dem Ranking gegen alle anderen Aufgaben. Dringlichkeit ist eine von fünf Stufen und beschreibt allein den Zeitdruck. Du kannst beides nutzen, musst aber nicht.
Verschwinden abgeschlossene Aufgaben?
Nein. Sie bleiben in der Datenbank und im Gantt. Über das Zahnrad kannst du sie mit Abgeschlossene ausblenden aus Liste und Prioritätsansicht ausblenden.
Ändert eine wiederkehrende Vorlage bereits erzeugte Aufgaben? Nein. Änderungen an der Vorlage wirken nur auf künftig erzeugte Aufgaben.
Kann ich eine erzeugte Aufgabe von ihrer Vorlage lösen? Nicht ausdrücklich. Aber du kannst sie frei ändern; sie wird nicht wieder mit der Vorlage abgeglichen.
Zählt eine Aufgabe zum Fortschritt des Arbeitspakets? Ja, wenn sie in einem Arbeitspaket liegt und die Fortschrittsmethode des Arbeitspakets rechnerisch ist. Details stehen unter Arbeitspakete & PSP.
Braucht die KI-Priorisierung ein Abo? Sie braucht einen eingerichteten KI-Provider. Über den TensorPM-Provider verbraucht sie KI-Credits, mit einem eigenen Schlüssel im Tarif Business nicht.
Wenn etwas nicht klappt
Eine gerade eingetragene Abhängigkeit ist nach dem Neuladen weg. Sie ist an der Prüfung gescheitert. Häufigste Ursachen: ein Kreis über mehrere Aufgaben, oder es besteht bereits eine FS-Beziehung und du hast SF für dasselbe Paar ergänzt. Löse den Kreis auf oder entscheide dich für einen der beiden Typen.
Meine wiederkehrende Vorlage hat noch nichts erzeugt. Wahrscheinlich ist das erste Intervall noch nicht abgelaufen. Am Startdatum selbst entsteht nichts. Prüfe außerdem, ob das Enddatum bereits erreicht ist.
Auf einmal sind zwanzig Aufgaben derselben Vorlage aufgetaucht. Das ist das Nachholen. Entweder war die App lange geschlossen, oder das Startdatum liegt weit in der Vergangenheit. TensorPM erzeugt dann alle Termine bis heute. Lösche die überzähligen und setze das Startdatum auf einen sinnvollen Punkt.
Neu bewerten oder Aufteilen sind ausgegraut.
Beide brauchen eine Auswahl. Wechsle in die Ansicht Liste, schalte den Bearbeitungsmodus über das Stift-Symbol ein und markiere mindestens eine Aufgabe.
Eine Spalte fehlt.
Sie ist ausgeblendet. Öffne Spalten -> Spalten verwalten und aktiviere sie über das Augensymbol, oder klicke Auf Standard zurücksetzen.
Die Liste wirkt leer, obwohl es Aufgaben gibt.
Prüfe zuerst die Filter. Ist Filter aktiv, öffne den Dialog und klicke Alle löschen. Prüfe danach, ob Abgeschlossene ausblenden im Zahnrad gesetzt ist.
Der Ist-Aufwand stimmt nicht.
Er setzt sich aus manuellen Eingaben und der über den Timer erfassten Zeit zusammen. Prüfe in der Kopfleiste unter Aktive Timer, ob noch ein Timer aus der letzten Woche läuft.
Eine Aufgabe erscheint nicht im Gantt.
Ein Balken braucht ein Startdatum und ein Fälligkeitsdatum. Ergänze das fehlende Datum.
Weitere Symptome und Lösungen stehen unter Fehlerbehebung.
Nächste Schritte
- Liefergegenstände gliedern: Arbeitspakete & PSP
- Prioritäten und Reihenfolge prüfen lassen: Vorschläge & Reihenfolge
- Schnellaktionen und Chat nutzen: Projektagent, Chat & Schnellaktionen
- Personen und Kosten verwalten: Personen & Budget
- Änderungen nachvollziehen: Dateien & Verlauf
- Begriffe nachschlagen: Glossar